ACH Step By Step - Part 1 - Setup
This "Step-by-Step" series is intended to provide you with
an orderly progression of procedures and procedural
considerations.
The actual details and expansive explanations are contained
elsewhere in the Help pages and will be referred to by link
to follow at the end of each page, where applicable.
This Step-by-Step page is dedicated to setting up your system
in readiness for ACH Payment posting.
When you have completed a full review of all the steps,
you should be:
Setting Up For ACH Payments
There are five areas in Collect! that require coordination
and/or configuration when you begin using the module.
This page lays out the areas requiring input or decision
with a suggested procedural order to follow with a view
to making your Billing Tree Module ready for operational
rollout. The module needs up to 5 Transaction Types to be existing
for posting ACH Payment. By default, the module uses these Transaction Types:
- 107 - Payment
- 105 - Payment Reversal
- 301 - NSF Charge
- 307 - Convenience Fee
- 305 - Convenience Fee Reversal
View: ACH Payments Transaction Types
It is necessary to confirm that you have the necessary
codes available and that they are configured to function
in keeping with your site's operational requirements. To
find your Transaction Types list of codes, your menu
path is "System\ Financial Settings\Transaction Types".
 Press F1 from the Transaction Type screen to
see details for each field in this window.
Press F1 from the Transaction Type screen to
see details for each field in this window.
For detailed explanations and descriptions of the
Transaction code setup, follow the link below.
ACH Transaction Types

ACH Setup
The ACH Setup screen is located in the menu path,
"System\ Preferences\ Billing Tree Setup\ACH Setup". This is where
you store the module's login credentials to the ACH Gateway and define
your company's preferences for the module's function and behavior.
For detailed explanations and descriptions of all the fields in the
ACH Setup screen, follow the link below.
See Also
- ACH Payments Setup
EFT Notices Setup
The menu option to set your Notification and Reminder letter
parameters is the third option in the Billing Tree Setup menu
which is located via the menu path
"System\ Preferences\Billing Tree Setup\ EFT Notices Setup".
Press F1 from the EFT Notices Setup screen to
see details for each field in this window.
For detailed explanations and descriptions of all the fields in
the EFT Notices Setup screen, follow the link below.
See Also
- EFT Notices Setup
ACH Client Settings
If your company is going to be charging convenience fees
to debtors for ACH payments, in addition to enabling the
feature in the ACH Setup window, you do need to enable an
indicator in each client Advanced Settings screen in order
to enable the fees for that specific client.
Click the Advanced button in the lower right corner of the
client screen and you will see a screen as follows, and
the "ACH convenience fees" switch is shown in the red box.
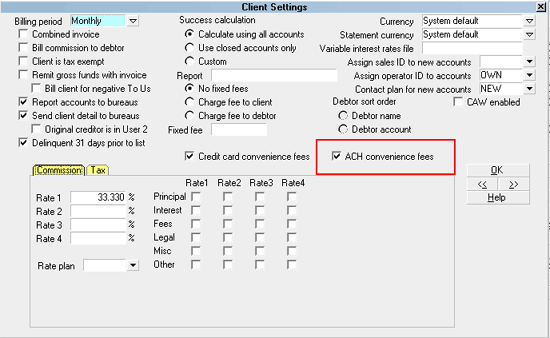
Client Settings screen
If you have a large client base which practicality
would preclude manually updating this switch
for ALL clients (or a large tagged list), contact
Technical Services for assistance with a writeback
to enable a volume of clients en masse for this
switch.
Debtor Detail
Like all the Tabs located in the lower portion of Collect! main
windows, the Debtor Detail Tab is a sub-window that is actually a
separate entity from the main Debtor screen. The Detail
Tab is pre-configured for use as a storage site for banking
information, and can be utilized for any end- user defined
purpose or preference.
This sub-window becomes a consideration because the module
uses it to store information obtained during the ACH payment
screen intake. Bank name, account and routing numbers are
auto-written from the ACH Single or Recurring payment entry
screen into the Detail Tab.
If your company has any data storage convention
that uses areas in the Detail Tab, you may wish to
contact Technical Services to discuss your options
to migrate this information into a special Attachment
Tab window we can create for you BEFORE you rollout
live with the module.
This will ensure your data isn't lost and the module's function is
not being impeded by staff removing what it writes into this Tab.
What exactly the module will write into this tab will be covered in more
detail in the ACH Step by Step - Part 2 - Single Payment topic.
Posting Payments
After you have entered the settings and decided on the operational
issues described so far, you are ready to begin posting ACH payments
to your accounts.
Proceed to ACH Step by Step - Part 2 - Single Payment and other
topics in the ACH Step by Step series for detailed instructions.
See Also
- Billing Tree Topics
|
Was this page helpful? Do you have any comments on this document? Can we make it better? If so how may we improve this page.
Please click this link to send us your comments: helpinfo@collect.org