System Setup
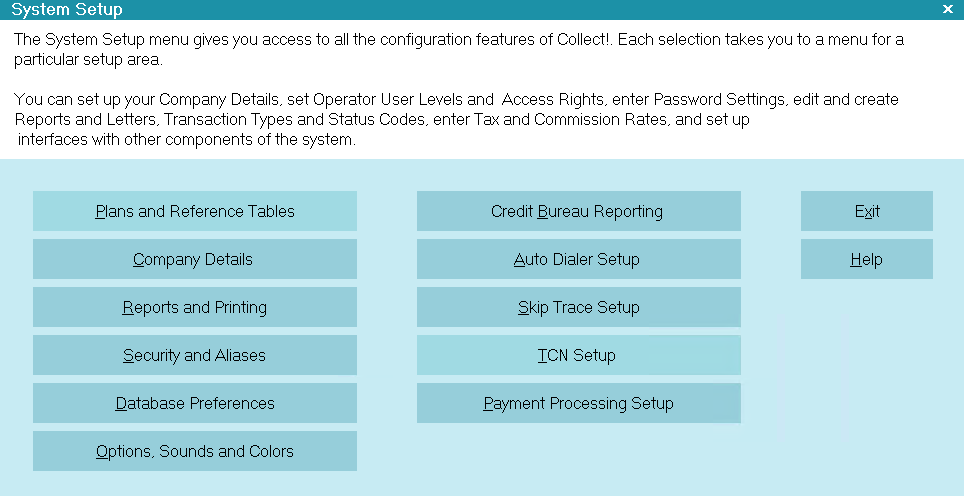
The System Setup menu gives you access to all the
configuration features of Collect!. Each selection takes
you to a menu for a particular setup area.
You can set up your Company Details, set Operator
User Levels and Access Rights, enter Password Settings,
edit and create Reports and Letters, Transaction Types and
Status Codes, enter Tax and Commission Rates, and set up
interfaces with other components of the system.
System Setup
Press F1 for details on each area in the menu.
Plans And Reference Tables
Select this button to open the
Plans, Tables and Defaults menu
to edit the following items.
- Contact Plans
- Debtor Status Codes
- Transaction Types
- Company Details
- Commission and Tax Rates
- Contact management options
- Automatic account closing options

Company Details
Select this button to open the Company Details form
where you enter your company's name, address and
your local tax rates.
 Take care as this information may be
printed in your reports and letters.
Take care as this information may be
printed in your reports and letters.
Reports And Printing
Select this button to open the
Report and Printer Setup menu.
Edit and create new reports and letters.
Set up printer control codes.
Display the Printable Field list of codes for
every field that can be printed in reports.
Security And Aliases
Select this button to open the
Security and Aliases menu.
Edit and create new Operator and
group information.
Organize Operators into groups.
Control access rights of User groups
to various parts of Collect!
Set system Password options for users.
Database Preferences
Select this button to open the Database Preferences
menu.
Choose the setup options and performance
parameters for the database you access
Access protocol selection and other
Network Setup parameters
Credit Bureau Reporting
Select this button to open the
Credit Bureau Setup form.
Set up IDs and codes for the bureaus
you are reporting to
Set the default credit reporting options
used when you choose a Debtor for reporting
Auto Dialer Setup
Select this button to open the Auto Dialer Preferences form.
Change the settings for your auto dialer.
Under Windows, we use TAPI, so be sure you
have the most up to date TAPI drivers from
Microsoft.
Options, Sounds And Colors
Select this button to open the
Screen and Messages form.
Set various system options.
Change date format and sounds.
TCN Setup
Select this button to open the TCN Setup window
where you can configure your options for using the
TCN interface feature.
This feature requires that you have
an account set up already with TCN.
This button is visible only if you have the TCN module
enabled in your Collect! license.
Billing Tree Setup
Select this button to open the Billing Tree Setup
form where you can enter details for using the
Billing Tree module for electronic credit
card and ACH payment processing in Collect!.
This feature requires that you have
an account set up already with
Billing Tree.
This button is visible only if you have
Billing Tree module enabled in your Collect!
license.
Exit
Select this button to return to the previous screen.
Help
Select this button for help on the System Setup
screen and links to related topics.
| 
Was this page helpful? Do you have any comments on this document? Can we make it better? If so how may we improve this page.
Please click this link to send us your comments: helpinfo@collect.org