How To Use Control Files
Control files allow you to attach a script to any field or form in the Collect! system. The script can do logical processing and
then it can write the result onto the screen or into the database. This requires that you are familiar with Collect!'s
Printable Field codes and that you have access rights to modify field properties in your database.
Control files open up a host of customization possibilities that let you tailor Collect! to suit your exacting requirements.
To help understand how control/script files can help, here are two real life scenarios.
1. An international collections user wants to automatically select the correct operator based on the country the debtor resides
in.
Solution: A control file attached to the Country field. When data entry personnel completes the Country field and presses Tab
or Enter, the control file runs, and the correct operator is selected for the account.
2. Some accounts require special attention. We want the status field on the Debtor form to change color when the account is
delinquent.
Solution: A control file attached to the Debtor form that changes the color of the status field depending on its value.
These simple examples show how control files can let you customize Collect! to an amazing level of detail.
Control File Operations
Control files can perform various operations:
1. Edit data in the database.
2. Change field attributes such as visibility, color, and captions.
3. Display a message to the end user.
4. Do whatever reports can do - define variables and equations, perform calculations, write results to the database or display
them to the screen.
5. Work at the Form and Field level.
Control files attached to forms are invoked just before the form is displayed.
Control file attached to fields are invoked as the user exits the field. Field level control files will execute on leaving a
field if the field data has changed.
At the FORM level, control files run UNCONDITIONALLY. At the FIELD level, CONDITIONS CAN BE SET to determine when attributes
change or calculations occur for the particular field.
 User level 99 does not read control files. Please sign in as a user other than level 99 if you are using control files.

Edit And Set Commands In Control Files
Control files support the @EDIT and @SET commands.
@EDIT
This command edits the data in a database field. After changing the data in the field the record is immediately written to the
database.
Syntax: @EDITde.u1 = {value}
value can be a variable, a database field or a date.
 If you are changing more than one field in a record at a time, use the @SET command to alter the fields in the record,
and only on the last change should you use the @EDIT command.
If you are changing more than one field in a record at a time, use the @SET command to alter the fields in the record,
and only on the last change should you use the @EDIT command.
Typically control files use the @SET command. The @EDIT command is only needed when you actually want to physically
write an updated record to the database. Since control files trigger off the 'current' record, you should generally
use the @SET command and only use the @EDIT command when altering data in related records like Clients, Attachments,
Transactions, etc.
You can use @EDITFULL where applicable. Please refer to the Help Topic How To Use The Report Writer Commands
for more information.
@SET
This command changes the value in the selected field of the database record, but does not write the record to disk until you
exit from the form.
Syntax: @SETde.na = {value}
value can be a variable, and database field or a date.
Log To Notes
You should use @SET when your control file is on a field and you also want to Log to Notes when modifications have occurred.
For instance, the Set Timezone sample uses a control file on the Debtor Home field to change the Time Zone. By using @SET in
the control file, instead of @EDIT, we ensure that changes to the phone number are still logged to notes.
Changing Field Attributes With Control Files
Field attributes can be changed through control files. Examples are Color, Caption, Rights.
In the script, these would be referred to as follows:
de.na.color
This means the color attribute of the Debtor Name field.
de.na.caption
This is the label attribute of the Debtor Name field.
de.in.rights
This is the access rights attribute of the Debtor Interest field.
COLOR
Setting this attribute changes the color of a field. Colors are defined as #RRGGBB in hexadecimal form, as in standard HTML
color usage.
Syntax: @SETde.na.color = #RRGGBB
RR is a hexadecimal Red color component between 0 and 255 (0 to FF hex).
GG is a hexadecimal Green color component between 0 and 255 (0 to FF hex).
BB is a hexadecimal Blue color component between 0 and 255 (0 to FF hex).
Example:
// control file to set color of Debtor Name field
@SETde.na.color = #3399FF
// End of file
Please refer to an online Color Chart for a quick reference to sample colors that you may use and to Using Color In Collect! for
additional examples.
You cannot change the color of the Debtor's Mode field using a control file.
RIGHTS
Set this attribute to control whether a field on a form is hidden, read only or able to be edited by the user.
Rights are defined as:
0 = Full
1 = No Delete
2 = Read Only
3 = No Access
// Set at FORM level to grant Read Only access to the Debtor Status field
@SETde.sta.rights = 2
// End of file
CAPTION OR ALIAS
Set this attribute to change the caption of a field.
Example:
// Set this at FORM level in the Attachment form to change the label of the Index 1 field.
@SETat.i1.caption = "Driver's License"
@SETat.i2.alias = "VIN #"
// End of file
You may need to put the caption in quotes to get this to work.
REQUIRED
Set this attribute to change whether or not a field needs to be filled in before leaving the form.
0 = Not Required
1 = Required
Example:
// Set this at FORM level in the Attachment form to set the requirement for the Index 1 field.
// Also, set this at the field level for the Type field for when the field changes.
@SETat.i1.required = 0
@SETat.i1.required = 1 if ( @at.ty = "2" )
// End of file
Fields that are set to No Access or Read Only cannot be set to required as the user
won't have the ability to edit the field.
Control File Examples
The following snippets give examples of ways that you can use control files to
- alert the Operator regarding certain accounts
- change the appearance of a form
- write a value to a field in a form
This is a fairly technical subject. Writing the scripts for control files requires a familiarity with the various commands that
can be used in the report writer. You may have to experiment a bit to get the results you need.
When a control file changes the value or appearance of a form or field, you may have to go off the form and back on
to see the effects.
1. Change Debtor Status
If the status is PRA, we may want to make the color of the Status field green.
// Set this at the FORM level
@SETde.sta.color = #FFFFFF
@SETde.sta.color = #00FF00 if (@de.sta = PRA)
@SET de.sta.color = #FFFFFF if (@de.sta <> PRA)
// End of file
We make the default color white before deciding what else to do. We set a color for our TRUE condition and one for
all other cases.
2. Debtor Delinquent
This Control File will change the color of the Debtor Delinquent field on the Debtor form.
Set at FORM level.
// Control file for Debtor Delnqnt
// Please add your report snippet below.
// This field can contain up to 10 numbers without a decimal.
@SETde.de.color = #99FF99 if (@de.de > @d-30)
@SETde.de.color = #00FFFF if (@de.de <= @d-30)
// End of file
When the Debtor Delinquent is within the past month, the color of the field changes to green. When the Debtor is over a month
delinquent, the color of the field changes to blue.
3. Debtor Range
This Control File can be used to identify Debtors in a range of file numbers. Different colors can be used to indicate different
ranges.
Set at FORM level.
// Control file for Debtor Client
// Please add your report snippet below.
// This field can contain numbers.
@SETde.na.color = #FFFFFF
@SETde.na.color = #CCFF00 if (@de.fi < 11000)
@SETde.na.color = #CC99FF if (@de.fi = 11000 .. 13999)
@SETde.na.color = #FFCCCC if (@de.fi = > 13999)
// End of file
This snippet changes the color of the Debtor Name field (@de.na) depending on the Debtor File Number (@de.fi).
4. Attachment
This Control File changes the labels of fields on the Attachment form depending on the value chosen from the Class field pick
list. For the examples below to work, the Class field pick list needs to be edited to add Invoice and Assets to the existing
list.
Set at FORM level.
Here is an example of script to change the caption of the Index 1 field to Invoice # or Assets and the caption of the File
field to View Invoice or View Assets. Notice that strings are enclosed in quotes.
// Control file for Attachment
// Please add your report snippet below.
// This field can contain numbers.
//The first two lines below initialize the default captions
@SETat.i1.caption = "Index 1"
@SETat.fi.caption = "File"
@SETat.i1.caption = "Invoice #" if (@at.cl = Invoice)
@SETat.fi.caption = "View Invoice" if (@at.cl = Invoice)
@SETat.i1.caption = "Assets" if (@at.cl = Assets)
@SETat.fi.caption = "View Assets" if (@at.cl = Assets)
// End of file
In the above snippet, the line "//End of file" must be included to tell Collect! to stop looking. So make sure you
include it.
If the user chooses 'Invoice' from the Class field pick list (@at.cl), the caption of the Index 1 field (at.i1) will change to
"Invoice #" and the text in the File field will read "View Invoice".
If the user chooses 'Assets' from the Class field pick list, the caption of the Index 1 field (at.i1) will change to "Assets"
and the text in the File field will read "View Assets".
You will have to go off of the attachment for the change to register. In the future, when you open this particular
attachment, the labels will display the correct captions according to the choice displayed in the attachment Class
field.
5. Debtor Other Phone Number Written To User 1 Field
This Control File will put the Debtor Other Phone number in the Transaction form in the User 1 field.
By default, Collect!'s Check reports use User 1 for the Check Number. If you plan to use the check printing features,
you would need to modify the check reports to take the check number from one of the other User fields on the
Transaction form.
Set at FORM level
// Control file for Transaction
// Please add your report snippet below.
// This field can contain numbers.
@EDITtr.u1 = @de.ot
// End of Control File
This control file will run whenever the transaction is opened to view.
6. Using Variables With Control Files
You can also use variables with control files. The following snippets are set at the FORM level, using variables. In this
example, the color of the Status field will change to GREEN if there have been more than 3 phone calls made to the debtor.
// Control file for Debtor
// Please add your report snippet below.
@varPHO# = 0
@de.con no total where (@co.ty = Phone)
@varPHO = @(varPHO+1) if (@co.do = Yes)
@de.con
@SETde.sta.color = #FFFFFF
@SETde.sta.color = #00FFFF if (@varPHO>3)
// End of file
7. Pick List
Use these commands to dynamically attach a Pick List to a field.
Example 1:
Set at FORM level.
// Attach pick list to Debtor state field - FORM level
@SETde.st.picklist = 1.pck
@SETde.st.picklist = states
// End of file
In the example above, the pick list (1.pck or states) needs to already exist in the system so that you can use it.
For more information about creating a pick list please refer to How To Use Pick Lists.
Example 2:
Set at FIELD level with conditions declared with an IF statement.
//Attach pick list at FIELD level with conditions and range.
@SETde.st.picklist = 15.pck if (@de.zi = 04000 .. 16999)
@SETde.st.picklist = 11.pck if (@de.zi = 89000 .. 95999)
// End of file
For the above example the following two pick lists were created.
//Pick list (15.pck) for Zip Code range 04000 .. 16999
"New York"
"Maine"
"Washington DC"
"New Jersey"
//End of File
//Pick list (11.pck) for Zip Code range 89000 .. 95999
"California"
"Nevada"
"Arizona"
//End of File
Please refer to How To Use Pick Lists for information on creating these pick lists.
Messaging
You can use a control file to display a message to the end user when a certain condition is encountered.
For example:
This control file will display a message alerting the operator that the account has been worked today.
Set at the FORM level.
@tvarText* = ""
@tvarText2* = ""
@varDate! = @d
@tvarText = "Don't phone this debtor. Already worked today."
@tvarText2 = @tvarText if (@de.wo = @varDate)
@message(@tvarText2)
//End of File
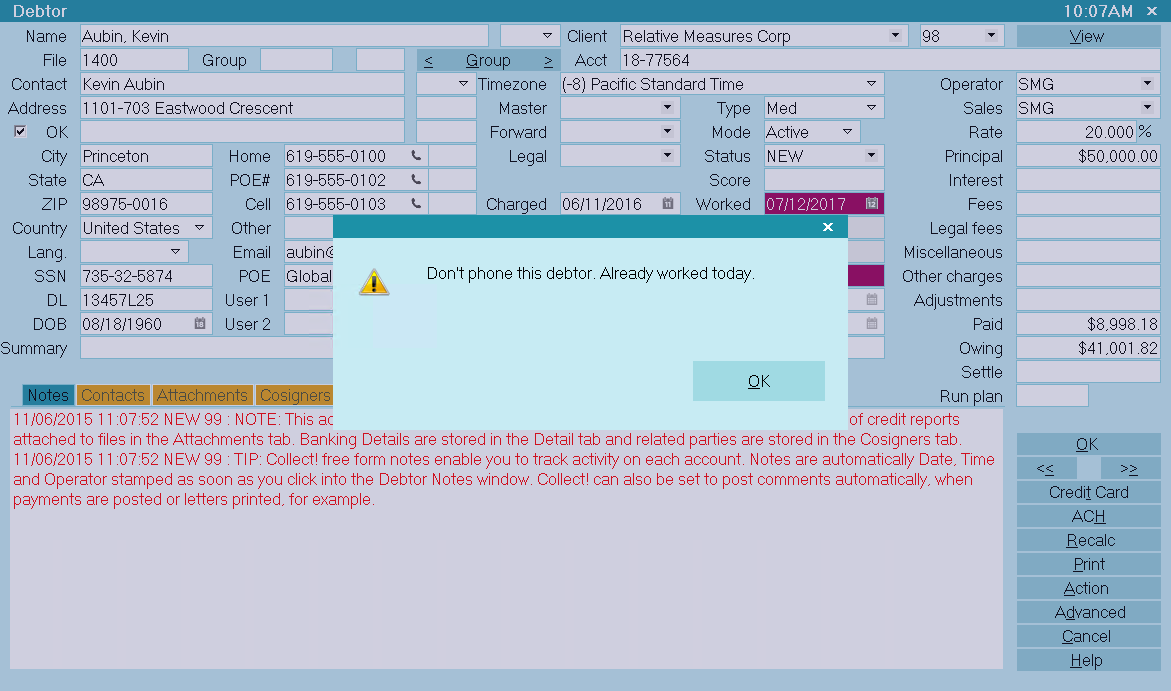
Message Displayed by Control File
Troubleshooting Control Files
Control Files take effect ONLY when you are signed in as a user with a level other than 99. If you are signed in as an operator
with User Level 99, you will not see any changes you have made to field labels and you will not invoke any code to edit fields
and perform calculations. Please make sure your operators have a valid User Level other than 99.
Run Contact Plan From Control File
You can run a contact plan from a control file using the command @RUNPLAN
SYNTAX:
@RUNPLAN({record},{planID}) {if ( @var = n )}
{record} = Either Client or Debtor
{planID} = Contact plan code
{if conditional} is optional and behaves normally
EXAMPLE:
@RUNPLAN(Client,REV)
This would run the REV contact plan on the Client who is current when the report or control file is executed.
{planID} can also be a variable.
For example, @RUNPLAN(Debtor,@varPlan) where @varPlan is set elsewhere in the report.
The optional "if" conditional works just as it does normally.
For example:
@RUNPLAN(Debtor,CLO) if ( @de.ow < 1.00 )
Attaching A Control File To A Form
1. Right click in the form, not on a field, and select Properties from the choices that are displayed. This will bring up the
Access Rights form for the form you are on.
You can Right click on any gray area of the form.
Check the Name field in the Access Rights form. It should display the name of the form you want to attach the Control File to.
OR
Pull down the System menu and choose Layout and Languages, Form properties. The Access Rights form will be displayed. Check the
Name field as described above.
2. Double-click in the Control File field to open the Control File editor or choose a button as described below.
3. Refer to sample files for guidelines.
4. Press F8 to save your Control File. The next time you enter the form, it will be activated.
Control files at the form level run unconditionally. You can only set conditions based on field values in control
files attached to individual fields.
Attaching A Control File To A Field
1. Right click in the field you want to attach the Control File to. Select Properties from the choices that are displayed. This
will bring up the Access Rights form for the field that is currently selected. Check the Name field in the Access Rights form.
It should display the name of the field you want to attach the Control File to.
OR
Pull down the System menu and choose Layout and Languages, Field properties. The Access Rights form will be displayed. Check
the Name field as described above.
2. Double-click in the Control File field to open the Control File editor or choose a button as described below.
3. Refer to sample files for guidelines. Press F8 to save your Control File. The field will display the changes when you exit
from it.
Control file attached to fields are invoked as the user exits the field. Field level control files will execute on
leaving a field if the field data has changed.
Saving Control Files
When you create a Control File, Collect! gives it a number and a *.ctf extension. Control files are stored in the
MASTERDB\control sub-directory of Collect! (i.e. ..\Collect\masterdb\control\1.ctf)
Buttons On The Control File Field
In the Access Rights form, the Control File field has four buttons to the right of it.
Use these buttons to do the following:
- Open a file
- Print a file
- Delete a file
- Select a .ctf file from the Collect\masterdb\control folder.
Open A File
If the File field already contains the name of Control File, click this button to open the file in the Control File editor.
You can modify the file if needed.
If the File field is empty, selecting the Open button will open a new Control File for you to create.
Print A File
To Print the displayed Control File select the Print button.
Delete A File
To delete the Control File select the button with the stylized X on it. This prompts you to delete the file.
Select An Existing Control File
To attach an existing Control File select the Magnifying Glass button. Collect! will open a dialog displaying the contents
of the Collect\masterdb\control folder. Control Files have a .ctf extension.
You should already know which file you want to select.
Time Zone Alert Example
This section explains how to use a pick list and control file to alert operators to timezones. It changes the color of the
Debtor Home Phone field to red when it is no longer acceptable to phone. This requires familiarity with using the Access Rights
form to create pick lists and control files and to attach them to fields and forms.
Managers with accounts in several states or countries often seek a way to alert operators using timezone information. Perhaps
it is too early or too late to phone a particular area. Using a pick list and control file, it is easy to alert your operators
to changes in Timezones so that they know when it is acceptable to phone an account.
This example uses the internal pick list on the Debtor Timezone field.
The Collect! Member Center has some utility scripts for changing the time zone field automatically when the debtor form
is loaded or when the phone fields or zip field is changed. By default, Collect! is setup to change the time zone
based on the basic North America time zones. It does not factor in daylight savings.
Click here for scripts that can factor in daylight savings or zip codes.
Time Zone Pick List
Collect! ships with an internal pick list attached to the Debtor Time zone field. To use this example, simply pick the
appropriate timezone for each account.
To view the pick list, you can open the Access Rights for the Debtor's Timezone field and select the folder icon next
to the pick list field.
This is a simple list of timezone values taken from standard timezone tables. It accurately represents the different time zones
in relation to Greenwich Mean Time.
Pick List for Debtor Timezone
"0" Local Time
"13" (0) Greenwich Mean Time
"-100" (-1) SE Greenland
"-200" (-2) Atlantic Ocean
"-300" (-3) Greenland Time
"-350" (-3.5) Newfoundland Time
"-400" (-4) Atlantic Time
"-500" (-5) Eastern Standard Time
"-600" (-6) Central Standard Time
"-700" (-7) Mountain Standard Time
"-800" (-8) Pacific Standard Time
"-900" (-9) Alaska Time
"-1000" (-10) Hawaii
"-1100" (-11) Pacific Ocean
"1200" (+/-12) International Date Line
"1100" (11) Kamchatskiy, E Russia
"1000" (10) Eastern Russia, Sydney, Australia
"950" (9.5) Mid Australia
"900" (9) Japan
"800" (8) China
"700" (7) W Mongolia
"650" (6.5) Burma
"600" (6) Almaty (Alma ATA), Russia
"550" (5.5) India
"500" (5) Ural Mountains, Russia
"450" (4.5) Afghanistan
"400" (4) NW Caspian Sea
"350" (3.5) Iran
"300" (3) Moscow, Mid-East, E Africa
"200" (2) E Europe, E Central Africa
"100" (1) Mid Europe/Africa
Timezone Control File
Next, open the Access Rights form for the Debtor form and create a control file as shown below.
// Control file for Debtor
// Please add your report snippet below.
@varZone# = -500
@varTime# = 0
@varCur# = @t
@varTime = @(de.ti-varZone)
@varTime = @varTime*100
@varCur = @(varCur+varTime)
@SETde.ho.color = #CCFFCC
@SETde.ho.color = #FF0000 if(@varCur > 170000)
@SETde.ho.color = #FF0000 if(@varCur < 080000)
@SETde.ho.color = #CCFFCC if(@varCur = 080000 .. 165959)
@SETde.ho.color = #CCFFCC if (@de.ti = Local Time)
//end of file
Adjusting the Samples for Your Timezone
The pick list contains all the timezones. Please find your timezone on the list and make sure that the value in the first
column is entered in the control file as @varZone#.
In the example, this value is "-500," that is, Eastern Standard time. So, if you are in Eastern Standard time, you won't have
to change this.
The control file is set to consider times between 8AM and 5PM as okay to phone. This uses the 24 hour clock. Please adjust
these as needed for your own requirements.
For example:
@SETde.ho.color = #FF0000 if(@varCur > 170000)
This means after 5PM, the field will turn red.
@SETde.ho.color = #FF0000 if(@varCur < 080000)
This means before 8AM, the field will turn red.
@SETde.ho.color = #CCFFCC if(@varCur = 080000 .. 165959)
This means between 8AM and 5PM, the field will turn green.
@SETde.ho.color = #CCFFCC if (@de.ti = Local Time)
This means for Local Time, the field will turn green.
Using the Timezone Pick List
Once the control file is attached to the Debtor form, select the appropriate timezone from the pick list.
Behind the scenes, Collect! stores the value for this timezone and calculates its difference in hours from your timezone.
If this difference means that the target timezone is earlier than 8 AM or later than 5 PM, right now, the debtor's Home Phone
field will turn red, alerting the operator that it is too early or too late to phone.
These values are set in the control file lines,
@SETde.ho.color = #FF0000 if(@varCur > 170000)
@SETde.ho.color = #FF0000 if(@varCur < 080000)
@SETde.ho.color = #CCFFCC if(@varCur = 080000 .. 165959)
@SETde.ho.color = #CCFFCC if (@de.ti = Local Time)
These times may be modified to suit your needs. Please note the numeric format used for the time.
The Debtor Timezone field works very nicely with the WIP List if you want to load operator's work queues according to
timezone. Please refer to How to Use the WIP List for more information.
Time Difference
The control file that manages Debtor timezones is called setzone.ctf and is stored in your "Collect\masterdb\control" folder.
It automatically sets the timezone for the debtor when the debtor is opened or when the phone numbers are changed.
@varZone# = -500
@varDif# = 0
//Rest of control file as shown above
//And then some additional lines as shown below.
@varDif = @(de.ti-varZone)/100
@SETde.u2.caption = Time Dif
@EDITde.u2 = @varDif if (@de.ti != Local Time)
//end of file
This will display the number of hours that the account's Timezone differs from the Local Time. It also changes the label of the
User 2 field to display "Time Dif."
| 
Was this page helpful? Do you have any comments on this document? Can we make it better? If so how may we improve this page.
Please click this link to send us your comments: helpinfo@collect.org