To enable the system to perform logic checks for you automatically as accounts are being entered
manually or grouped by a batch process, there is an Account Matching Setup window that needs to be
filled out. This setup window will contain your company's preferences and parameters that the
system will use as default settings to decision whether each incoming account is the same person as
any debtor in pre-existing inventory. It also contains general defaults that will govern what other
possible actions will, or will not, happen as a function of accounts being grouped together.
The Account Matching Setup window is located via the menu path "System\Preferences\Plans and Reference
Tables\Account Matching Setup".
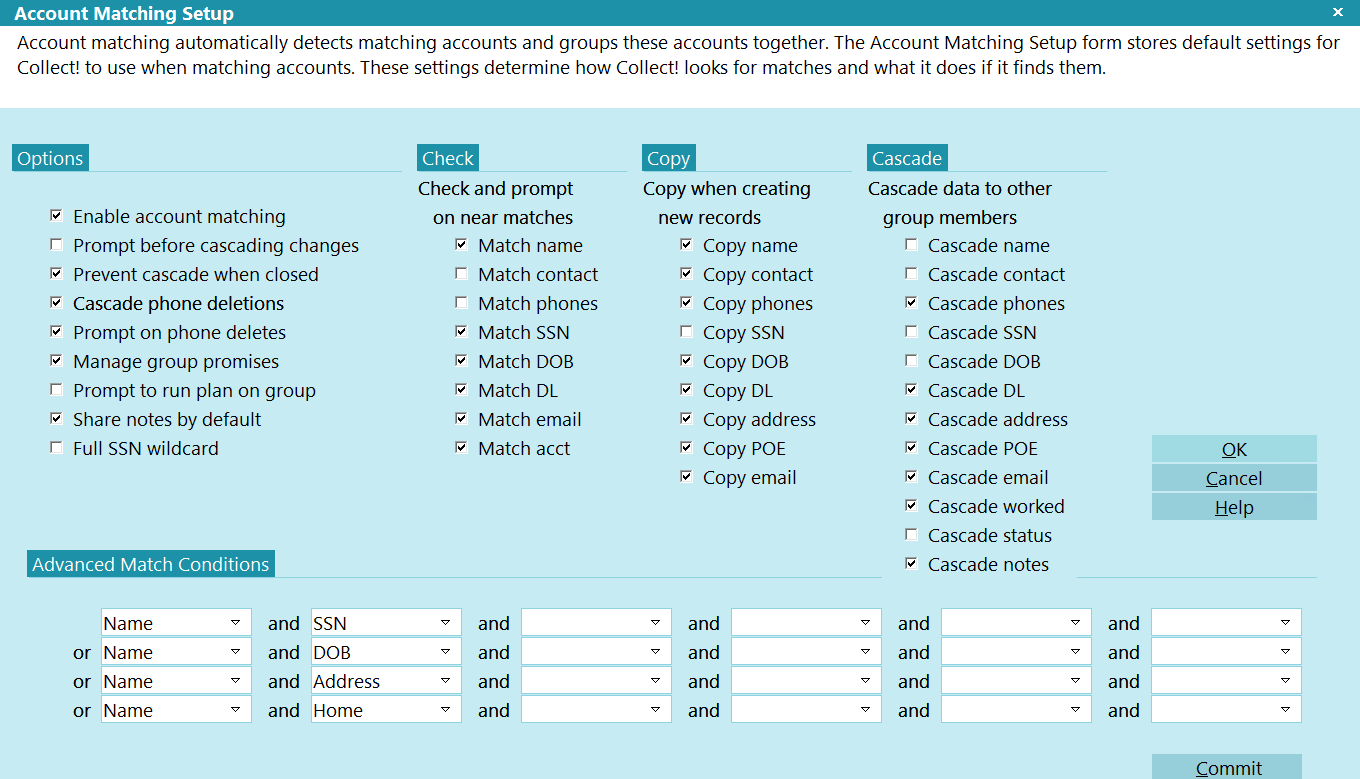
The window is organized into sections labelled Options, Check, Copy, Cascade and Advanced Match
Conditions.
Click Here to Close this Form.
Account matching automatically detects matching
accounts and groups these accounts together.
The Account Matching Setup form stores default settings
for Collect! to use when matching accounts. These settings
determine how Collect! looks for matches and what it does
if it finds them.
Account Matching Setup Window
Account matching handles two basic conditions - first,
when new accounts are entered, and second, when existing
accounts are grouped together arbitrarily.
When entering new accounts, Collect! checks for matching
entries such as name, or social security number. When you
exit from a field after typing something, Collect! checks if
there's another account with a matching or close value. If there
is, it displays a list and lets you choose one.
 When adding accounts to an existing group, the
current settings in the Account Matching Setup
window are set on added accounts. When creating new
group, the current settings are set on all accounts.
When adding accounts to an existing group, the
current settings in the Account Matching Setup
window are set on added accounts. When creating new
group, the current settings are set on all accounts.
Accessing Account Matching Setup
The Account Matching Setup window may be accessed in
multiple ways. Provided your User Level provides the software
access, you can use one of the following ways to get to the
Account Matching Setup:
- Using the menu bar at the top of your screen, click
"System\Preferences\Plans and Reference Tables\Account
Matching Setup".
- From the Main Menu, click the "System Administration"
button on the left of the window, then click "Setup and
Configuration" button. This will take you to the same
menu options as above. Click "Plans and Reference Tables\Account
Matching Criteria" to complete the navigation to the
same destination as in #1 above.

Options
This section contains account matching
options. The selections are explained below.
Enable Account Matching
This switch turns on the account matching
feature. When you turn the switch off,
account matching is disabled.
Disable Account Matching
You can enable or disable account matching
using the 'Enable account matching' check box.
Prompt Before Cascading Changes
Turn ON the Prompt before Cascading Changes
switch with a check mark to receive a prompt
to verify before copying data.
It is important to switch this ON if you
have any doubts about the data you may
be copying.
Prevent Cascade When Closed
Switch this ON with a check mark to prevent
cascading of data to group members where the
account has a Closed Mode. Collect! will still
show matching records if the account is closed,
but it will not cascade any data or changes to
closed accounts. This switch is in the Group
Member Setup form as well.
Cascade Phone Deletions
Switch this ON with a check mark to cascade
phone deletions. With this switch ON, you can
delete a phone number for one group member
and Collect! will delete the number from the
other group members, as well.
Any phone number deleted by this process will be
logged to the Debtor's Notes.
Prompt On Phone Deletes
Switch this ON with a check mark to alert
the user before cascading phone deletions.
If this switch is ON, the user will be
warned only when a phone number is about
to be lost due to a blank cascading across
the group. This prompt will only occur
once per set of group members. If the
user selects NO, blanks will not cascade
across, otherwise they will.
Any phone number deleted by this process
will be logged to the Debtor's Notes.
This switch is visible only when "Cascade
phone deletions" is switched ON.
Manage Group Promises
Switch ON 'Manage group promises' to
have Collect! manage promised payments for group
members. Collect! will advance the debtor's
Promise date when the promise is met. Specified
contact plans for full payment, underpayment,
overpayment, NSF payment and broken payment
conditions are called when necessary. The
payment can be posted to any group member and
Collect! will find the next qualifying promise
contact in the group to manage.
When this switch is ON and a payment is posted,
Collect! automatically fills in Promise details
based on the Promise contact's promised Amount
and the setting for Transaction Type in the
Payment Values form.
For this feature to work, 'Automatically manage
promises' on the Payment Posting Options form
must be set to ON.
If this feature is enabled, when an
account's balance reaches $0.00, then
the Promise Contact will move to the
next Group Member with the highest balance.
Prompt To Run Plan On Group
Switch this ON with a check mark to to enable
run plans on groups from the RUN PLAN field
and ACTION button on the debtor form. When
enabled, if you run a contact plan on the debtor,
and you are on a group, Collect! will prompt you
asking if you want to run the contact plan on
the entire group or just the current member.
Share Notes By Default
Switch ON 'Share notes by default' to display
the 'Share Notes' tab on the Debtor by default.
The 'Share Notes' tab displays all the notes
from all group members in a single tab. The
notes in this tab are read only and cannot
be edited.
Full SSN Wildcard
Switch ON 'Full SSN Wildcard' to search the
entire SSN for the partial match when using
the * character. When off, only the last 4 of
the SSN are used for the partial search.
Check And Prompt On Near Matches
Check and Prompt on Near Matches controls
which fields are automatically checked for
matching debtors as you enter information.
You will be prompted when near matches are
found. The settings are explained below.
Match Name
Enabling this switch invokes an attempt to
try to match newly entered or newly edited
accounts based on information in the Name
field.
Match Contact
Enabling this switch invokes an attempt to
try to match newly entered or newly edited
accounts based on information in the Contact
field.
Match Phones
Enabling this switch invokes an attempt to
try to match newly entered or newly edited
accounts based on information in any of the
phone fields.
Match SSN
Enabling this switch invokes an attempt to
try to match newly entered or newly edited
accounts based on information in the SSN
field.
Match DOB
Enabling this switch invokes an attempt to
try to match newly entered or newly edited
accounts based on information in the DOB
field.
Match DL
Enabling this switch invokes an attempt to
try to match newly entered or newly edited
accounts based on information in the DL field.
Match Email
Enabling this switch invokes an attempt to
try to match newly entered or newly edited
accounts based on information in the email field.
Match Acct
Enabling this switch invokes an attempt to
try to match newly entered or newly edited
accounts based on information in the acct field.
Copy When Creating
The Copy When Creating New Records controls
whether or not you will copy a particular
field's information FROM the EXISTING account
TO the NEW account being entered. This will
save you time, should the information be
identical.
Data in the new debtor will be overwritten
by the data in the matching existing account.
If you do not want to risk losing possibly
newer information or previously unknown trace
leads if a prior demographic is unknown on
existing accounts, then DO NOT use this feature.
The options below control which fields you
have overwrite ability FROM and EXISTING account
TO a NEW account being entered:
Copy Name
When this switch is ON, the process will copy
the information in the Name field to a newly
entered account from the original account,
if there is a match.
Copy Contact
When this switch is ON, the process will copy
the information in the Contact field to a newly
entered account from the original account,
if there is a match.
Copy Phones
When this switch is ON, the process will copy
the information in all phone fields to a newly
entered account from the original account,
if there is a match.
Copy SSN
When this switch is ON, the process will copy
the information in the SSN field to a newly
entered account from the original account,
if there is a match.
Copy DOB
When this switch is ON, the process will copy
the information in the DOB field to a newly
entered account from the original account,
if there is a match.
Copy DL
When this switch is ON, the process will copy
the information in the DL field to a newly
entered account from the original account,
if there is a match.
Copy Address
When this switch is ON, the process will copy
the information in the address fields to a newly
entered account from the original account,
if there is a match.
Copy POE
When this switch is ON, the process will copy
the information in the POE field to a newly
entered account from the original account,
if there is a match.
Copy Email
When this switch is ON, the process will copy
the information in the email field to a newly
entered account from the original account,
if there is a match.
Cascade Data To Other
The Cascade Data to Other Group Members
controls how the accounts in a group are
synchronized with respect to shared fields
when an update takes place on ONE account
in the group.
We recommend caution with this feature: it
does overwrite information in the target fields
once an update has been initiated on any
account in the group.
A popular switch pairing is the use of Cascade
along with the Options switch to "Prevent
cascade when closed".
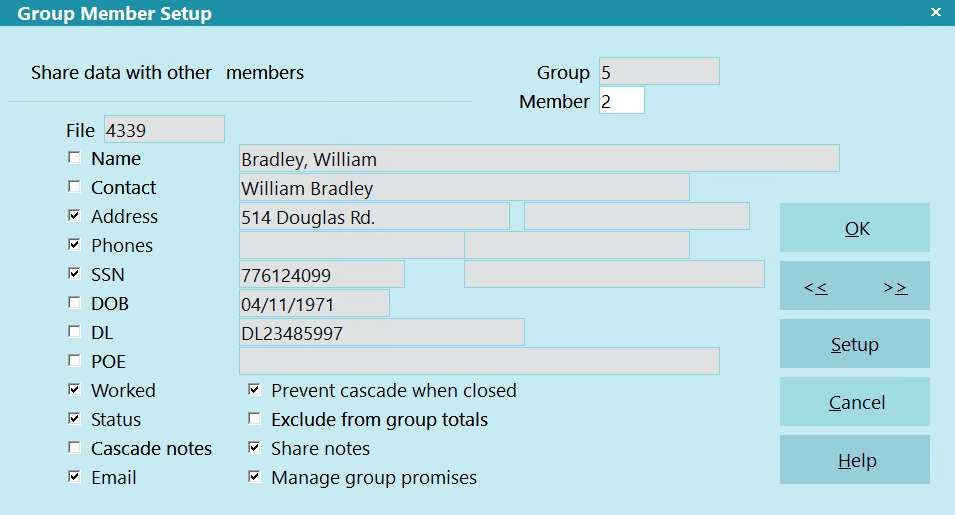
Each group member has its own cascade settings
located inside the Group Tab, Group Member
Setup. It is possible to fine-tune the settings
ad hoc on a per group basis if the need arises.
Additionally, you can modify the settings to
be different on select members within a group
such that some group members remain independent
and/or unaffected by updates.
The choices to control cascading data are
explained below:
Cascade Name
When this switch is ON, the feature will
cascade any edits entered into the Name field
across all matching accounts.
Cascade Contact
When this switch is ON, the feature will
cascade any edits entered into the Contact field
across all matching accounts.
Cascade Phones
When this switch is ON, the feature will
cascade any edits entered into any phone fields
across all matching accounts.
If you want to cascade deleting phone numbers,
you must switch ON "Cascade phone deletions."
Cascade SSN
When this switch is ON, the feature will
cascade any edits entered in the SSN field
across all matching accounts.
Cascade DOB
When this switch is ON, the feature will
cascade any edits entered into the DOB field
across all matching accounts.
Cascade DL
When this switch is ON, the feature will
cascade any edits entered in the DL field
across all matching accounts.
Cascade Address
When this switch is ON, the feature will
cascade any edits entered in the address
fields across all matching accounts.
Cascade POE
When this switch is ON, the feature will
cascade any edits entered in the POE field
across all matching accounts.
Cascade Email
When this switch is ON, the feature will
cascade any edits entered in the email field
across all matching accounts.
Cascade Worked
When this switch is ON, the feature will
cascade the Worked Date of an account across
all matching accounts.
The Worked Date on grouped accounts is
always kept up-to-date on all group members,
and is shown in red if someone worked the
account already today. In this way, you can be
sure you won't be calling the same account in
one day.
Cascade Status
When this switch is ON, the feature will
cascade changes of the Status Code of an
account across all matching accounts.
If your site uses statuses such as PIF,
SIF, DIS etc., you may wish to leave
this switch OFF to prevent an accidental
sweep of a status code that was meant
for a single account inside the group.
Cascade Notes
When this switch is ON, the feature will
cascade notes to other members in the
established group, provided the 'Cascade
notes' switch is also activated within the
Group Tab of the individual debtor accounts.
Visit the Collect! Member Center for a utility
report to assist with mass updating of the
"Cascade notes" and "Share notes" switches
in pre-existing groups. Choose the drop-down
menu Add-Ons, then the category "Utility Reports
and Snippets" from the body of the page. If
you are logged into the Member Center, the
zip called "Group Notes - Cascading and Share
Notes Tab". The zip file contains a write back
report that will optimize your ability to activate
the new fields. To utilize the report, import the
.rpt file into your system and follow the
directions which come with the report zip file.
Cascade notes may be further controlled for
each individual site by the 'Prevent cascade
when closed' and 'Prompt before cascading
changes' switches in the Options area of the
Account Matching Setup window.
Advanced Match Conditions
This section is where you define the criteria
that will be used to determine which fields
in combination of Boolean AND/OR conditions
will be used to decision whether a new account
entering the system will be deemed a match to
one or more accounts currently existing in your
database. Criteria for the match conditions
are chosen from the pick lists on the fields.
Press F1 for additional details when your
cursor is within this input entry area.
Commit
Select this button to commit your changes.
In progress.
OK
Selecting this button will save any data
you have entered and return you to the
previous form.
Cancel
Select this button to ignore any changes
you may have made and then return to the
previous form.
Help
Select this for help on the Account
Matching Setup window and links to related
auto-grouping topics.
Check this ON if you want to use automated account matching. Leave it unchecked if you will not be
utilizing grouping at all.
Check this ON if you want the system to give you a popup window to which the user must respond by
clicking Yes or No each time it prepares to cascade data across the group. Leave this unchecked if
you want the system to cascade information as per the switch settings, with no prompt to the user.
Check this ON if you want the system to ignore any account with Mode "Closed" that may be part of a
group when information is available to be cascaded. This is a popular switch to have turned ON where
agencies are required by their clients to cease documenting accounts in any way once accounts have
been closed/recalled/reassigned to other agencies. This switch ensures only accounts with Mode
Active (and any status) will be eligible for auto-cascade.
Check this ON if you want the system to remove the same phone number on all accounts in the group
at the same time (Mode Active or Closed being governed by the switch above). Leave this unchecked
if you do not want auto-removal of a phone number on all matching accounts.
The switches in this section decide whether a user will be presented with a browse list of "near"
matches when data-entering New Business or keying in a search for a specific debtor.
Recommendation is to leave all of the switches in this section OFF rather than have your staff being
inundated with lists of accounts that are not remotely related to the new debtor or account being
searched for.
The switches in this section are inquiring for specific fields you may, or may not, wish to have
auto-copied to NEW accounts from EXISTING accounts if there is a grouping taking place.
Recommendation is to leave all of these switches in this section OFF. If there is any error or
omission in existing inventory OR the new account incoming has more recent / good demographics,
then having this switch ON will mask that data with the overwrites. Additionally, if your office
does litigation, you would not want to alter the exact name with which the debtor entered into their
obligation with the creditor.
The switches in this section pertain to how the system will handle updates made to an account that
is a member of a group of accounts. There are 11 different types of cascades you can turn ON or
OFF, as per your site's preferences. Because these switches overwrite existing data on all files
in the group (Active or Closed, depending on a separate switch under Options), we recommend extreme
care be taken and that your Access Rights "Log to Notes" switches are set on individual fields.
Because typographical errors can also occur with staff doing field updates that will cascade, you
may also wish to limit which fields are allowed to cascade.
This section governs what criteria will be used to decision whether an incoming account is a match
to one or more accounts already existing in your database AND what fields to make comparisons with
when accounts are being manually grouped together by a user.
Collect! ships with a set of default match conditions that should be reviewed and updated for your
site's preferences before commencing to group accounts manually or via batch process.
The entry area is visual, but represents Boolean logic checks: reading across horizontally, these
are fields which are joined by "AND" conditions. Example, the match will only be made if the Name
AND social security number of the NEW account compared to an existing account are the same. If that
is not true, then the decision tree moves to the next condition. The separate lines of conditions
are joined by an "OR" mathematical operator. It is the "OR" condition that allows the process to
continue to read vertically through the four lines of logic the system provides to define matching
criteria. While it sounds laborious, the software manages these checks live while a staff member
is working or in batch mode very quickly.
Accounts which are successfully matched will become associated with a system assigned Group ID Number
along with the sequential Group Member Number each account is separately assigned to distinguish
each account within the group.
There is a Member Setup button in this screen. Click the button when any particular group member
is selected and you will see the settings for that specific Debtor.
If you modify any settings on this specific debtor that differ from the system global Account
Matching Settings for which fields to share/cascade across all files, it will be these new, individual
settings that will override the global defaults from that point forward. This can be useful if you
have a client with different preferences as compared to the rest of your database.
The Shared Notes tab provides a thumbnail view of ALL notes on ALL accounts within the group
consolidated into a single Shared Note tab. If a user is looking for a specific note in a
particular date range but does not recall which individual file it may be located on, this tab
would be a handy utility tool.
The switch within the Group Member Setup does not automatically turn itself on. There is a Write
back report on the Member Center in the Utility Reports and Snippet section which Members may
download to set these switches globally in their existing grouped accounts and add into contact plans
to routinely switch on the items of interest in new accounts grouped go forward. The mini-package
with instructions is called "Group Notes - Cascading and Share Notes Tab".

Was this page helpful? Do you have any comments on this document? Can we make it better? If so how may we improve this page.
Please click this link to send us your comments: helpinfo@collect.org