How To Search For Records
There are several ways to search for records in your database:
The first two methods can be used when a list is displayed. These methods work for any list that
you are viewing anywhere in your Collect! system.
List View - Column - Finding A Record Based On A Single Criterion
Whenever you display a list, your cursor will appear on the first field in the list. For example,
when displaying the Debtor list, your cursor will appear on the Debtor Name field.
If you start typing the name you are looking for, Collect! will start searching through the list for
a record matching the name. If it finds a record containing what you typed, the first matching record
will be displayed in the list.
The Debtor Name field is indexed and the search should complete very quickly. If the field is not
indexed, Collect! will have to scan through the complete list to find a matching record. In this case,
you will see a message at the bottom right of the screen indicating that Collect! is searching. If
you press any key while it is searching, Collect! will cancel the search and display a message to
the effect that the 'Scan was canceled by the operator'.
To search on another field, press the Tab key until the cursor is flashing on that field. If you
search on the Debtor Number, the process is a little different due to the fact that the debtor
number is a numeric field. Collect! can't find a match on a numeric field until all numbers have
been entered. For example, if your Debtor's Number is 10021, then you will need to type the complete
number for Collect! to find the record in the database. This is simply because the field is a number,
and Collect! processes numbers differently from text.
 This type of quick search is available on every list in the system.

List View - Search Criteria - Finding Multiple Records With One Or More Criteria
You may want to search for records based on more than one criterion. When you are displaying a list,
press F6 (Find) to open the Edit Search Criteria window.
Click Here to View this Form.
Click Here to Close this Form.
Using the Edit Search Criteria form, you can filter any
list to display only the records you want.
Press F6 'Find' or use the Edit menu 'Find'
option, or select the Find icon at the top of the screen.
This will display an Edit Search Criteria list of all the fields in
the current record. The list contains a 'From' and a 'To' field,
which define the search criteria.
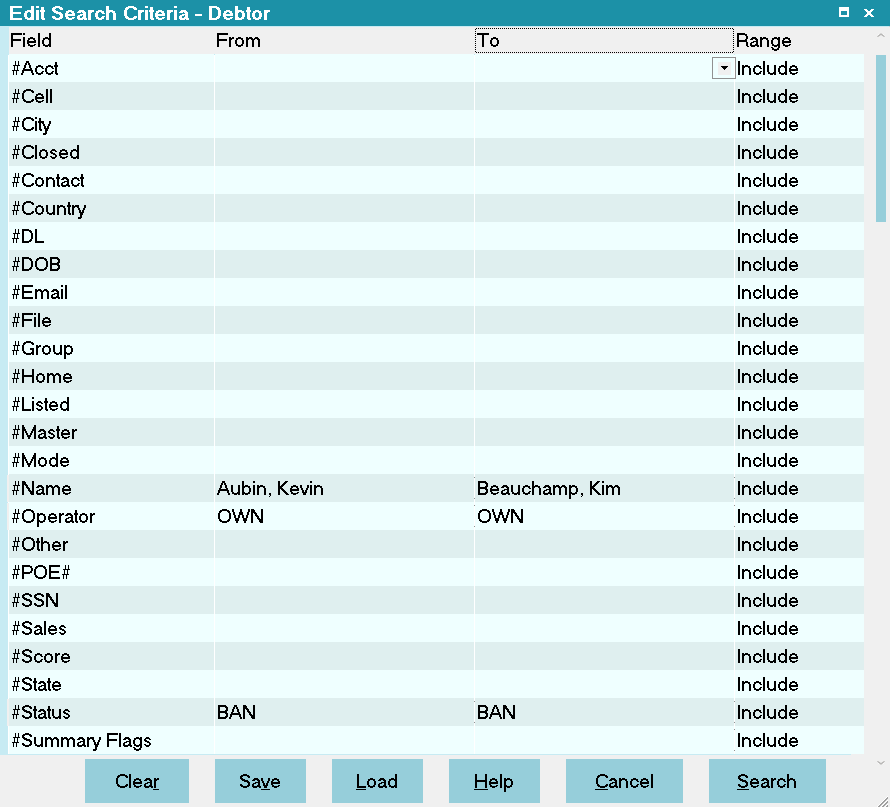
Edit Search Criteria
Field
The fields that are available to search for on the record.
Indexed fields are displayed with a prefix [#]
in front of the name.
This form factors in access rights, so if you have a user
that does not have access to a field, it will not display.
From
Enter the starting point for a range that you want to search.
Indexed fields don't allow for wildcard searches. When you select
one of these fields, it will display a list. The value you put into
the FROM field must be in the list.
To
Enter the ending point for a range that you want to search.
Indexed fields don't allow for wildcard searches. When you select
one of these fields, it will display a list. The value you put into
the TO field must be in the list.
Range
This field contains a pick list with Include or Exclude. Include means that
you want to include the range in your search. Exclude means that you want to
exclude the range in your search.
Clear
Press this button to clear the criteria you have set.
Save
Press this button to save the query you have designed.
Collect! will prompt you to enter a name and a location.
The query will be saved with an *.qry extension.
Load
Press this button to load a previously saved query that
you designed. Collect! will allow you to navigate to a
folder to select a *.qry file. The query you select will be
loaded into the Edit Search Criteria form with all the
criteria you saved.
Help
Press this button for help on the Edit Search Criteria
form and links to related topics.
Cancel
Select this button to cancel your search
and return to the previous screen.
Search
Select this to begin searching the database using the
criteria you have set in the Edit Search Criteria form.
The results will be displayed when Collect! completes the
searching process.
It may take a while for Collect! to complete
the search if your database is large.
Filter Records For Your Displayed List
- Use the Arrows to highlight a field to use for searching.
- Fill in the From and To fields to select a range.
- Press F8 or choose Search to run the search.
The displayed list will now be limited to those records which
match the contents of the 'From' and 'To' fields you filled in.
 An S will appear in the status bar at the bottom
of the screen to indicate 'Search Criteria' is active and
the list that you are viewing is filtered.
An S will appear in the status bar at the bottom
of the screen to indicate 'Search Criteria' is active and
the list that you are viewing is filtered.
Note that you can use as many fields for selection as
you wish. Some fields are indexed, and very fast searches
are possible.
Clear Your Search Criteria
- Select Edit from the top menu bar.
- Select the Clear Search Criteria option.
The displayed list will now show all records.
The S at the bottom of the screen will disappear,
indicating that 'Search Criteria' is no longer active.
Exit Without Changing Any Search Criteria
Press Escape or choose Cancel.
Examples
These examples assume you are displaying the Client form.
The same principles apply regardless of the particular list
you are viewing.
List Clients With
To display all clients starting with 'A'
- Use the Arrows to highlight the Name field.
- Press Enter twice to move into the From column.
- Type the letter 'A' in the 'From' field.
- Type an 'A' into the 'To' field.
- Press F8.
List Client Range
To list all clients from M to Z
- Use the Arrows to highlight the Name field.
- Press Enter twice to move into the From column.
- Type the letter 'M' in the 'From' field.
- Type an 'Z' into the 'To' field.
- Press F8.
List Clients With Over 20 Accounts
To list all clients with greater than 20 accounts:
- Use the Arrows to highlight the Accounts field.
- Press Enter twice to move into the From column.
- Type the number 20 into the 'From' field.
- Leave the 'To' field blank.
- Press F8.
International Currency
You may find that using an asterisk [*] in your
search will give you better results when searching currency
fields for Euro values.
For example:
When searching for a Principal Amount of 1000 Euros, try
using *1000 in your search criteria.
Restricting Access Rights
Access to the Edit Search Criteria screen can be completely
restricted by assigning rights to the appropriate menu item,
that is 301007 EditFind.
By disabling the Find menu, all the alternate access
points will be disabled as well. The alternate access points
for Edit Search Criteria are F6, CTRL+F, CTRL+G and the
Find button in the control bar.
When access is denied, the standard access rights dialog
will appear and reveal the ID of the appropriate menu item.
This type of search capability is available in all lists in the system.
The default Indexed fields are displayed with a prefix [#] in the Field column. Searches on
these fields will go faster than searches using non-indexed fields.
You can create your own indexes in the database.
Collect! remembers your search criteria. If you enter something into the Edit Search Criteria
window, and Collect! can't find the record, pull down the Edit menu and choose 'Clear Search
Criteria' to reset your options.
Quick Search And Find By
You can also use the Quick Search feature from the Main Menu to search for records.
Click Here to View this Form.
Click Here to Close this Form.
Welcome! You are signed on to a database, and the files are now
open for your use.
The Main Menu is organized into the basic tasks you perform in
Collect!. Select one of the tasks below, or use the Menus at the
top, for quick access to information and tools.
Use the convenient Quick Search area to find an account to
work. This feature works the same as the Find By options in
the Browse menu.
Work In Progress lists all activities (contacts) you have scheduled
To Do today.
Daily Administration takes you to menu selections for tasks you
perform on a daily basis, like entering new business, payments
and charges, and printing letters and reports.
On a daily basis, you should use the Work In Progress and
Daily Administration options. Other options will be used
periodically, as needed.
Month End is for your periodic and month end accounting.
This includes generating and printing statements, checks, and
reports for payables and receivables.
System Administration takes you to menu selections for
setting up Collect! and running database maintenance.
Reports makes it convenient to print several standard reports
that are used most often. You can also choose to print your
daily letter batch.
Tutorials takes you to the FLASH format Tutorials video
which demonstrates basic functions in Collect! that you
will use every day in your business operation.

Main Menu
Work In Progress
Select this button to open the Work In Progress (WIP)
List. This is a To Do List that displays a work queue for
the operator who has signed into Collect!. The WIP List
displays any uncompleted contacts that the operator
has been assigned to look after. This enables you to
follow up specific accounts. By default, Promises, Phone,
Review and Other contacts are displayed in the WIP List.
Daily Administration
Select this button to view the Daily Administration
menu where you can choose from a series of
standard daily office procedures, like entering
new business, payments and charges, and
printing letters and reports.
Daily Administration lets you:
- Post new business
- Print daily reports
- Enter Client and Debtor payments
- Perform daily account batch functions
Month End
Select this button to view the Month End
menu where you can choose from a series of
standard month or selected period end
accounting procedures.
Month End lets you:
- Calculate statements and invoices
- Prints monthly statements
- Print your accounts receivable summary
- Print your accounts payable summary
- Print month or period end reports
System Administration
Select this button to view the System Administration
menu where you can set up Collect! to suit your
needs and run maintenance on your database.
Setup and Configuration
This takes you to various
areas for setting up Collect! for the way you do
business.
- Enter your company details and address
- Specify users and their access rights
- Set up transaction types
- Set up debtor status codes
- Customize contact plans
- Create letters and reports
Database Maintenance
This takes you to the
database maintenance dialog where you can
adjust your settings and run the internal
maintenance routines.
Reports
Select this button to open the Reports menu where
you can select from a variety of analytical and
summary reports. Print your own customized
reports from this menu or run your daily scheduled
letter batch.
Reports you can print from this menu include:
- Total listings report
- Client analysis
- Month batch analysis
- Operator analysis
- Scheduled batch letters
- Trust account summary
- Year end summary report
- Your customized reports
Tutorials
Select this button to access the Tutorials page where
you can play the FLASH format Tutorials video to see
an overview of basic functions and features in Collect!.
Quick Search
Use this area of the Main Menu to quickly browse your
database and find accounts. The searching criteria for
these Quick Search fields follows the same guidelines
as the Browse, Find By menu options.
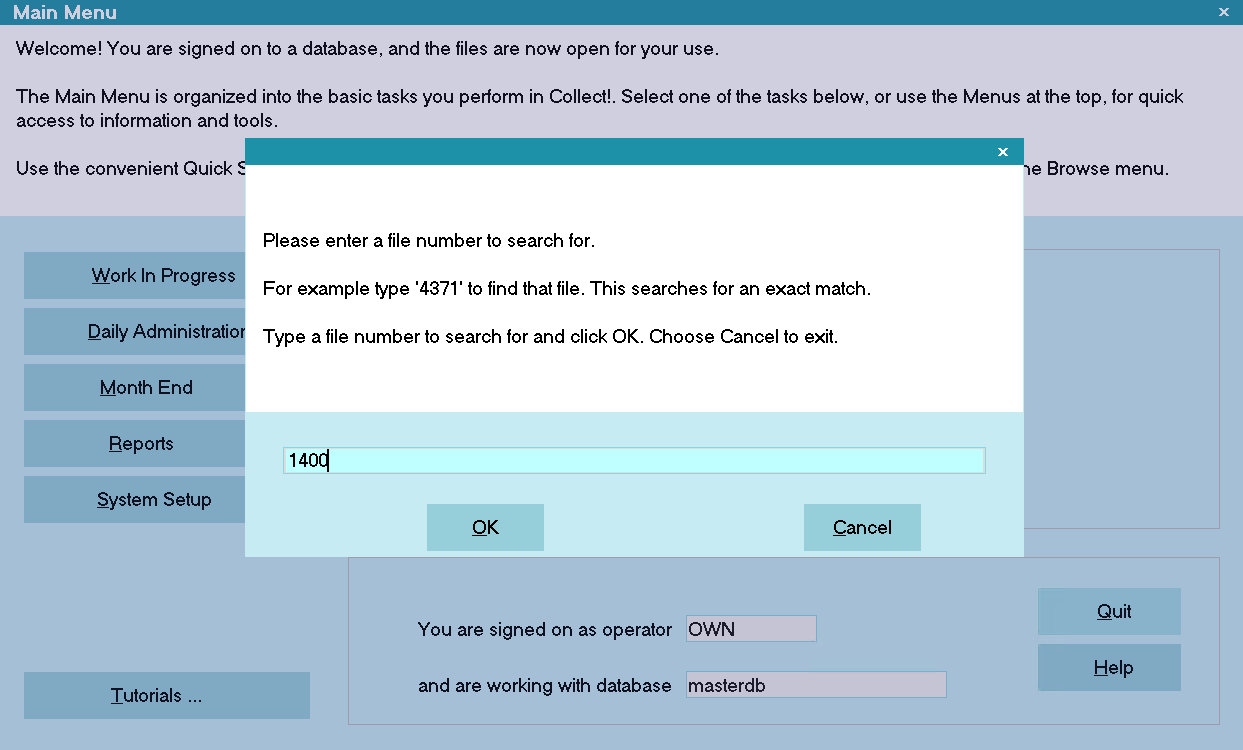
File No
Please enter a File Number to search for. For
example, type '4371' to find that file. This searches
for an exact match.
Type a File Number to search for and press ENTER.
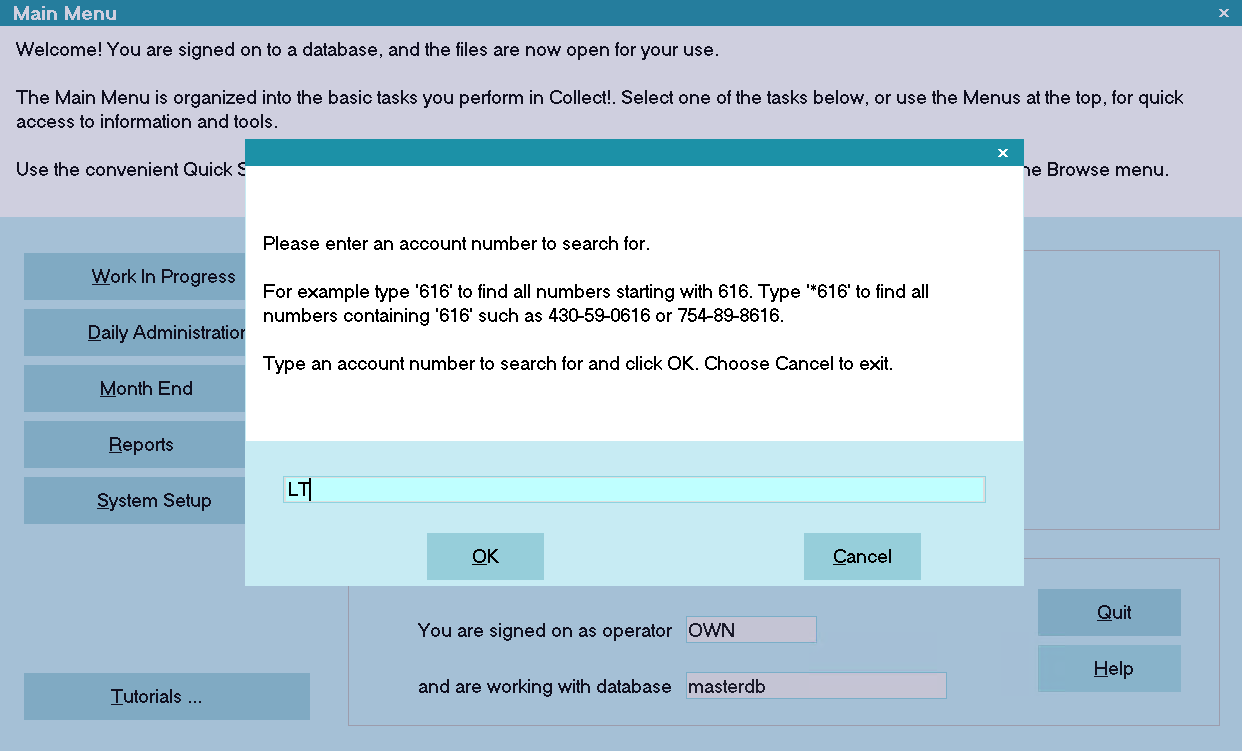
Acct No
Please enter an Account Number to search for. For
example, type '616' to find all numbers starting with 616.
Type '*616' to find all numbers containing '616' such
as 430-59-0616 or 754-89-8616.
Type an Account Number to search for and press ENTER.
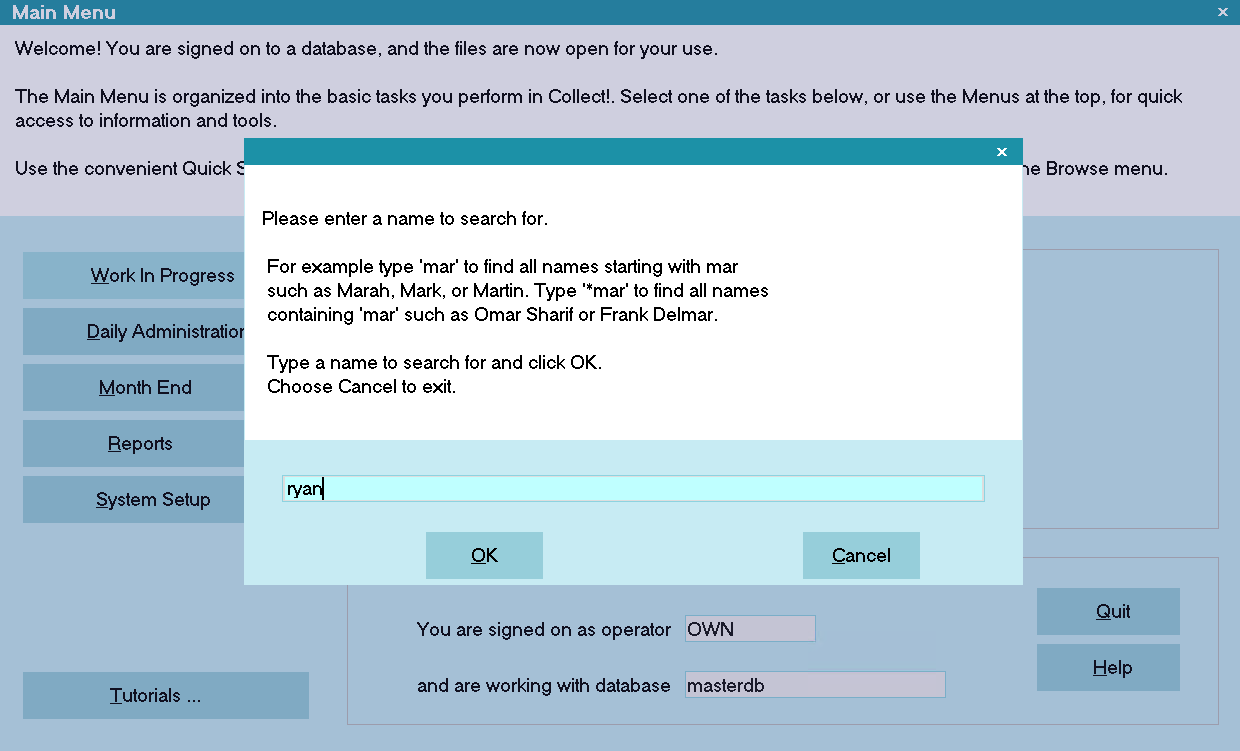
Name
Please enter a Name to search for. For example,
type 'mar' to find all names starting with mar, such
as Marah, Mark, or Martin.
Type '*mar' to find all names containing 'mar',
such as Omar Sharif or Frank Delmar.
Type a Name to search for and press ENTER.
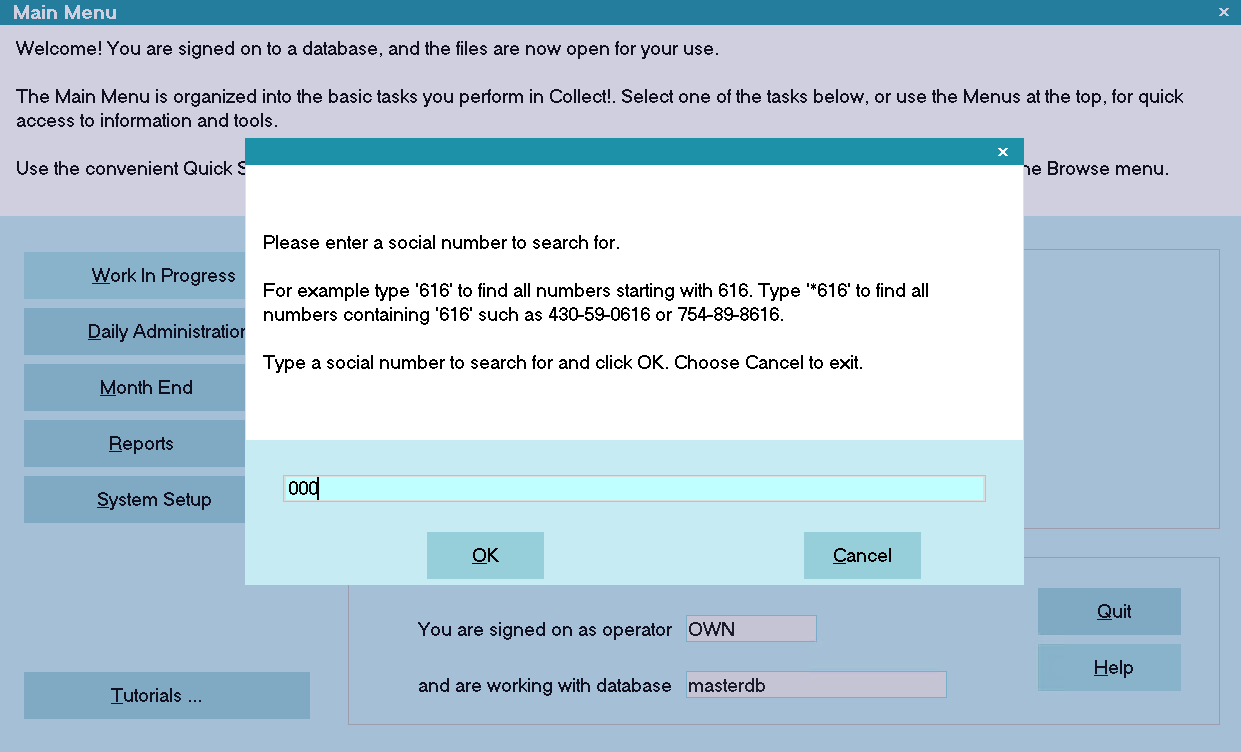
SSN
Please enter a social number to search for.
For example type '777-88-9999' to find that social.
This searches for an exact match.
Type '*9999' to find all socials ending in 9999.
Wildcard searching only allows searching by the last
4 digits.
Type a Social Number to search for and press ENTER.
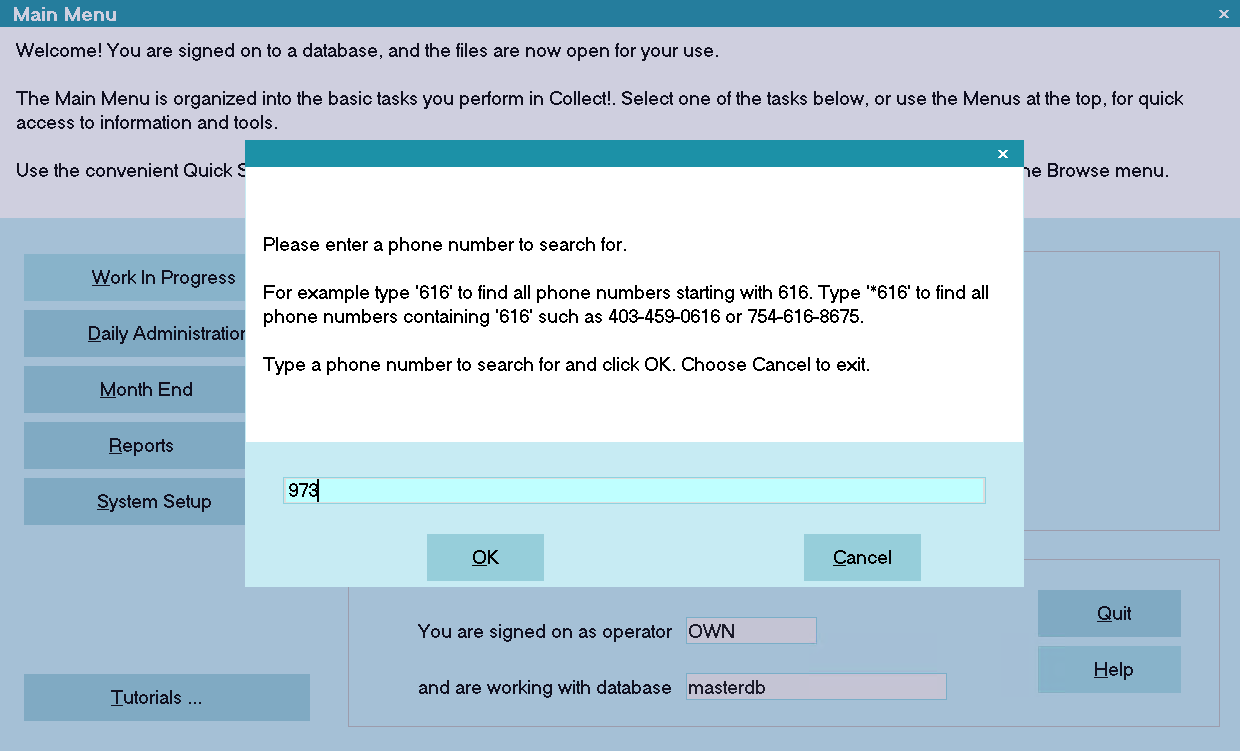
Phone
Please enter a Phone Number to search for. For example,
type '616' to find all phone numbers starting with 616.
Type '*616' to find all phone numbers containing '616',
such as 403-459-0616 or 754-616-8675.
Type a Phone Number to search for and press ENTER.
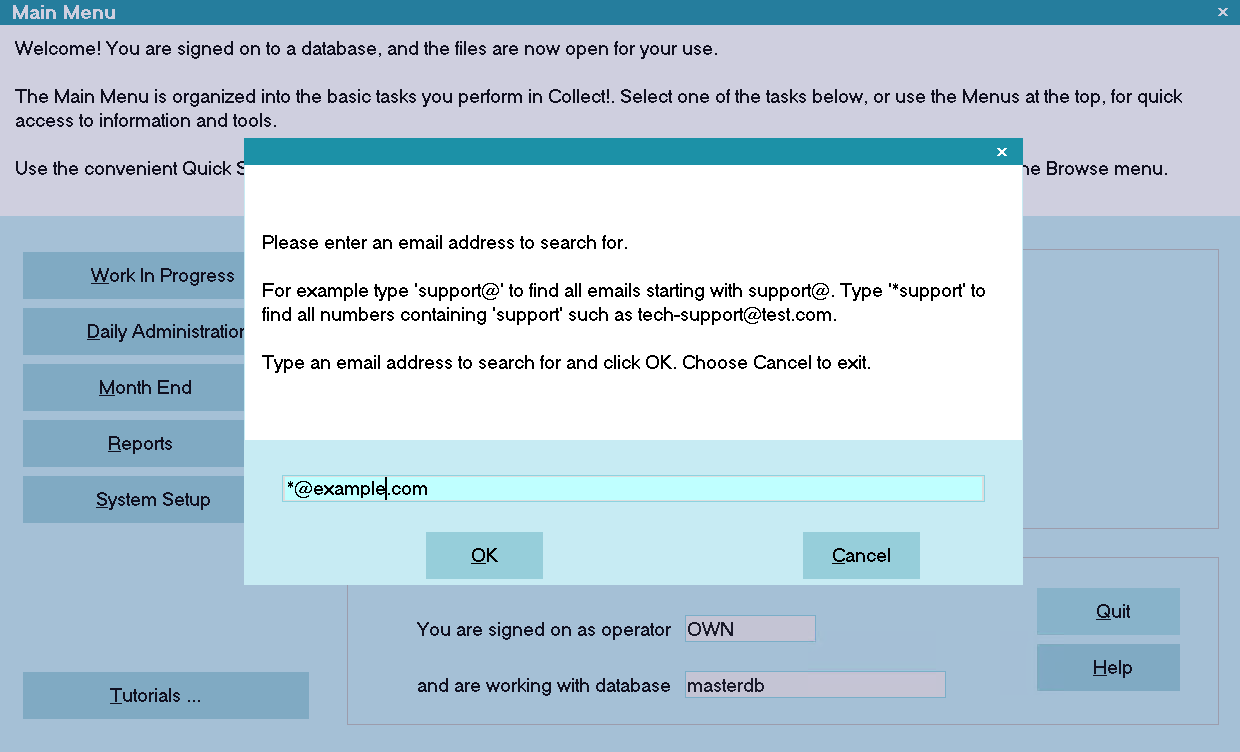
Email
Please enter an Email Address to search for. For example,
type 'support@' to find all emails starting with support@.
Type '*support' to find all numbers containing 'support',
such as tech-support@test.com.
Type an Email Address to search for and press ENTER.
You Are Signed On AS Operator
You signed into Collect! using the ID shown here.
The ID you sign on with is important in determining
what the system does for you. When you open your
To Do list, you will see contacts assigned to the ID
displayed in this field. When notes are entered for
a debtor or contacts are created or completed, they
are stamped with this ID.
The Collect! Demo is set up to sign you in
as ID OWN and Password own. You can
put in any other ID and Password that is
a valid Operator ID in your system.
And Are Working With Database
This is the folder name of the database you have opened.
Ordinarily, you would see MASTERDB displayed in this
field when you are working in your Masterdb Database.
Quit
To sign out off Collect! select this button or press Enter on
your keyboard while the button is highlighted. This will
exit you to the Welcome To Collect! screen.
Help
Select this button for help on the Main Menu
screen and links to related topics.
For more advanced searching, use the Find By menu.
Click Here to View this Form.
Click Here to Close this Form.
The Find By menu offers many choices for quickly
searching for records in your database using
indexed fields.
When you select one of the Find By options to begin
a search, you are prompted to enter information.
The form that is displayed will give you instructions
for entering the "search string" as required for the
option you selected. Each available choice that you
may select for performing a search has different
requirements for its search string. For instance, some
fields require numbers and others may contain
characters and/or numbers.
Please read the instructions displayed on the screen
for you as you begin to enter your search criteria.
If you need to search for a record belonging
to a particular client, you can add
"->{client number}" to the end of the query to
get results from just that client number.
Example: "John D->1234" will return all the
values starting with John D from client 1234.
If you need to search for an exact match, you can add
"=" to the beginning of the query. Example: "=John Doe"
will only return the values that are John Doe and will
not return John Doefall.
Collect! searches for data that starts with
the string you entered. For wildcard searching,
add a * to your search criteria. See below for
examples.
If you are searching for a string, but you only know a
portion of the string, like an email domain, then you can
do wildcard searching by adding "*" to the beginning of
the query. Example: "*@domain.com" will return all values
that contain domain.com anywhere in the result.
 WARNING: Searching with the * is a lot slower than just typing
the first few characters of the desired name because
the system has to read every single key and search it
for matching characters.
WARNING: Searching with the * is a lot slower than just typing
the first few characters of the desired name because
the system has to read every single key and search it
for matching characters.
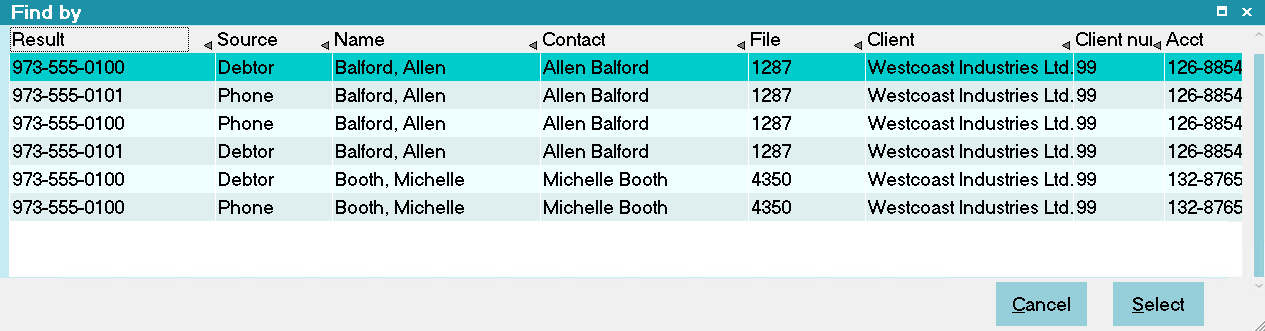
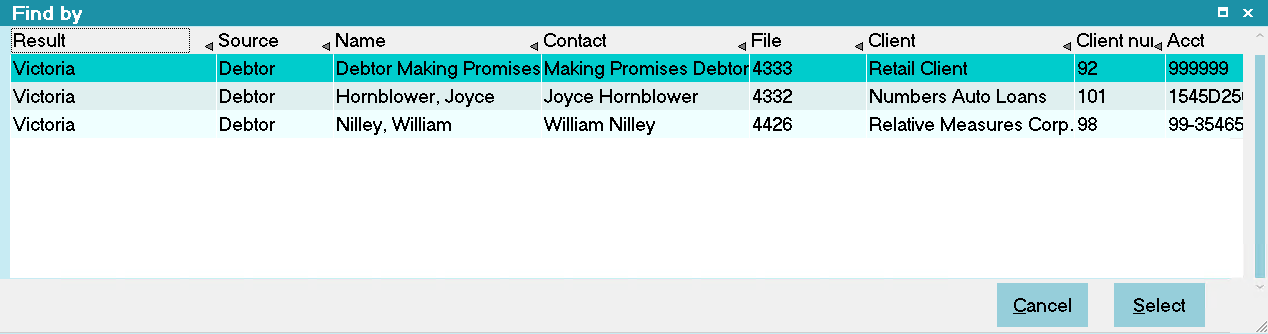
Debtor Name
This option, Find By Name, searches the list of
Debtors for the name you enter.
Find By Name Prompt
A list of matching records will be displayed.
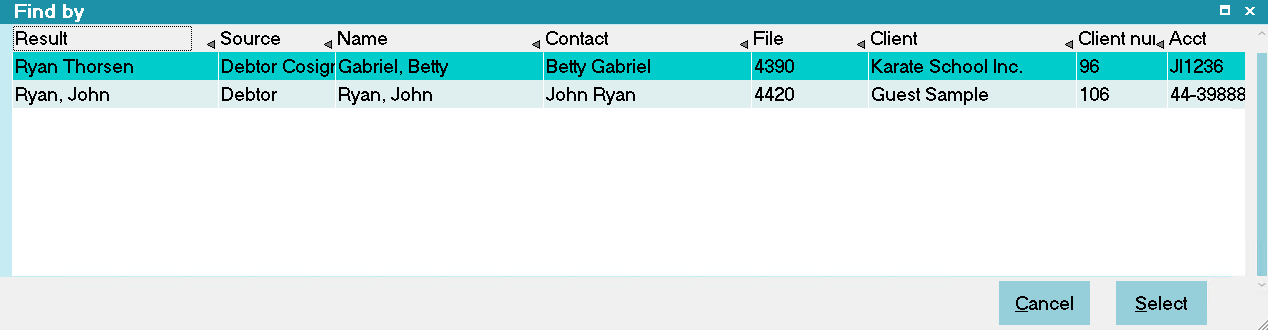
Find By Name Results
This function searches the Debtor Name, Contact
and Cosigner Name and lists all matching names.
For example to find all instances of Fred type
'Fred'.
Use hot key CTRL+F1 to access Find By Name.
Debtor Phone
This option, Find By Phone, searches the list of
Debtors for the phone number you enter. You
must use "-" where necessary. e.g.: 214-777-8898
not 2147778898, unless you have the 'Only numerics
in phone fields' option selected on the Options,
Sounds and Colors form. If this option is set,
then any value can be put into the search string
as Collect! will only search the database on the
numeric value.
Find By Phone Prompt
A list of matching records will be displayed.
Find By Phone Results
Use hot key CTRL+F2 to access Find By Phone.
Debtor Social
This option, Find By Social, searches the list of
Debtors for the S.S.N. or S.I.N. that you enter.
You must use "-" where necessary. e.g.: 214-77-8898
not 214778898, unless you have the 'Only numerics
in SSN fields' option selected on the Options,
Sounds and Colors form. If this option is set,
then any value can be put into the search string
as Collect! will only search the database on the
numeric value.
Find By Social Prompt
A list of matching records will be displayed.
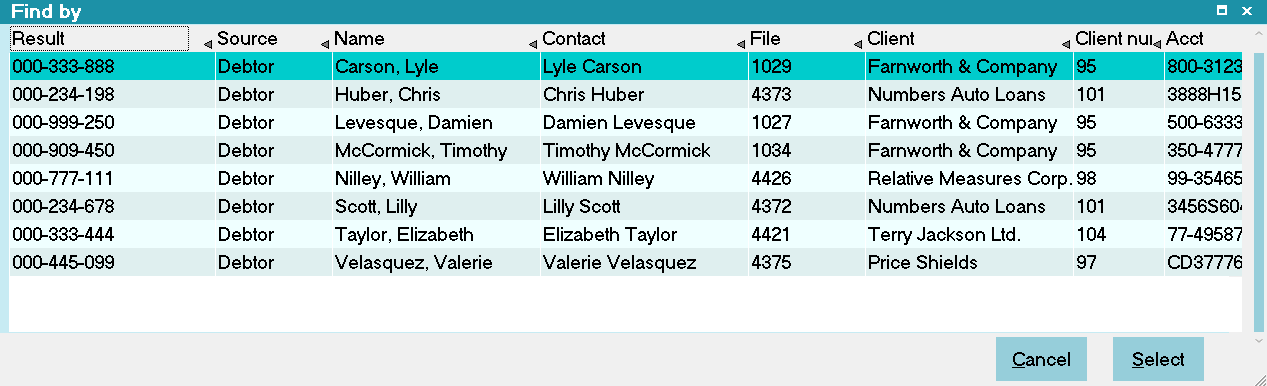
Find By Social Results
Use hot key CTRL+F3 to access Find By SSN.
By default, wildcard searching on this
field will only look at the last 4 digits
in the database. To enable full wildcard
searching, select the "Full SSN Wildcard"
box on the Account Matching Setup form.
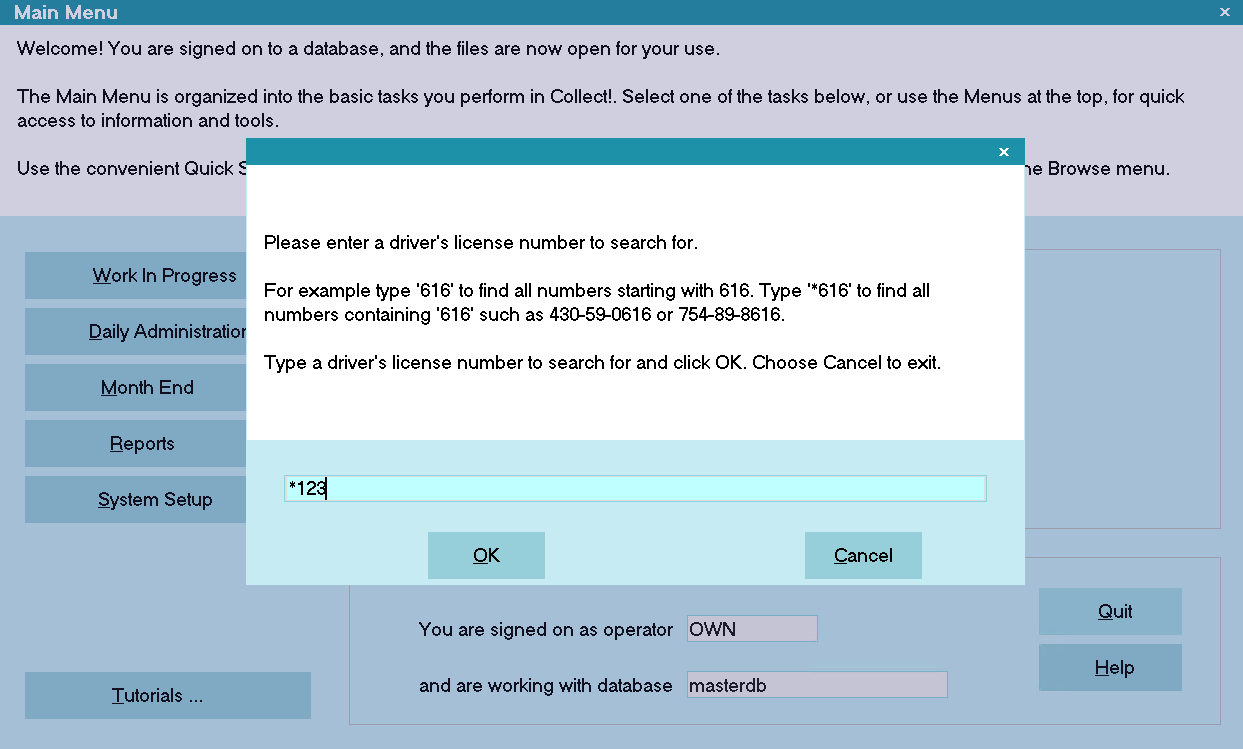
Debtor Date Of Birth
This option, Find By Date of Birth, searches
the list of Debtors for the Date of Birth that
you have entered. You must be accurate to
the day when entering the date of birth.
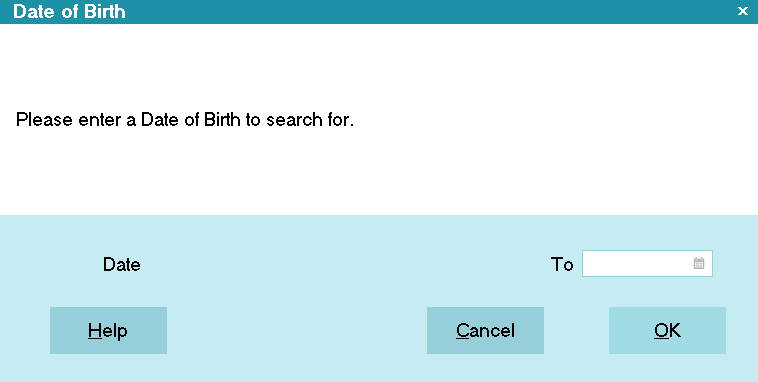
Find By Date of Birth Prompt
A list of matching records will be displayed.
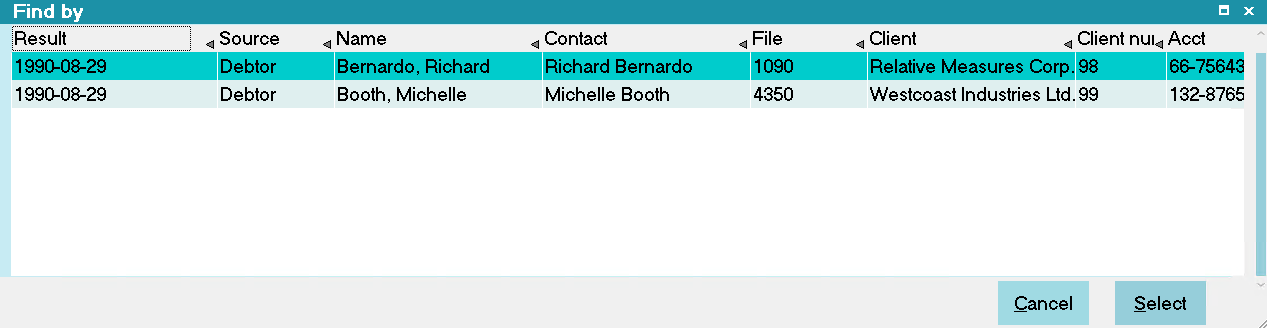
Find By Date of Birth Results
Use hot key CTRL+F4 to access Find By DOB.
Debtor Driver's License
This option, Find By Driver's License, searches the
list of Debtors for a close match to the driver's license
ID you have entered.
Find By Driver's License Prompt
A list of matching records will be displayed.
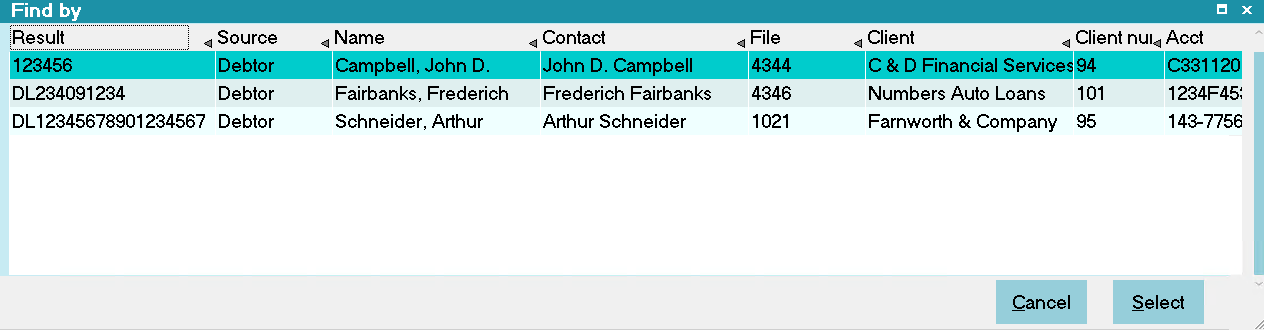
Find By Driver's License Results
Use hot key CTRL+F5 to access Find By Driver's License.
Debtor Email
This option, Find By Email, searches the list of
Debtors for a close match to the debtor's Email
address you have entered.
Find By Email Prompt
Example:
Type 'support@' to find all email addresses
starting with 'support@'.
Type 'support' to find all email addresses
containing support, such as tech-support@test.com.
A list of matching records will be displayed.
Find By Email Results
Use hot key CTRL+F6 to access Find By Email.
Debtor File Number
This option, Find By File Number, searches the
list of accounts for a file number. Only exact
matches are displayed.
Find By File Number Prompt
You should not have two or more records
with matching file numbers.
Use hot key CTRL+F7 to access Find By File Number.
Debtor Account Number
This option, Find By Account Number, searches the
list of accounts for all records containing the
string that you enter.
Find By Account Number Prompt
Example:
Type '616' to find all numbers starting with '616'.
Type '*616' to find all numbers that contain '616'.
A list of matching records will be displayed.
Find By Account Number Results
Use hot key CTRL+F8 to access Find By Account Number.
Debtor City
This option, Find By City, searches the list of
Debtors for all accounts containing in the City
field, the text string that you enter.

Find By City Prompt
Example:
Type 'vic' to find all city names beginning with 'vic'.
Type '*ria' to find all city names containing '*ria'.
A list of matching records will be displayed.
Find By City Results
Use hot key CTRL+F9 to access Find By City.
Debtor State
This option, Find By State, searches the list of
Debtors for all accounts containing in the State
field, the text that you enter.
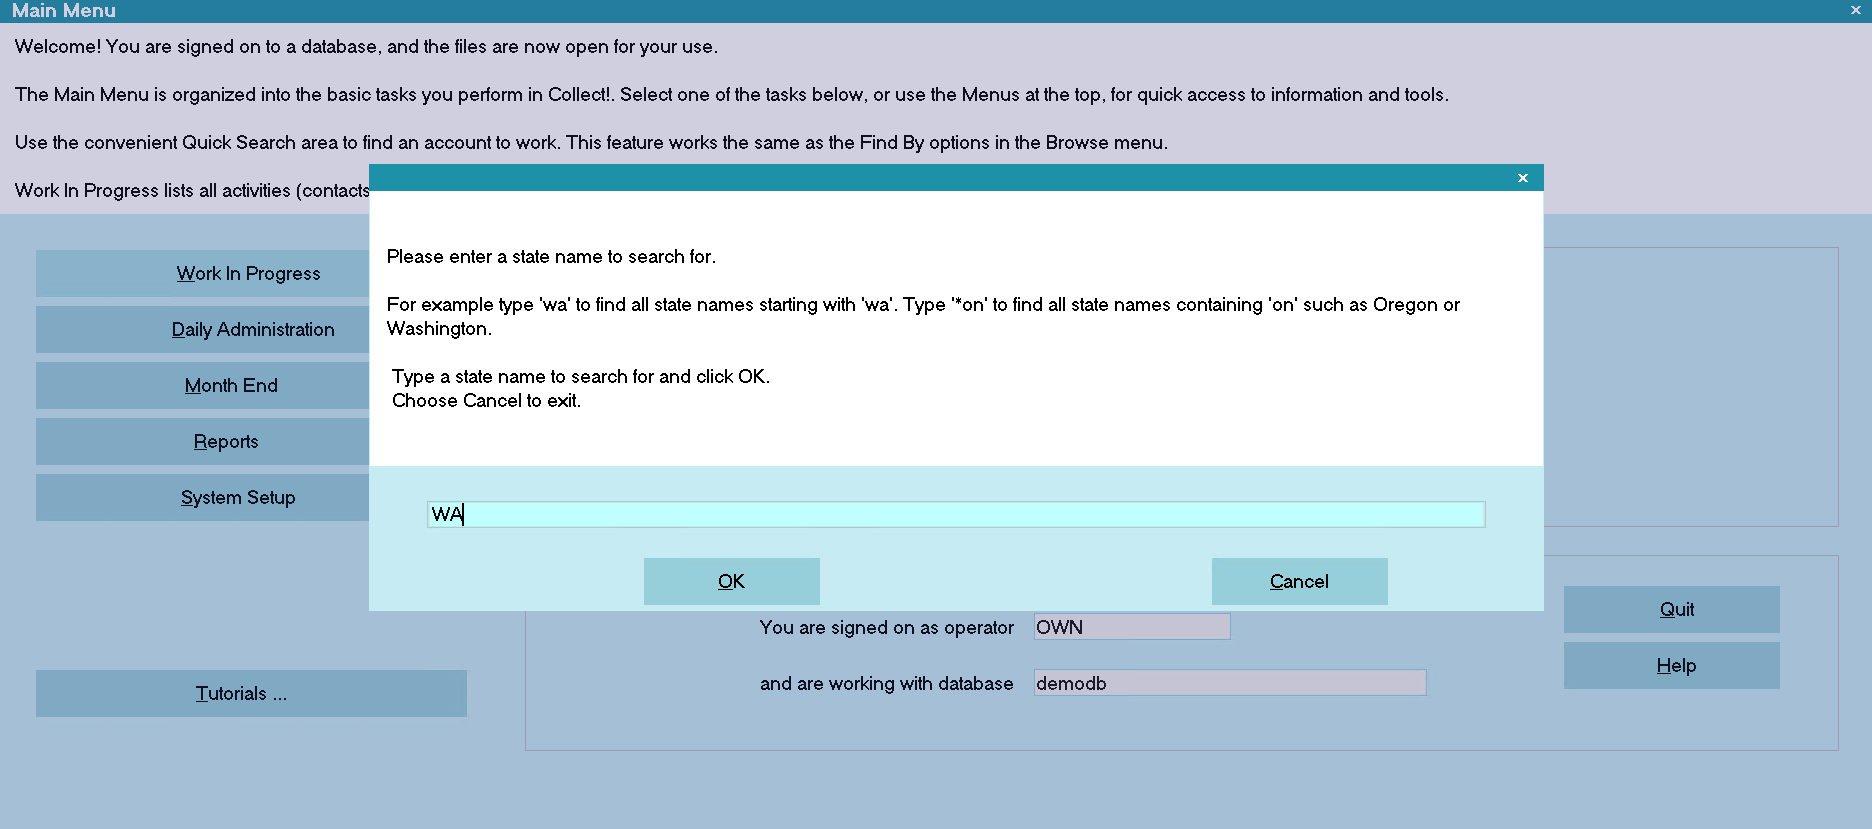
Find By State Prompt
Example:
Type 'wa' to find all states that begin with 'wa'.
Type '*wa' to find all state names containing 'wa'.
A list of matching records will be displayed.
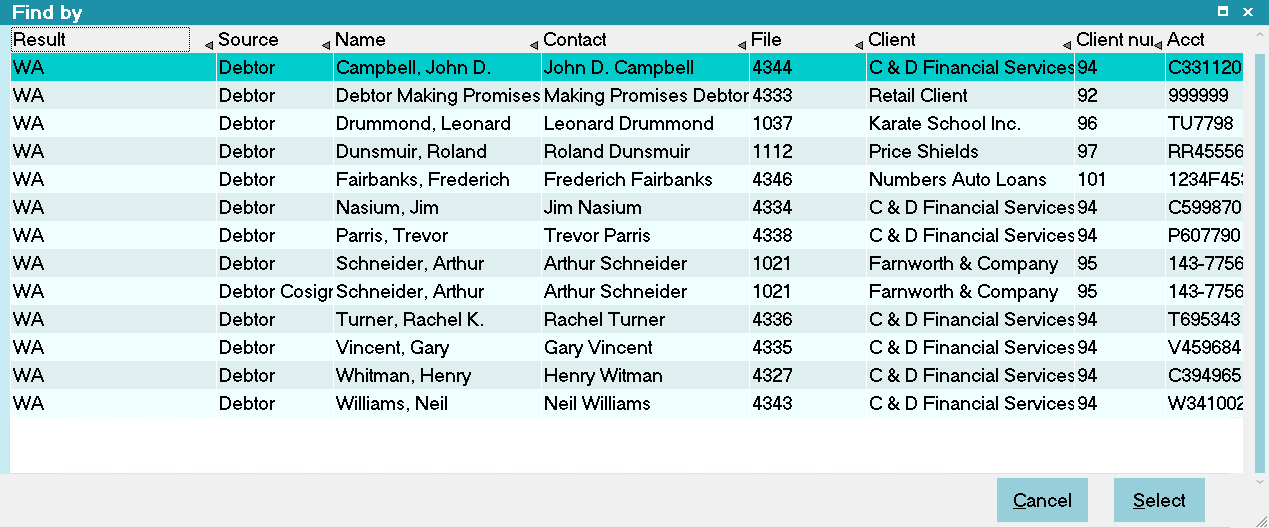
Find By State Results
Use hot key CTRL+F10 to access Find By State.
Debtor ZIP
This option, Find By Zip, searches the list of
Debtors for all accounts with Zip codes starting
with the numbers that you enter.
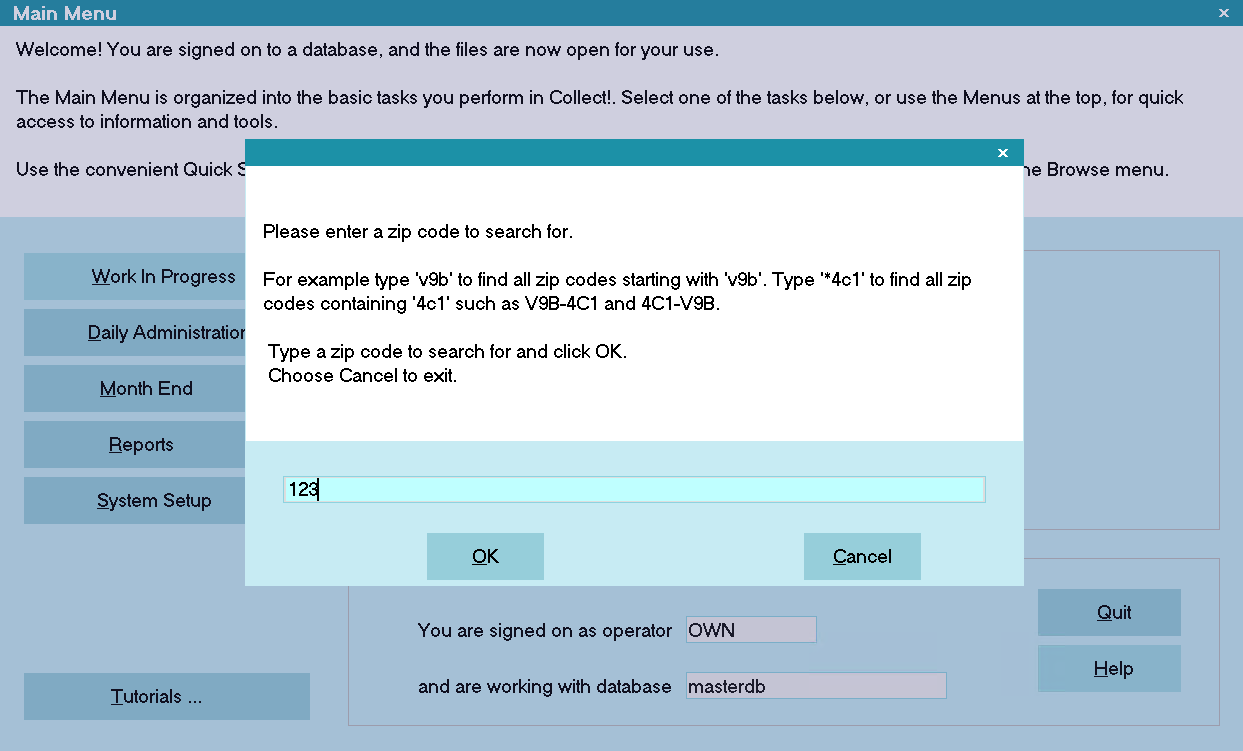
Find By Zip Prompt
Example:
Type 'v9b' to find all zip codes starting with 'v9b'.
Type '*4c1' to find all zip codes containing '4c1'.
A list of matching records will be displayed.
Find By Zip Results
Debtor Street
This option, Find By Street, searches the list of
Debtors for all accounts with a Street address
matching the criteria that you enter in the Address
Information form. Criteria such as City, State and
ZIP may be used to narrow down the search.
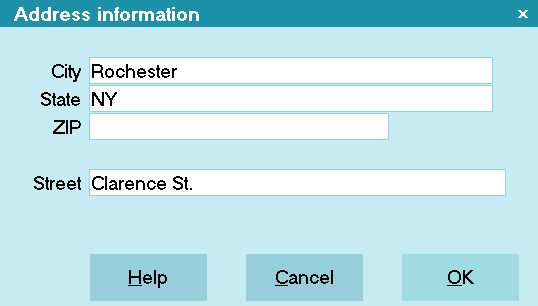
Address Information
This Find By option searches for Street addresses that
match the data you entered.
A list of matching records will be displayed.
You can see from the results whether the address
match was found on the Debtor or the Cosigner record.
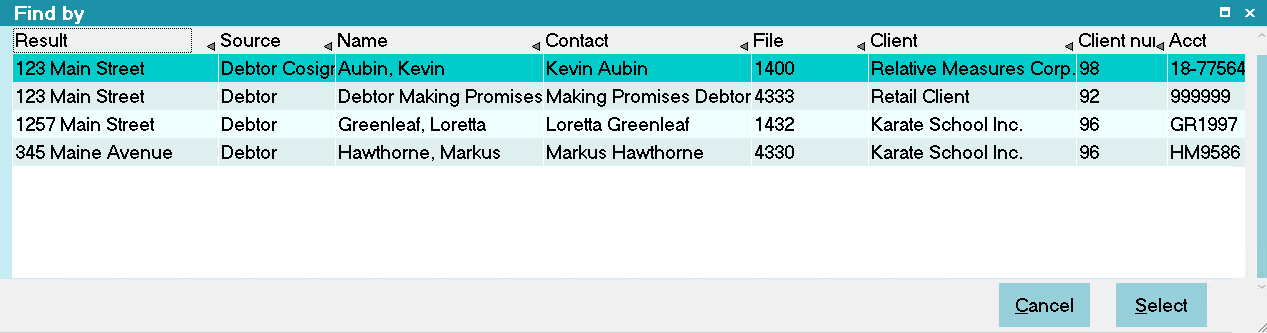
Find By Street Results
Select this option to display the Address Information
form. Press F1 for more help.
Debtor Attachment Index 1
This option searches the list of Debtor attachments
for a text string in the Index 1 field that contains
the text that you enter. Partial matches are listed.
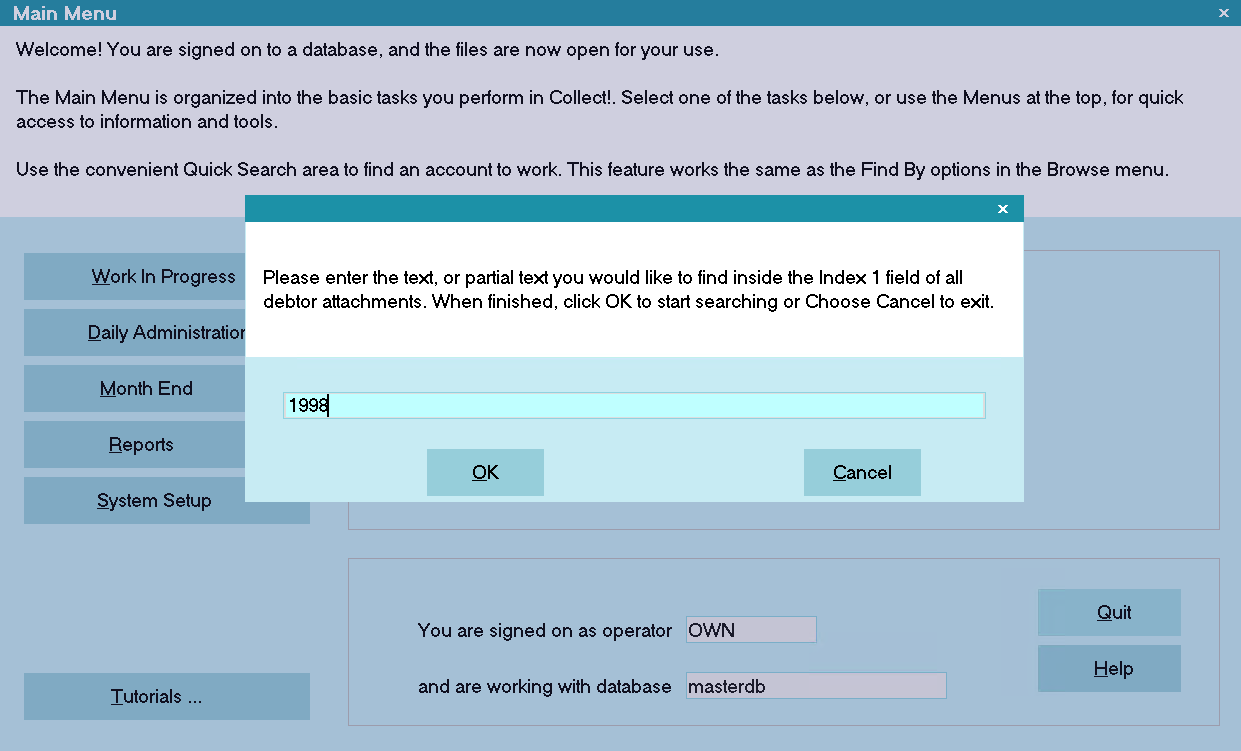
Find By Index Prompt
A list of matching records will be displayed.
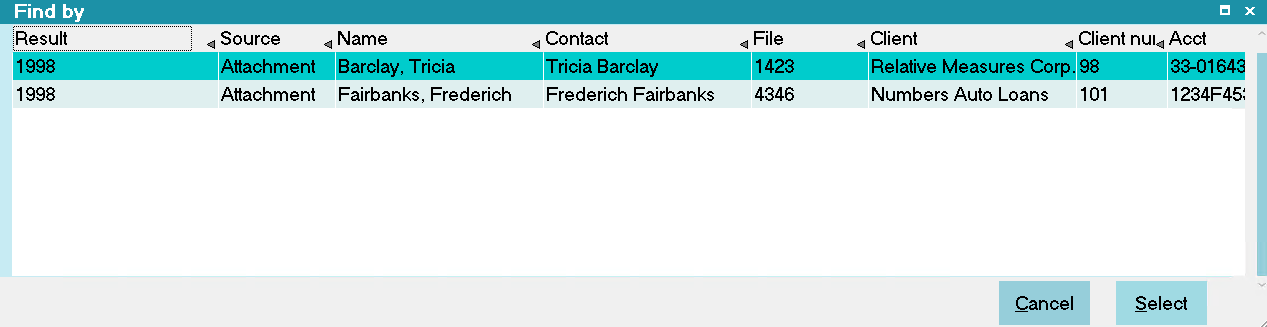
Find By Index Results
Debtor Attachment Index 2
This option searches the list of Debtor attachments
for a text string in the Index 2 field that contains
the text that you enter. Partial matches are listed.
Debtor Attachment Date 1
This option searches the list of Debtor attachments
for a date in the Date 1 field that matches the date
range you enter.
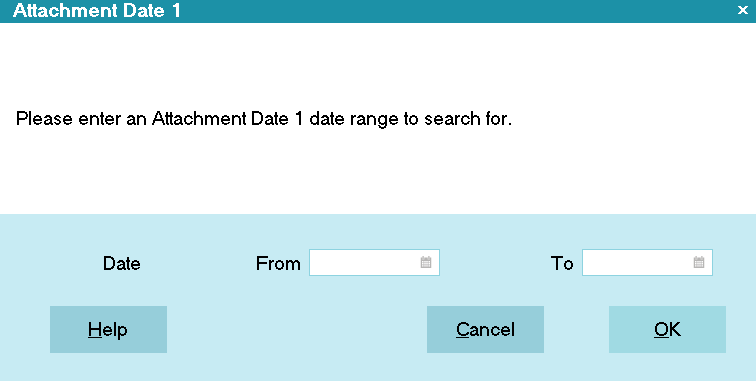
Find By Date Prompt
A list of matching records will be displayed.
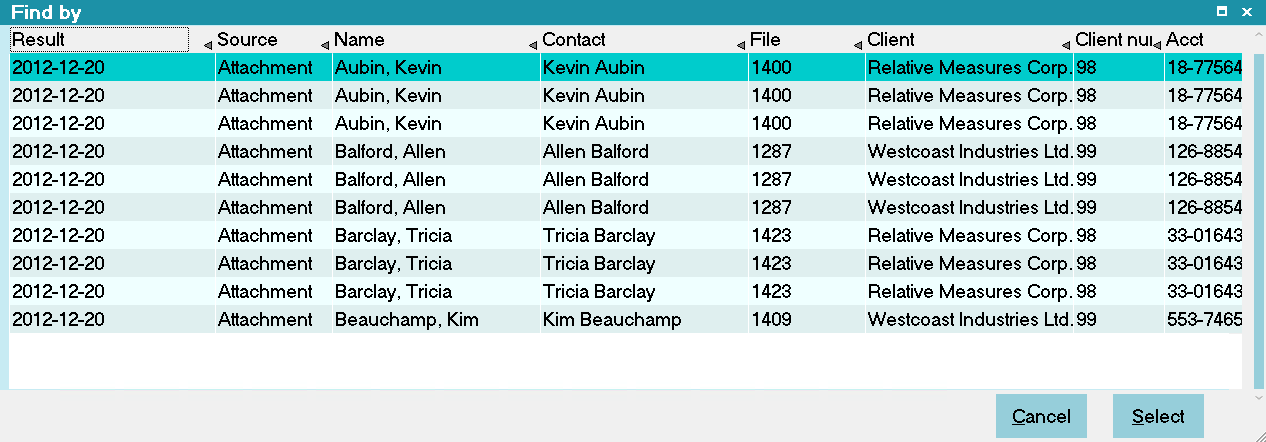
Find By Date Results
Debtor Attachment Date 2
This option searches the list of Debtor attachments
for a date in the Date 2 field that matches the date
range you enter.
Debtor Attachment Date 3
This option searches the list of Debtor attachments
for a date in the Date 3 field that matches the date
range you enter.
Debtor Transaction Invoice #
This option searches the list of Debtor transactions
for a number in the Invoice Number field that matches
the number you enter.
Debtor Transaction Alt Invoice #
This option searches the list of Debtor transactions
for a number in the Alt Invoice Number field that matches
the string you enter.
Debtor Transaction Receipt #
This option searches the list of Debtor transactions
for a number in the Receipt Number field that matches
the number you enter.
Debtor Transaction Alt Receipt #
This option searches the list of Debtor transactions
for a number in the Alt Receipt Number field that matches
the string you enter.
Find By Hot Keys
You can type in a hot key from anywhere in the system
to quickly bring up the Find By screen.
| Hot Key |
Function |
| Ctrl+F1 |
Find by Name |
| Ctrl+F2 |
Find by Phone |
| Ctrl+F3 |
Find by SSN |
| Ctrl+F4 |
Find by DOB |
| Ctrl+F5 |
Find by DL |
| Ctrl+F6 |
Find by Email |
| Ctrl+F7 |
Find by File Number |
| Ctrl+F8 |
Find by Client Account Number |
| Ctrl+F9 |
Find by City |
| Ctrl+F10 |
Find by State |
| Ctrl+F11 |
Find by Street |
Find By For Client Operators
If you provide your clients with access to your desktop
application version of Collect, you can enable your Clients
to browse for records in your database, using the Browse,
Find By feature, while restricting them to only view their
own accounts.
As an alternative, you can provide Clients access to your
system via the web browser interface using Web Host.
Client Name
This option, Find By Name, searches the list of
clients for the name you enter.
A list of matching clients is displayed.
This function searches the Client Name and lists
all matching names. For example to find all
instances of Fred type 'Fred'.
To search for a set of characters in the middle
of a name, type *Fred (or whatever you need).
The * tells Collect! to search all names for a name
containing the typed characters. For example,
if you know there's a 'Fred's A-1 Body Shop' in
your system, you could type '*A-1' and it will
come up with both 'Fred's A-1 Body Shop' and
'Erma's A-1 Cleaners'.
Searching with the * is a lot slower than just
typing the first few characters of the desired
name because the system has to read every single
key and search it for matching characters.
Client Phone
This option, Find By Phone, searches the list of
clients for the phone number you enter. You
must use "-" where necessary. e.g.: 214-777-8898
not 2147778898, unless you have the 'Only numerics
in phone fields' option selected on the Options,
Sounds and Colors form. If this option is set,
then any value can be put into the search string
as Collect! will only search the database on the
numeric value.
Client Email
This option, Find By Email, searches the list of
clients for a close match to the Client's Email
address you have entered.
Example:
Type 'support@' to find all email addresses
starting with 'support@'.
Type 'support' to find all email addresses
containing support, such as tech-support@test.com.
Client Number
This option, Find By Client Number, searches the
list of clients for a client number. Only exact
matches are displayed.
Client Alt Client Number
This option, Find By Alt Client Number, searches the
list of clients for all records containing the string
that you enter.
Example:
Type '616' to find all numbers starting with '616'.
Type '*616' to find all numbers that contain '616'.
Client Owned By Client
This option, Find By Owned by Client, searches the
list of clients for all records containing the numeric
string that you enter.
Example:
Type '616' to find all numbers starting with '616'.
Type '*616' to find all numbers that contain '616'.
Client City
This option, Find By City, searches the list of
clients for all clients containing in the City
field, the text string that you enter.
Example:
Type 'vic' to find all city names beginning with 'vic'.
Type '*ria' to find all city names containing '*ria'.
Client State
This option, Find By State, searches the list of
clients for all clients containing in the State
field, the text that you enter.
Example:
Type 'wa' to find all states that begin with 'wa'.
Type '*wa' to find all state names containing 'wa'.
Client ZIP
This option, Find By Zip, searches the list of
clients for all clients with Zip codes starting
with the numbers that you enter.
Example:
Type 'v9b' to find all zip codes starting with 'v9b'.
Type '*4c1' to find all zip codes containing '4c1'.
Client Street
This option, Find By Street, searches the list of
clients for all clients with a Street address
matching the criteria that you enter in the Address
Information form. Criteria such as City, State and
ZIP may be used to narrow down the search.
Select this option to display the Address Information
form. Press F1 for more help.
Client Attachment Index 1
This option searches the list of client attachments
for a text string in the Index 1 field that contains
the text that you enter. Partial matches are listed.
Client Attachment Index 2
This option searches the list of client attachments
for a text string in the Index 2 field that contains
the text that you enter. Partial matches are listed.
Client Attachment Date 1
This option searches the list of client attachments
for a date in the Date 1 field that matches the date
you enter.
Client Attachment Date 2
This option searches the list of client attachments
for a date in the Date 2 field that matches the date
you enter.
Client Attachment Date 3
This option searches the list of client attachments
for a date in the Date 3 field that matches the date
you enter.
Client Invoice #
This option searches the list of client invoices
for a number in the Counter field that matches
the number you enter.
Client Receipt #
This option searches the list of client invoices
for a number in the Check field that matches
the number you enter.
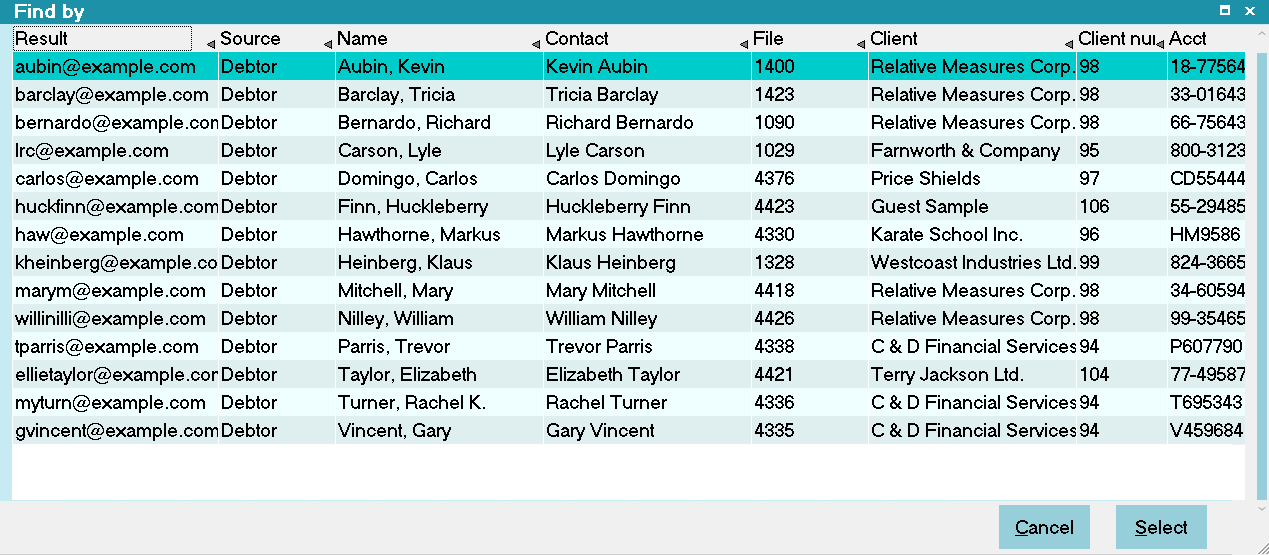
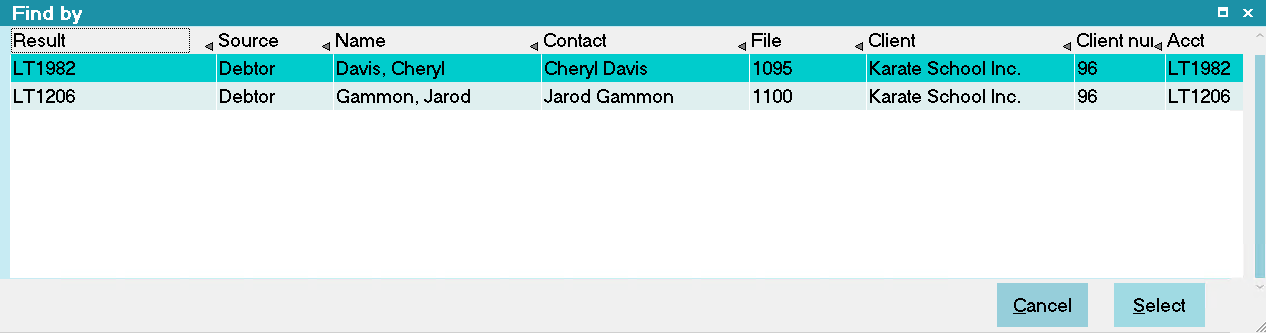
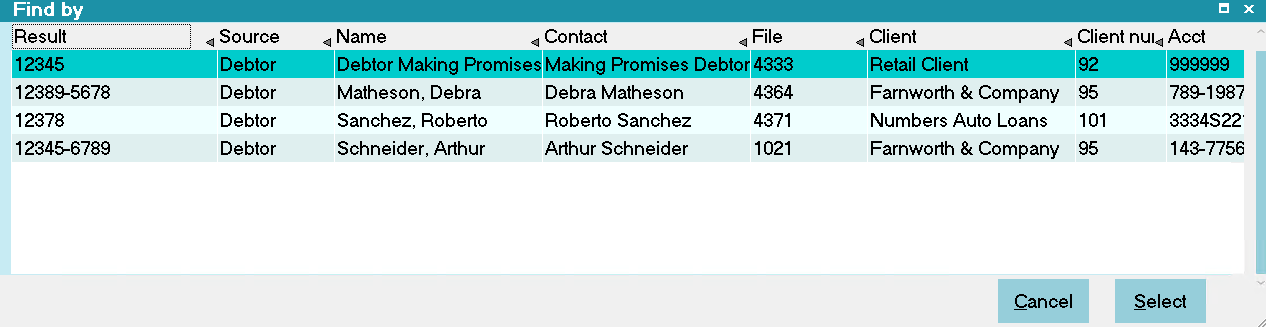
Find By Result List Fields
Result
This column will display the database value that was
returned from the search query. For example, if you searched
by Name, it will display the name that was returned. If you
searched by Phone, it will display the phone number that was
returned.
Source
This column will display the record that returned the result.
For example, if you search on Name and it was a Cosigner that
was found, it will display Cosigner in this column.
Name
This column will display the Name of the Debtor or Client that
the result is associated with.
Contact
This column will display the Contact of the Debtor or Client that
the result is associated with.
Number
This column will display the File Number of the Debtor or Client Number
of the Client that the result is associated with.
Owner Name
This column will display the Client Name of the Debtor or Owned By Client Name
of the Client that the result is associated with.
Owner Number
This column will display the Client Number of the Debtor or Owned By Client Number
of the Client that the result is associated with.
Account
This column will display the Acct of the Debtor or the Alt Client Number
of the Client that the result is associated with.
Listed
This column will display the Listed Date of the Debtor or the Client Listed Date
of the Client that the result is associated with.
Charged
This column will display the Charge Date of the Debtor that the result is associated
with. For Clients, this will be blank.
Owing
This column will display the Owing of the Debtor or the sum of the Debtors Owing
of the Client that the result is associated with.
Database Query
You can use SQL queries to search for records. These queries can be executed in a report, or via
a database access tool like SQL Server Management Studio.
WARNING: Executing SQL queries directly can cause damage to your database, if you are not familiar
with SQL. Please contact Technical Support for assistance in building custom reports.
| 
Was this page helpful? Do you have any comments on this document? Can we make it better? If so how may we improve this page.
Please click this link to send us your comments: helpinfo@collect.org