How To Use Judgements In Collect!
Judgement information is handled in two places in Collect! Both are accessed while viewing a Debtor form. Judgements are
normally set up after the original information has been entered for the debtor. The important fact to remember about Judgements
is that Collect! completely ignores any financial information prior to the Judgement Date. Therefore, if you should need to keep
pre-Judgement financial information, there are a few extra steps that you need to complete.
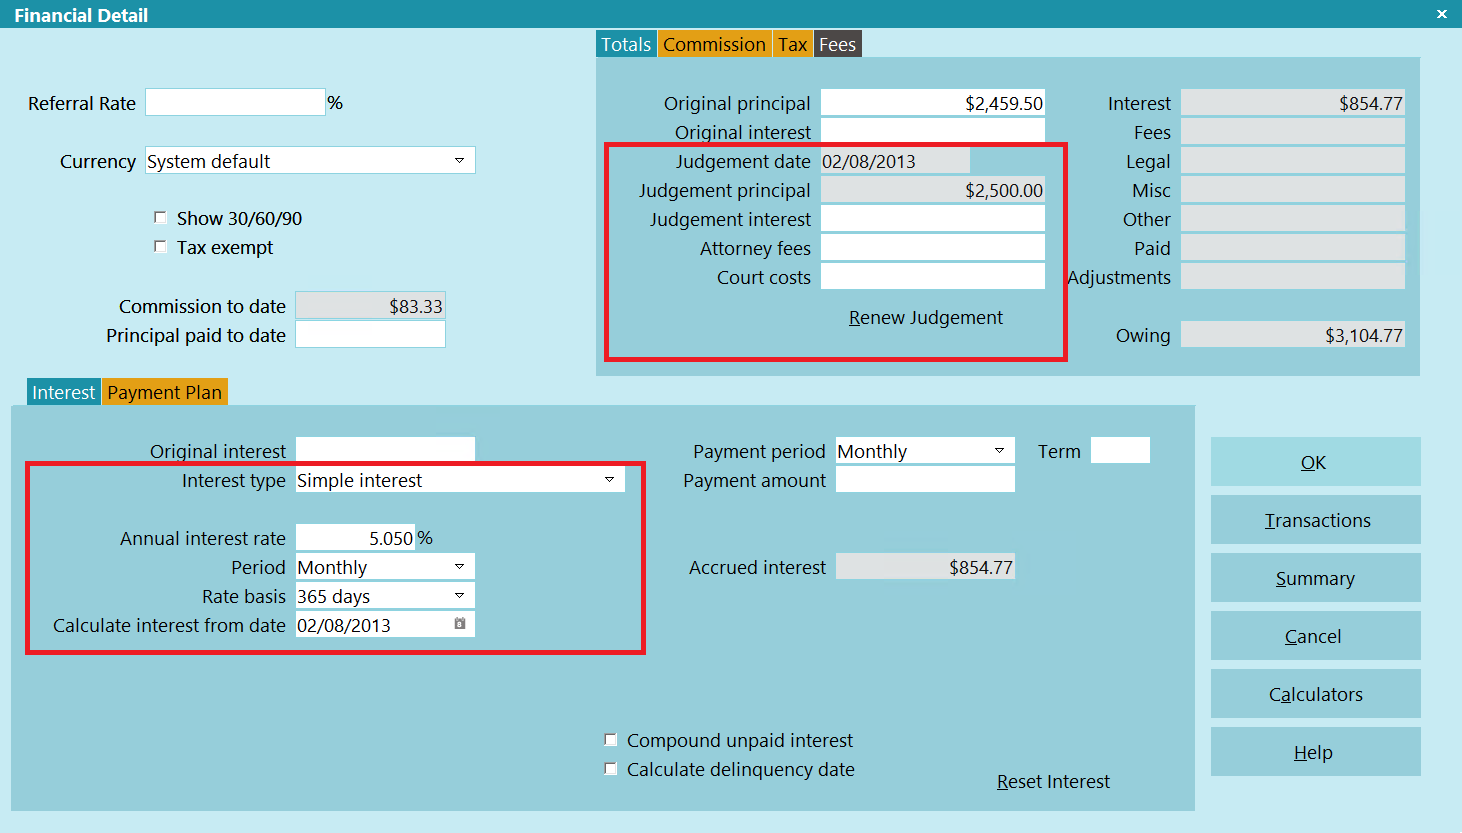
Judgement Date and Judgement Principal are entered using the Financial Detail form. To access this form, select the field
labeled Principal on the Debtor form. If it is not important to you to keep previous financial information, then simply fill in
the Judgement Date field and then the Judgement Principal field will display for you to enter the Judgement amount. If you need
to keep the prior financial information for this account, you will need to post transactions to capture the accrued values,
PRIOR to entering the Judgement Date.
Judgement interest is set through the Debtor form by selecting the Interest field. This will show you the Interest Detail form.
Enter the Original Judgement Interest and/or the Interest Rate for the Judgement. If you need to save any prior fees or accrued
interest, you should post transactions to capture these amounts, PRIOR to setting up the Judgement information.
Entering Judgement Information
When a Judgement is entered in Collect!, all calculations on a go forward basis will use the Judgement Principal. Any interest
calculated will use the new Judgement Principal starting from the Judgement Date. Collect! changes the field labeled
Principal to Judgement. The field actually changes color to notify the operator that this is now a Judgement account. All
transactions and Original Principal information will be ignored prior to the Judgement Date entered.
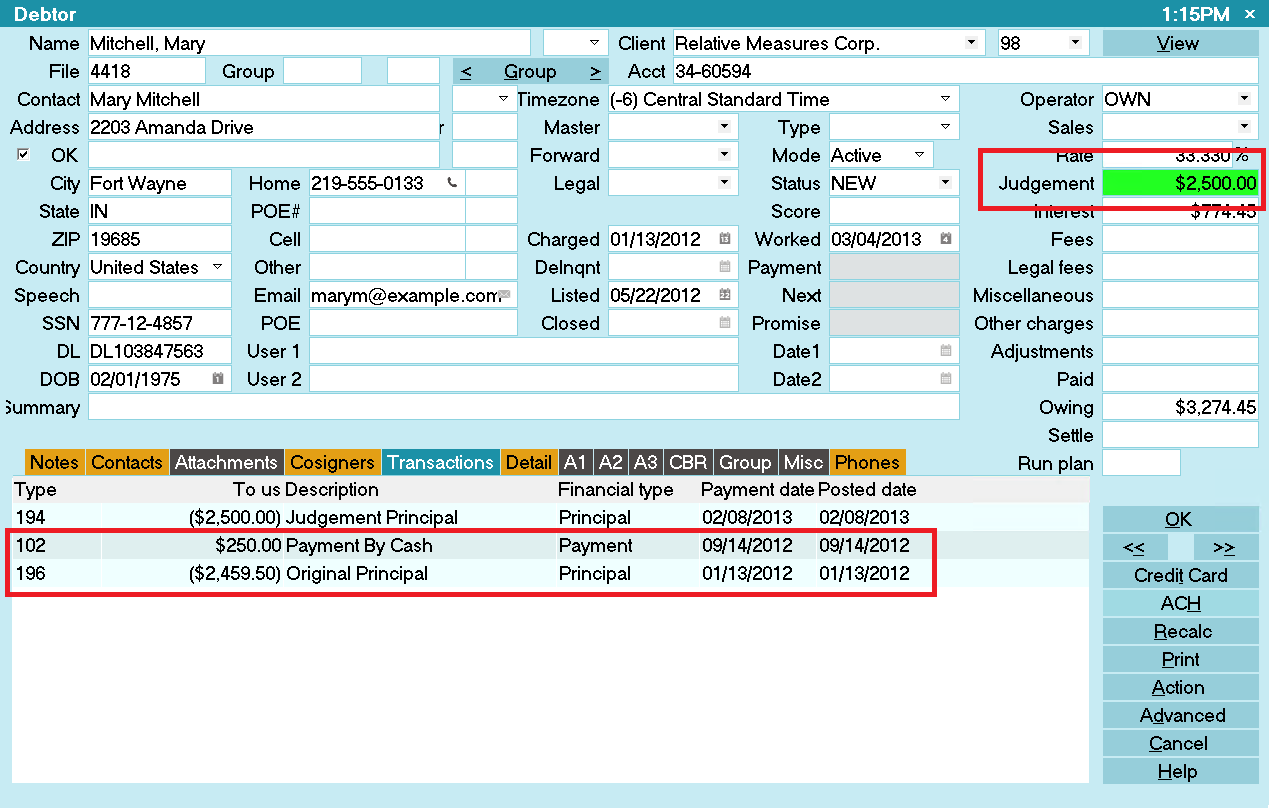
Debtor Form
Collect! will make sure Judgement values in the Financial Detail and the 194 Judgement Principal transaction are always
synchronized. When a Judgement exists, the fields will be grayed out in the Debtor's Financial Detail. You can enable them by
deleting the 194 Judgement Principal transaction. If you modify the Date or Amount on the 194 Judgement Principal transaction, th
e
Financial Detail will be updated automatically.
When calculating interest on Judgement accounts, Collect! will always use the Judgement Date as the earliest date to
calculate interest from. Multiple 194 and 195 transactions are ignored. The active one is the most recent of each. If a
Judgement Date is set, ALL other principal type transactions are ignored.
 If you need to post additional interest transactions on the account, you can use any other interest type transaction,
such as the Type 495, Additional Judgement Interest.
If you need to post additional interest transactions on the account, you can use any other interest type transaction,
such as the Type 495, Additional Judgement Interest.
Collect! looks for Financial Type "Interest" when adding up all the interest on the account, posted AFTER the Judgement
Date. It displays this total interest on the Debtor form. However, the Judgement Interest field will only display the Original
Judgement Interest amount stored in the 195 transaction.
Many users have extra information such as case number. Or, perhaps you have scanned the Judgement documents. This
kind of information can easily be entered using an Attachment on the Debtor form.
Entering The First Judgement
1. Go to the Debtor.
2. Navigate to the Financial Detail form by clicking on the Principal field or Advanced button.
3. Enter a Judgement Date.
 If there is any accrued interest, Collect! will provided a pop-up asking if you want to post it in order
to have the history of the pre-judgement interest.
If there is any accrued interest, Collect! will provided a pop-up asking if you want to post it in order
to have the history of the pre-judgement interest.
4. Enter the Judgement Principal.
5. Optional: Enter the Judgement Interest, Attorney Fees, and Court Costs.
 WARNING: Collect! uses predefined Transaction Types for Judgements. Principal is 194, Interest is 195,
Attorney Fees is 394, and Court Costs is 294.
WARNING: Collect! uses predefined Transaction Types for Judgements. Principal is 194, Interest is 195,
Attorney Fees is 394, and Court Costs is 294.

Judgement Renewals
1. Go to the Debtor.
2. Navigate to the Financial Detail form by clicking on the Principal field or Advanced button.
3. Click the Renew Judgement button to enabled the Judgement Date field.
4. Enter a Judgement Date.
If there is any accrued interest, Collect! will provided a pop-up asking if you want to post it in order
to have the history of the pre-renewal judgement interest.
5. Enter the Judgement Principal.
6. Optional: Enter the Judgement Interest, Attorney Fees, and Court Costs.
WARNING: Collect! uses predefined Transaction Types for Judgements. Principal is 194, Interest is 195,
Attorney Fees is 394, and Court Costs is 294.
Judgement Principal Adjustments
By default, Collect! ignores all transactions that are Financial Type Principal when a Judgement is involved. Before you can post
an adjustment, you need to create a Transaction Type for it. Here is an example.
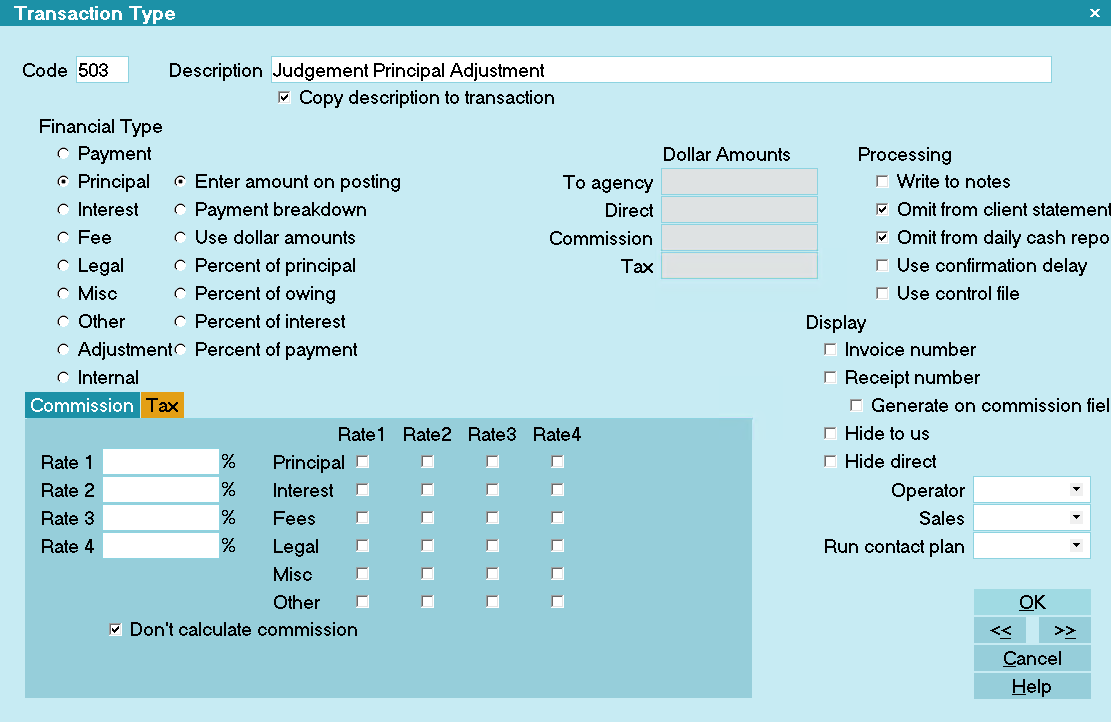
Judgement Principal Adjustment Transaction Type
In order to post a Judgement Principal Adjustment, you need to do the following:
1. Go to the Debtor.
2. Navigate to the Transactions Tab and click NEW.
3. In the type field, select or type in the code for the Adjustment Type.
4. Fill in the To Us field with the adjustment amount.
5. Navigate to the Transaction Detail tab and enter the following string in the User 7 field: JudgementPRAdjust
This is the only way to get a Principal Transaction to modify the Principal amount on the Debtor.
You can automatically fill the User 7 field with the text string with a Control File. Using the 503
example above, create or add to an existing Control File on the Transaction Type field (Access Right
transaction:type) and put in the following text:
@SETtr.u7 = JudgementPRAdjust if ( @tr.ty == 503 )
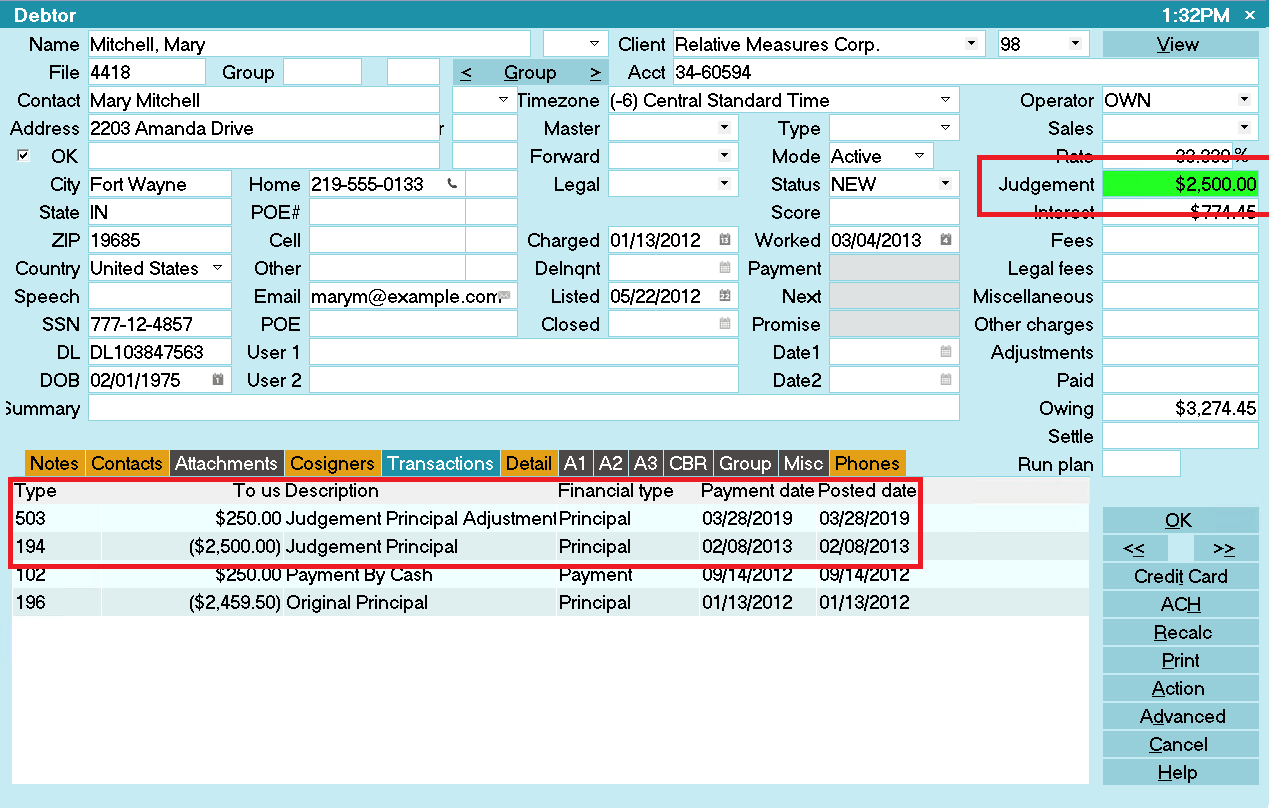
Judgement Before Principal Adjustment
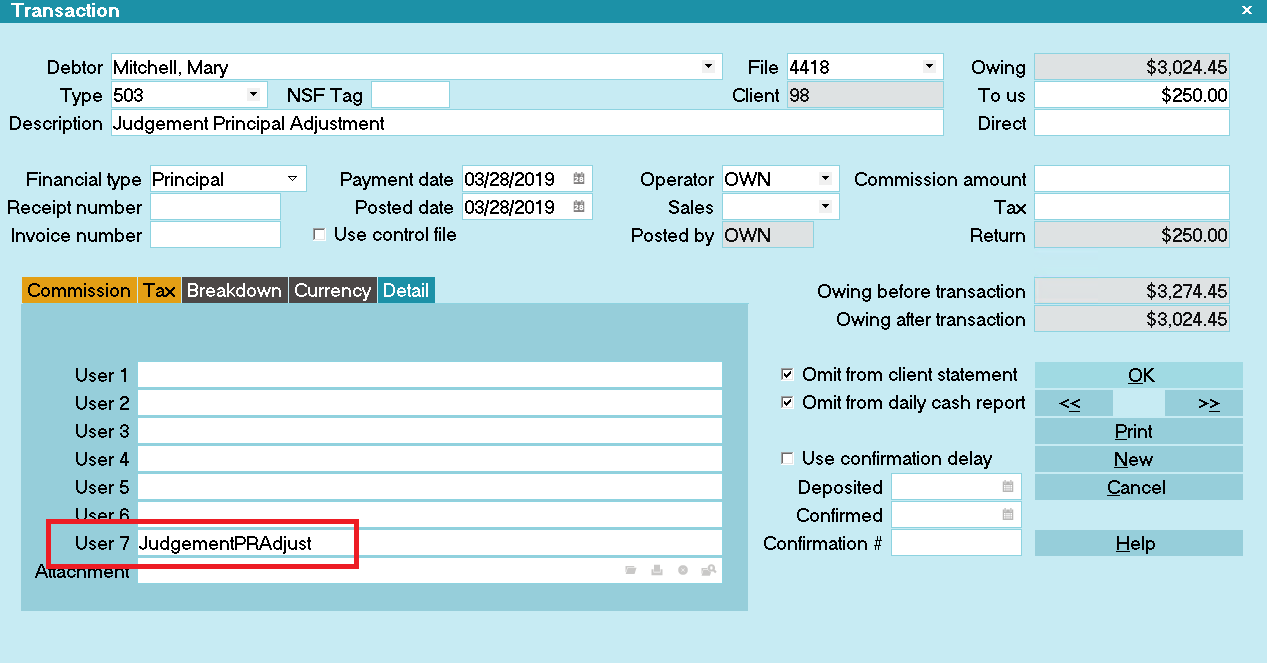
Judgement Principal Adjustment Transaction
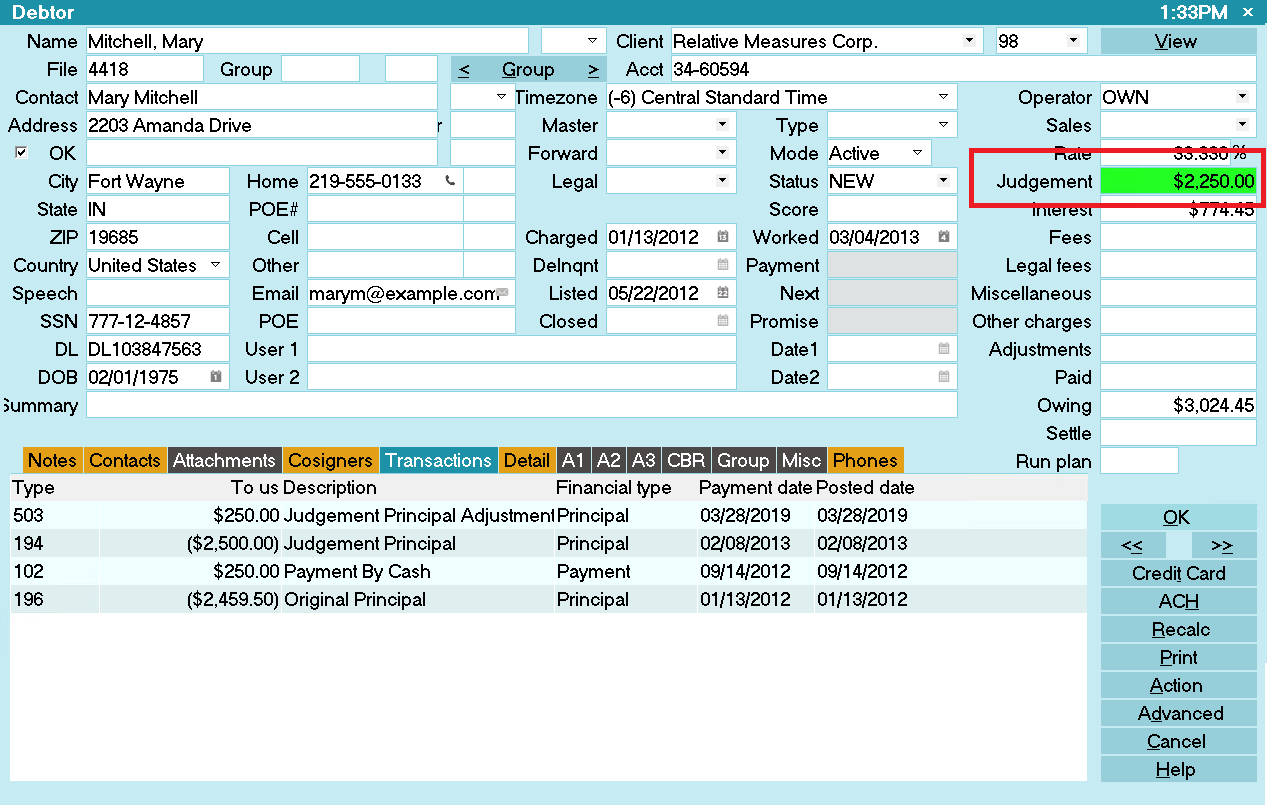
Judgement After Principal Adjustment
| 
Was this page helpful? Do you have any comments on this document? Can we make it better? If so how may we improve this page.
Please click this link to send us your comments: helpinfo@collect.org