How To Setup Account Matching
Where one debtor has multiple accounts in your office, it is efficient inventory management strategy to mitigate redundancy and
lost opportunities (i.e. payout given without a collector's awareness that there were additional debts owed) by grouping
accounts together.
To enable the system to perform logic checks for you automatically as accounts are being entered manually or grouped by a batch
process, there is an Account Matching Setup window that needs to be filled out. This setup window will contain your company's
preferences and parameters that the system will use as default settings to decision whether each incoming account is the same
person as any debtor in pre-existing inventory. It also contains general defaults that will govern what other possible actions
will, or will not, happen as a function of accounts being grouped together.
The Account Matching Setup window is located via the menu path "System\Preferences\Plans and Reference Tables\Account Matching
Setup".
The window is organized into sections labelled Options, Check, Copy, Cascade and Advanced Match Conditions.
Options
Enable Account Matching
Check this ON if you want to use automated account matching. Leave it unchecked if you will not be utilizing grouping at all.
Prompt before cascading changes
Check this ON if you want the system to give you a popup window to which the user must respond by clicking Yes or No each time
it prepares to cascade data across the group. Leave this unchecked if you want the system to cascade information as per the
switch settings, with no prompt to the user.
Prevent cascade when closed
Check this ON if you want the system to ignore any account with Mode "Closed" that may be part of a group when information is
available to be cascaded. This is a popular switch to have turned ON where agencies are required by their clients to cease
documenting accounts in any way once accounts have been closed/recalled/reassigned to other agencies. This switch ensures
only accounts with Mode Active (and any status) will be eligible for auto-cascade.
Cascade Phone Deletions
Check this ON if you want the system to remove the same phone number on all accounts in the group at the same time (Mode Active
or Closed being governed by the switch above). Leave this unchecked if you do not want auto-removal of a phone number on all
matching accounts.

Check
The switches in this section decide whether a user will be presented with a browse list of "near" matches when data-entering
New Business or keying in a search for a specific debtor.
Recommendation is to leave all of the switches in this section OFF rather than have your staff being inundated with lists of
accounts that are not remotely related to the new debtor or account being searched for.
Copy
The switches in this section are inquiring for specific fields you may, or may not, wish to have auto-copied to NEW accounts
from EXISTING accounts if there is a grouping taking place.
Recommendation is to leave all of these switches in this section OFF. If there is any error or omission in existing inventory
OR the new account incoming has more recent / good demographics, then having this switch ON will mask that data with the
overwrites. Additionally, if your office does litigation, you would not want to alter the exact name with which the debtor
entered into their obligation with the creditor.
Cascade
The switches in this section pertain to how the system will handle updates made to an account that is a member of a group of
accounts. There are 11 different types of cascades you can turn ON or OFF, as per your site's preferences. Because these
switches overwrite existing data on all files in the group (Active or Closed, depending on a separate switch under Options),
we recommend extreme care be taken and that your Access Rights "Log to Notes" switches are set on individual fields.
Because typographical errors can also occur with staff doing field updates that will cascade, you may also wish to limit which
fields are allowed to cascade.
 Cascade Notes increases productivity many fold as now your collectors will NOT have to copy/paste their notes onto
multiple accounts to ensure that all of the files in the group have received workstandard activity compliant with
your clients' expectations.
Cascade Notes increases productivity many fold as now your collectors will NOT have to copy/paste their notes onto
multiple accounts to ensure that all of the files in the group have received workstandard activity compliant with
your clients' expectations.
Advanced Match Conditions
This section governs what criteria will be used to decision whether an incoming account is a match to one or more accounts
already existing in your database AND what fields to make comparisons with when accounts are being manually grouped together by
a user.
Collect! ships with a set of default match conditions that should be reviewed and updated for your site's preferences before
commencing to group accounts manually or via batch process.
The entry area is visual, but represents Boolean logic checks: reading across horizontally, these are fields which are joined
by "AND" conditions. Example, the match will only be made if the Name AND social security number of the NEW account compared to
an existing account are the same. If that is not true, then the decision tree moves to the next condition. The separate lines
of conditions are joined by an "OR" mathematical operator. It is the "OR" condition that allows the process to continue to read
vertically through the four lines of logic the system provides to define matching criteria. While it sounds laborious, the
software manages these checks live while a staff member is working or in batch mode very quickly.
Accounts which are successfully matched will become associated with a system assigned Group ID Number along with the sequential
Group Member Number each account is separately assigned to distinguish each account within the group.
Group Tab On Debtor Accounts
After you have setup the global Account Matching Setup, you can fine-tune your data sharing options on a per group and
individual account level. When you are on a Debtor screen, click the Group Tab to access the Group Details window. This will
list all debtors in the group and summary totals representative of all debtor accounts in this group.
There is a Member Setup button in this screen. Click the button when any particular group member is selected and you will see
the settings for that specific Debtor.
If you modify any settings on this specific debtor that differ from the system global Account Matching Settings for which
fields to share/cascade across all files, it will be these new, individual settings that will override the global defaults from
that point forward. This can be useful if you have a client with different preferences as compared to the rest of your database.
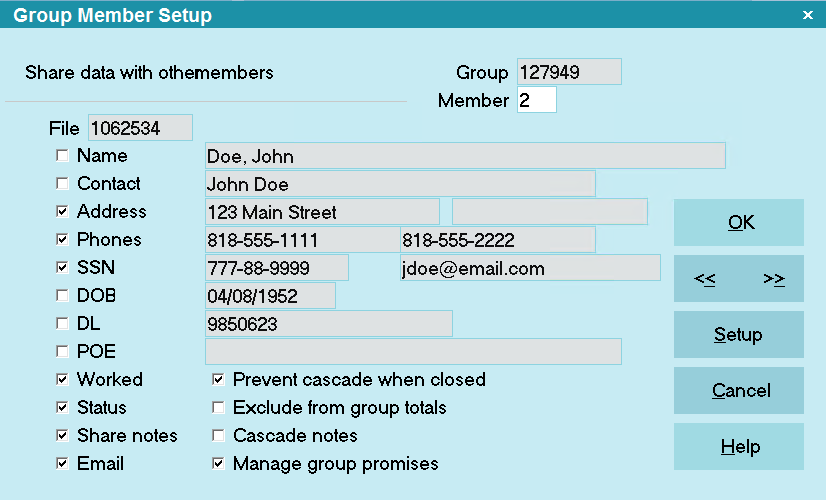
Group Member Setup Window
The Shared Notes tab provides a thumbnail view of ALL notes on ALL accounts within the group consolidated into a single Shared
Note tab. If a user is looking for a specific note in a particular date range but does not recall which individual file it may
be located on, this tab would be a handy utility tool.
The switch within the Group Member Setup does not automatically turn itself on. There is a Write back report on the Member
Center in the Utility Reports and Snippet section which Members may download to set these switches globally in their existing
grouped accounts and add into contact plans to routinely switch on the items of interest in new accounts grouped go forward.
The mini-package with instructions is called "Group Notes - Cascading and Share Notes Tab".
Adding A New Debtor To An Existing Group
When you enter a new Debtor and Collect! finds matching accounts in the database, it will alert you and allow you to add this
new Debtor to the existing group. The procedure for adding the Debtor, at this point, is the same as ordinary grouping
procedure described in Help on Grouping Debtors below.
| 
Was this page helpful? Do you have any comments on this document? Can we make it better? If so how may we improve this page.
Please click this link to send us your comments: helpinfo@collect.org