How To Setup The Auto Dialer
The Auto Dialer in Collect! works with your Windows Dialer/TAPI settings, softphones/protocols (SIP, TEL, SKYPE, etc.), or URL
strings. This document describes how to connect your phone lines, your computer's modem and telephone handset, and then enable
the auto dialer.
If you can dial a number using the Windows Phone Dialer, then you can also dial using Collect!.
 Please ensure that you have installed the Phone Dialer that is part of your operating system software. Check
that this feature is functioning outside of Collect!. If it is not installed or does not work, it will not
work in Collect! either.
Please ensure that you have installed the Phone Dialer that is part of your operating system software. Check
that this feature is functioning outside of Collect!. If it is not installed or does not work, it will not
work in Collect! either.
Windows Dialer / TAPI
Connect the phone line from the wall to your computer modem's Line input. Connect your telephone to the modem's Phone input.

If Your Computer Does Not Have A Modem
If you are on a network, there are alternative ways to set up auto dialing.
Multi-line business phone systems cannot be used with modems, which require a single telephone data line to operate. Some
multi-line phone systems will support a computer's phone dialer, and some will not. You will need to consult your
telecommunications service provider to determine this in your own case.
Another way of setting up the auto dialer on a network-wide basis is to use "Voice Over IP" (VOIP). This passes the
telephone voice signals over your IP (Internet) connection, thus integrating your telecommunications and computer
network systems. Setting this up is beyond the scope of this document, but a wealth of information on this
subject is available on the Internet, and from your telecommunications and Internet service providers.
If your phone provider has a TAPI driver which allows you to dial a number using the Windows Phone
Dialer (dialer.exe), then Collect!'s Auto Dialer will work transparently for you.
Collect! can also communicate with the softphone of your choice, provided your O/S is configured already to handle
the softphone communication protocol you specify. Please see below for further details.
Set Up The Auto Dialer
Select System from the top menu bar and then select Preferences and then select Auto Dialer Setup.
OR
From the Main Menu, choose System Administration. Then, from the System Administration menu, choose Setup and Configuration.
Then select Auto Dialer Setup when the System Setup menu is displayed.
Make sure any settings you want customized are correct for your operations. All other settings should be left as they are.
Click on OK to save the settings.
 To configure your TAPI interface use the Windows Control Panel.
Set Up Operators Using Auto Dial
From the menu path "System\Preferences\Plans and Reference Tables", select WIP Options.
Enable this feature by checking the box labeled Automatically Display Dialer.
If all other click-to-dial functionality has been configured on your site to allow Operators to dial their phones directly
from a Collect! window, then enabling this preference switch and clicking to Save as Default for the company will invoke
Collect! to automatically dial the phone number when an Operator is in their WIP list and the Contact Event which has presented
on their screen is a Phone Type.
Softphone
You can use a softphone for your Collect! auto dialed calls. This feature allows you to click on a phone number directly
or the phone icon beside a phone number and the system will automatically dial the number for you. It can be configured
to present the user with a prompt to dial pop up or to dial in the background without prompting by setting the switches
with your preference in \System\Preferences\Auto Dial Setup.
This requires that your operating system is set up to handle the softphone protocol of your choice. This feature also
enables UDP protocol dialing.
This option is set at the \System\Rights\Operator screen.
1. Open the Operator window for the user you want to set up for softphone, and click into Detail Tab.
2. Click the check box beside "Use softphone for dialer" to enable this setting.
3. Enter the prefix for the protocol you want the system to use for your automated dialing in the "Note 2" field.
For example: "sip:" or "tel:"
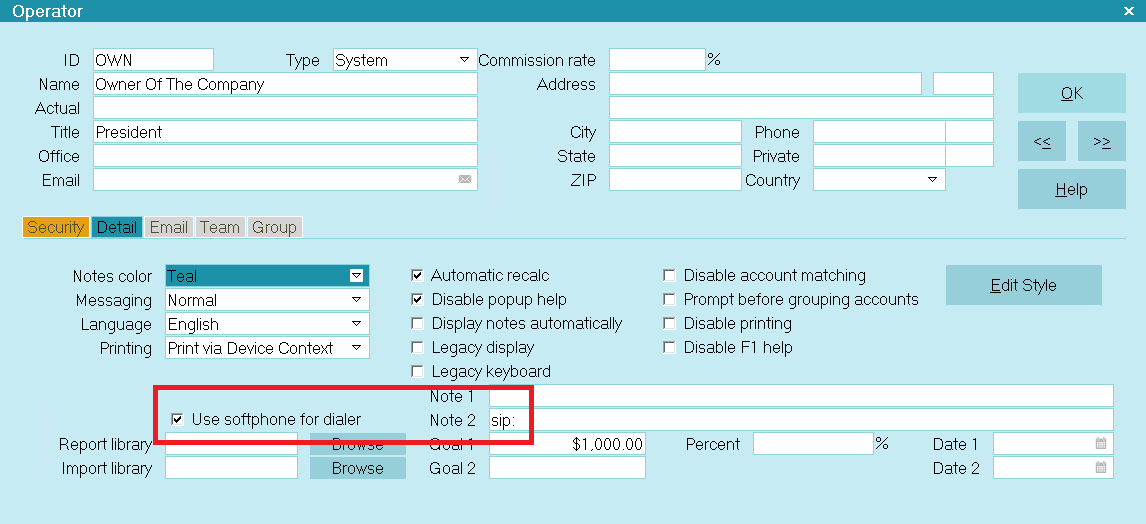
Softphone Settings in Operator Detail
Once you have enabled these settings, all use of the dialing features will be sent to the program registered with your O/S
as the default protocol handler for softphone calls.
UDP Protocol Dialing
With of a few configuration settings, Collect! can be made to integrate with UDP Protocol dialing systems.
The UDP dial string is constructed in the following way:
UDP/:[ipaddress]:[port];[extension]#authcode (optional)
UDP/: This static string starts the setup.
[ipaddress]: This is the IP Address of the dialer. *** MUST be followed by a colon.
[port]: This is the Port the dialer's IP Address is listening on. *** MUST be followed by a colon.
[extension] This is the Operator's Phone Extension.
#authcode This static string is an optional command to add ClientNumber[4]DebtorNumber[8] to the UDP dial
string.
UDP Redirect Setup
1. From the menu path \System\Rights\Operator screen, enter the Detail Tab and switch ON "Use softphone for dialer" for
every user that you wish to be using the automatic dial feature.
2. In the "Note 2" field, enter the command string in the following format:
UDP:/ipaddress:port:extension
Example:
UDP:/192.168.2.122:1544:452
When the user clicks a phone number, Collect! will send "extension,number" to the IP Address and Port via UDP protocol.
UDP Redirect Setup
Example of Resulting String Sent:
452,5551237777
This requires that your dialing system is able to read the dialing string that Collect! submits. This may require
custom programming for implementation. Contact Tech Services if you have questions or requests for integration with
third party dialing systems.
Authorization Code for UDP String
There is an optional parameter in the UDP string configuration that enables you to send an "Auth Code" with your UDP string by
using the command #authcode. This is required for security with some systems.
By default, the #authcode command will send 4 digits of the Client Number followed immediately by 8
digits of the Debtor File Number. The resulting Authorization Code is ALWAYS 12 digits.
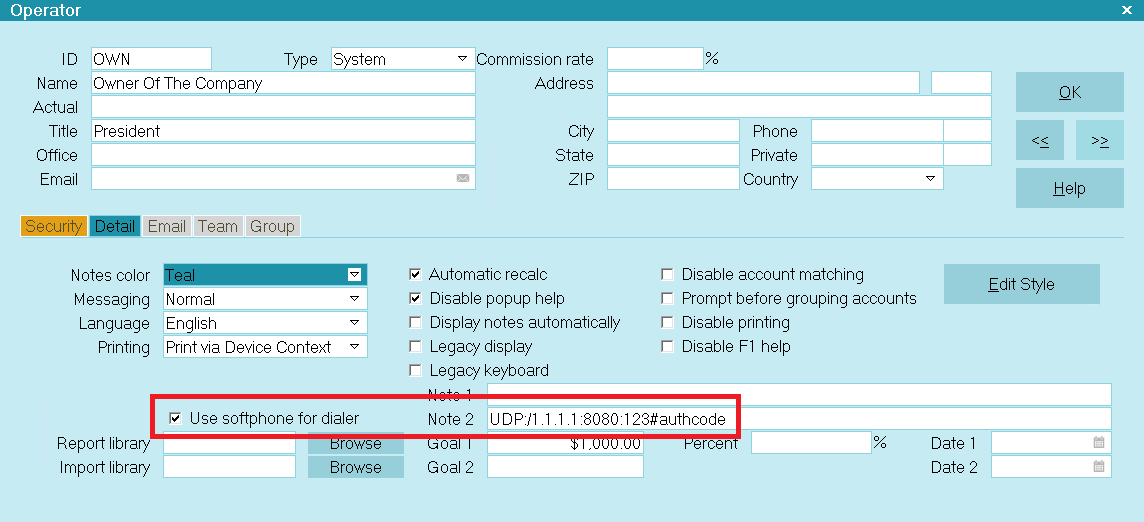
In the \System\Rights\Operator screen, enter the Detail Tab and enter the command string in the "Note 2" field in the following
format:
UDP:/ipaddress:port:extension#authcode
Example:
UDP:/1.1.1.1:8080:123#authcode
When the user clicks a phone number, the system will send "extension,number,ClientNumber[4]DebtorNumber[8]"
to the IP Address and Port via UDP protocol.
UDP Redirect Setup with Authorization Code
Example of Resulting String Sent:
452,5551237777,123412345678
Example - Auth Code Format
When Collect! detects the parameter #authcode, it pulls 4 digits of the Client Number, immediately followed
by 8 digits of the Debtor Number, to create a unique 12 digit Auth Code to add to the UDP string.
1. Client Number: LAST FOUR digits.
2. Debtor Number: LAST EIGHT digits.
3. Insert LEADING ZEROES if needed.
Example:
Client # 24
Debtor File # 4585
Collector Extension 109
Dialing phone number 818-555-1111
Resulting UDP string:
109,8185551111,002400004585
If the user dials clicks to dial from any area in Collect! where the Client Number and/or Debtor Number are not
applicable, the #authcode command is ignored.
Resulting UDP string:
109,8185551111
URL Dialing
The Auto Dial functionality is capable of URL softdialing with compatible phone systems, allowing the use of
an IP Address to dial their API from Collect!.
Operator Setup and Requirements:
- 'Use softphone for dialer' must be selected on the Operator Detail tab
- The Operator Detail Note 2 field must contain the file name of the dialstrings file stored in the config\dialstrings
folder with the file extension ".dialstring"
- The Operator Detail Note 1 field may contain the username and password of the API, if the API requires one. The username
and password must be separated by an "&" which means that the username cannot contain this character
- In the config\dialstrings folder, you need to have a file containing the API URL that will be passed to the
web browser
- In the dialstring file, you can use the following commands to pass the appropriate information to the URL:
- @phone - the phone number being dialed
- @user - the username for the API (left of the & character)
- @pass - the password for the API (right of the & character)
You can have a generic dialstring file (global.dialstring) that all users use that is
controlled by the username and password, or if your API is specific to each operator,
you can have an operator specific file (own.dialstring).
Dialstring Examples
Grandstream
This instructions have been tested with the GPX models. For other models, please refer
to the phones user manual.
First you need to configure your phones. Each phone must be done individually. Obtain the login
information from your phone provider. The default username is admin and password is admin, but
if you use a VOIP provider to provision your settings, then the provider may have changed the
password.
Once signed in, go to the Settings menu, then to the Call Features sub-menu. In the list, look
for Click-To-Dial Feature, enable it, and click Save and Apply.
Grandstream phones have 2 API accounts: Admin (0) and User (1). For the examples below, we will
use the Admin account with the default password. Please edit where applicable.
Once the phone is ready, you can now configure your Operators. There are 2 methods:
1. Generic: All Operators use the same config file with the same account. The only settings that
change for each operator is there phone's IP address and possibly the phone password.
This method is easier to maintain as you don't need to have dialstring files for each
Operator. You simply need to set them up in Collect!.
2. Operator Specific: Each Operator has their own config file. This is useful if each phone has
a different username and password.
Generic:
Navigate to the config\dialstrings folder. Create one, if it does not exist. Create or open the
global.dialstring file. Copy the following into the file:
http://@user/cgi-bin/api-make_call?phonenumber=@phone&account=0&password=@pass
We have created a sample file here
that you can download and put into your dialstrings folder. Once downloaded, rename the file to
global.dialstring and place it into your config\dialstrings folder. If you are running a Client
installation, you will need to put this file in the client version of the dialstrings folder.
Navigate to an Operator, go to the Operator Detail tab and configure the following:
Use softphone for dialer: check it
Note 1: 192.168.99.99&admin - where the IP address is the IP address of the phone
Note 2: global.dialstring
Operator Specific:
Navigate to the config\dialstrings folder. Create one, if it does not exist. Create or open the
.dialstring file where is the ID of the Operator that you are configuring.
Copy the following into the file and update the IP address to match the Operator's IP address of their phone:
http://192.168.99.99/cgi-bin/api-make_call?phonenumber=@phone&account=@user&password=@pass
Navigate to an Operator, go to the Operator Detail tab and configure the following:
Use softphone for dialer: check it
Note 1: 0&admin - where 0 is either 0 or 1 for the account and replace admin with the actual password
Note 2: .dialstring
Yealink
This instructions have been tested with the T46S model. For other models, please refer
to the phones user manual.
First you need to configure your phones. Each phone must be done individually. Obtain the login
information from your phone provider. The default username is admin and password is admin, but
if you use a VOIP provider to provision your settings, then the provider may have changed the
password.
Once signed in, go to the Features menu, then to the Remote Control sub-menu. In the list, look
for Action URI Allow IP List, fill in either the Operators workstation IP or type in the word
'any' without quotes, and click Confirm.
Yealink phones have several Outgoing Identities. For the one that you are using, go to the Directory
menu, then to the Phone Call Info sub-menu, and take note of Outgoing Identity value, herein
referred to as {Identity}.
Once the phone is ready, you can now configure your Operators. Due to the design of the Yealink API,
there is only 1 method:
1. Generic: All Operators use the same config file with the same account. The only settings that
change for each operator is there phone's IP address and possibly the phone password.
This method is easier to maintain as you don't need to have dialstring files for each
Operator. You simply need to set them up in Collect!.
Generic:
Navigate to the config\dialstrings folder. Create one, if it does not exist. Create or open the
global.dialstring file. Copy the following into the file:
http://@user/servlet?key=number=@phone&outgoing_uri=@pass
We have created a sample file here
that you can download and put into your dialstrings folder. Once downloaded, rename the file to
global.dialstring and place it into your config\dialstrings folder. If you are running a Client
installation, you will need to put this file in the client version of the dialstrings folder.
Navigate to an Operator, go to the Operator Detail tab and configure the following:
Use softphone for dialer: check it
Note 1: 192.168.99.99&{Identity} - where the IP address is the IP address of the phone and {Identity}
is the value that you noted above (EX: 2011@192.168.2.154)
Note 2: global.dialstring
Calling A Report To Dial A Number
The Auto Dial functionality is capable of calling a report. This allows for complex scenarios as reports
can output to a web link to then submit a call using web forms or Javascript. Reports can also use
SQL to make API calls.
Operator Setup and Requirements:
- 'Use softphone for dialer' must be selected on the Operator Detail tab
- The Operator Detail Note 2 field must contain the name of the report prefixed with the text "report:"
(Example: report:dialer_report).
- In the dialstring file, you can use the following commands to pass the appropriate information to the URL:
As the report won't have access to the Autodialer's @phone command, you will need to reference
the @dph.nu field in the report.
| 
Was this page helpful? Do you have any comments on this document? Can we make it better? If so how may we improve this page.
Please click this link to send us your comments: helpinfo@collect.org