How To Encrypt A Database Column
Use the Always Encrypted Wizard in Microsoft SQL Management Studio to help protect sensitive data stored in a
SQL Server database. Always Encrypted allows clients to encrypt sensitive data inside client applications and never reveal the
encryption keys to SQL Server. As a result, Always Encrypted provides a separation between those who own the data
(and can view it) and those who manage the data (but should have no access).
 WARNING: If you are using the Collect! Web Host, you will need to upgrade to version 9 or higher.
Encrypting Columns
For instructions on how to encrypt columns, please refer to Microsoft's documentation here:
https://docs.microsoft.com/en-us/sql/relational-databases/security/encryption/always-encrypted-wizard.
At present, Collect! only supports Deterministic encryption.
Use the default value for the Encryption Key: CEK_Auto1
Once done, you can run a query to verify that the column was encrypted. The below query is an example of checking that the
SSN column was encrypted.
select top (100) de_sin, de_name from debtor where de_sin is not null

Supported Columns
A list of supported columns can be found in the Collect\bin\schema\column-encryption.txt file. When Collect starts and finds
encrypted columns that are not in this list, it will display a warning and output the unsupported columns to the application log.
The list is a comma separated list with the first part being the table name and the second part being the field name.
Example: debtor,de_sin
WARNING: Encrypting unsupported columns and manually adding them to this list may prevent Collect from working correctly.
ODBC Driver And Networking
Navigate to your Collect\bin\sqlconfig.ini file and replace 'sql driver' with 'ODBC Driver 13 for SQL Server'
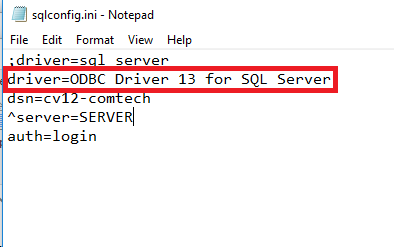
ODBC Driver Setup in sqlconfig.ini
 You can use comments in the INI file by starting a line with a semi-colon.
On your server, you will need to export the Key and Certificate and import it on all of the work stations.
We are working on having Collect! use a certificate store which may be available in a future release.
Exporting your Certificate and Key
1. On your server, go to the Start Menu and search for 'MMC' or navigate to Windows RUN and run 'MMC'
2. When the console opens, go to File -> Add/Remove Snap-ins.
3. Select 'Certificates' and click Add.
4. Select 'My user account' and click Finish. Click OK.
5. Navigate to Certificates - Current User -> Personal -> Certificates
6. Right-click the certificate that you want to export and navigate to All Tasks -> Export.
 If you use different certificates for each column, you will need to export all applicable certificates.
7. On the Wizard Welcome screen, click Next.
8. On the Export Private Key screen, select Yes, then click Next.
9. On the Export File Format screen, leave the defaults, then click Next.
10. On the Security screen, select Password, enter a password, then click Next.
11. On the File to Export screen, navigate to a shared folder and put in a file name, then click Next.
12. On the Completion screen, click Finish.
13. Close the MMC console and select No to saving the changes.
Importing your Certificate and Key
1. On your server, go to the Start Menu and search for 'MMC' or navigate to Windows RUN and run 'MMC'
2. When the console opens, go to File -> Add/Remove Snap-ins.
3. Select 'Certificates' and click Add.
4. Select 'My user account' and click Finish. Click OK.
5. Navigate to Certificates - Current User -> Personal
6. Right-click the Certificates folder and navigate to All Tasks -> Import.
If you use different certificates for each column, you will need to export all applicable certificates.
7. On the Wizard Welcome screen, click Next.
8. On the File to Import screen, click Browse.
9. Change the file type to Personal Information Exchange, navigate to the certificate file, then click Open, then click Next.
10. On the Private Key Protection screen, select Enter the Password, then click Next.
WARNING: You should only ever select the 'Mark this key as exportable.' box if you are transfering the Certificate
and Key to a new server. On a client workstation, a key should not be exportable.
11. On the Certificate Store screen, leave the defaults, then click Next.
12. On the Completion screen, click Finish.
13. Close the MMC console and select No to saving the changes.
If Collect! cannot find a Certificate, column encryption will be turned off and the encrypted columns will be
set to read only.
Collect Database Preferences
Sign into Collect! and navigate to the Database Preferences screen and select the COLUMN ENCRYPTION ENABLED box.
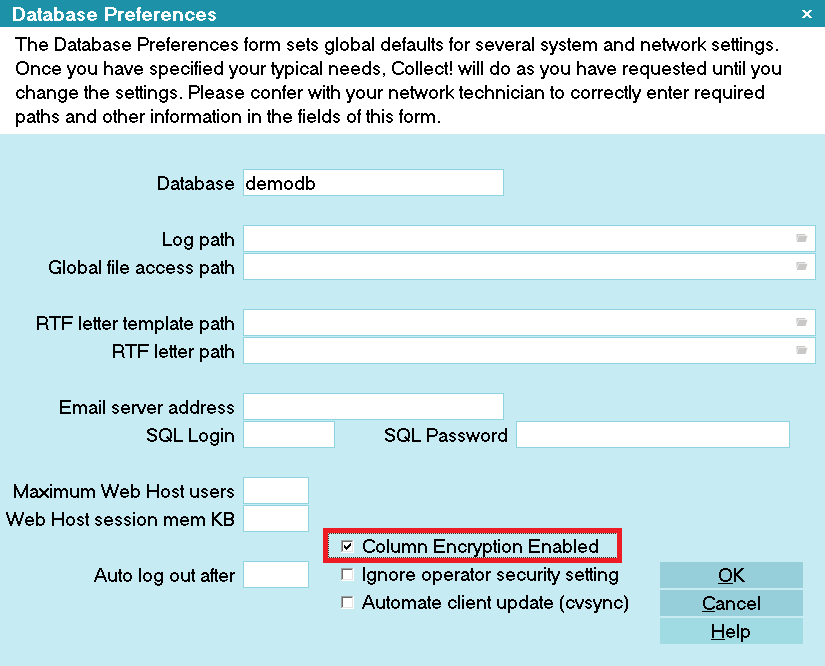
Collect! Database Preferences Setup
Troubleshooting
If you have an encrypted column, but you have not selected the COLUMN ENCRYPTION ENABLED box on the Database Preferences
form, or if you are using the wrong ODBC driver, Collect! will not read the encrypted columns properly. The applicable
fields will be displayed on the form with a Maroon background and will be set to read only. Editing data in the other
fields will not affect the data in the encrypted columns.
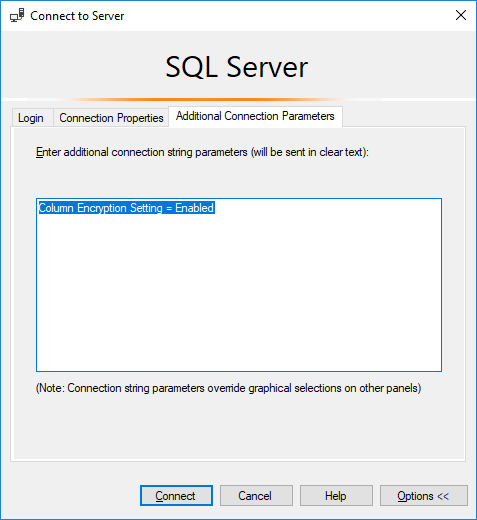
If you are trying to run queries in Management Studio, we recommend adding 'Column Encryption Setting = Enabled' to the
connection parameters. This will allow you to run queries without special formatting. You can find the connection parameters
form by clicking the 'Other >>' button.
Management Studio Connection Parameters
If you use Random Encryption, Collect! won't be able to query the column in areas like Search Criteria or Report loops. You
must use Deterministic Encryption.
You cannot search on a range with encrypted columns. Searching can only be done on an exact match. This also means that
you cannot do partial searches like 'Doe, Jo' (if name were encrypted) or '*1234' to look for the last for characters
of a SSN (if SSN was encrypted).
Encrypted columns cannot be sorted. This will be indicated in the column header where the unsortable columns will have a
red arrow instead of a green one.
| 
Was this page helpful? Do you have any comments on this document? Can we make it better? If so how may we improve this page.
Please click this link to send us your comments: helpinfo@collect.org