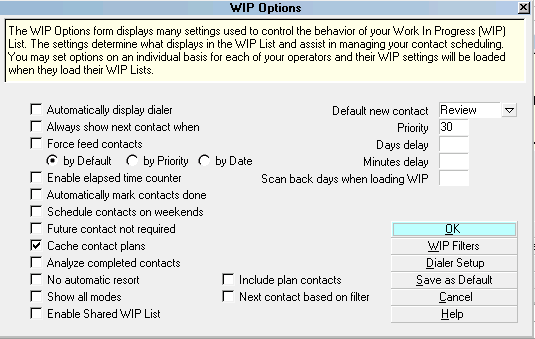
WIP Options Basics
The WIP Options window contains the fine detail controls
that you can use to put the finishing touches on your workplan
strategies, keeping your Collectors focused with structured
orders of operations. These settings and switches can be
set on a per individual basis or can be saved and applied
to all Collectors in the same Operator Level.
 The settings are only applicable when accounts
are being worked from inside a WIP List.
The settings are only applicable when accounts
are being worked from inside a WIP List.
With this flexibility built in, you can mix and match
settings and switches, then observe the different results
they generate. The best way to determine for your own
unique use how you want to set these Fields, is to test
your settings on a representative Level generic ID used
for testing only, and assess how that combination of
settings behaves for you. If you have attained the
desired results, then go ahead and apply the settings
to the live Collector IDs as Saved As Default settings.
We recommend applying and testing combination settings
by applying one switch/setting at a
time. Troubleshooting when you have applied five changes
all at once will blur the root cause if anything doesn't
behave in the expected way.
From the WIP Options screen, you are able to access the WIP
Filters window. This screen has a button leading to the
WIP Reload Filters screen. The WIP Reload Filter screen
is for content controls to be applied to the WIP list
of interest. It allows you to make these changes on
a per user basis OR per Operator Level OR across all
Collectors of any level. If you want to make
changes and save them as default to be applied to all
of your Collectors, make the change once on one Collector
ID then use the Copy Operator Configuration utility
accessible from the menu path \System\Rights\Copy Operator
Configuration and follow the prompts.

WIP Options form
Accessing WIP Options
The WIP Options screen may be accessed in four ways.
Which one you will use will depend on user Level and
personal navigation preference.
- From the menu bar at the top of the screen, click
\System\Preferences\Plans and Reference Tables\WIP
Options.
- From the Main Menu, click \System Administration\
Setup and Configuration\Plans and Reference Tables\
WIP Options.
- From the Main Menu, click the button labeled
Work in Progress, then the Reload button in the upper right
corner of the WIP screen. This will open the Reload Work
In Progress window. The WIP Options button is in the upper
left corner of this screen and will take you to the WIP
Options screen.
- When on any Contact event screen, you can click the Defaults
button in the lower right of the screen to access the WIP Options
window.

See Also
- WIP Options
| 
Was this page helpful? Do you have any comments on this document? Can we make it better? If so how may we improve this page.
Please click this link to send us your comments: helpinfo@collect.org