How To Use Flex Screen
The Flex Screen feature expands the Collect! window size automatically to fit whatever monitor you
are viewing. This feature detects the screen resolution automatically and the Collect! window
stretches to the most appropriate size for the monitor. You can make additional adjustments manually
or return the screen to its native dimensions.
To enable the Flex Screen feature, you must switch it on in a file called uidefault.ini
located in the \Collect\bin folder. This initialization file is read when your system starts up.
You open this file in a text editor such as Notepad or UltraEdit.
The first item in this file appears as follows:
# Enable auto-sizing and Collect! will set the screen size
autosize=yes
Having autosize set to "yes" enables the feature.
Disable Flex Screen
If you do not want Collect! to stretch to fill your monitor, you can set the above-noted feature
switch to "no", or rename the uidefault.ini in the Collect\bin folder so it is not
read.
You also have the ability to customize the Collect! screen dimensions, as follows.

Customize Flex Screen
To customize the dimensions and font that Collect! uses for Flex Screen, you can modify the
uidefault.ini file as described in this topic.
View uidefault.ini
Alternatively, and what is a more current method of initializing session preference controls, you
can create your own INI (initialization) files by using settings in the Target line in of your
desktop Collect! Shortcut called Command Line Arguments. These are included in the Target line path
to your Collect! executable and determine how your session boots up, with what individual preferences
such as screen size, and it can even log you all the way into the system. This allows each
workstation to have different preferences established as can be necessary in office environment where
individuals have different degrees of visual acuity.
Specify An Ini File
If your office requires that all systems initialize with identical settings, Collect! has a special
command line startup option for the Flex Screen. It is /c.
Example:
Collect\bin\cv13.exe /c
Used by itself, this command is just like Collect!'s default behavior. It looks for the
uidefault.ini in the Collect\bin. If you specify a different INI file, that is
what will be read that for all the stations' Flex Screen settings.
Example:
cv13.exe /c{filename}
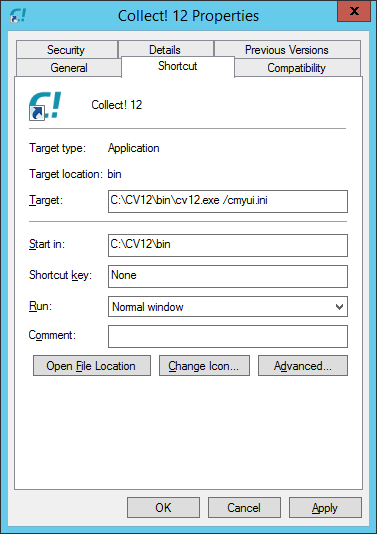
Target: Collect\bin\CV13.exe /cmyui.ini
 INI File Specified in the Command Line
The INI file specified in Collect!'s shortcut Target must be present in the Collect\bin folder. If
you do not specify a file name, Collect! will look for "Collect\bin\uidefault.ini" which will be
used for everyone.
Adjusting Ini Settings
Collect! ships with the uidefault.ini. This may be found in your \Collect\bin folder.
In the INI file, there are several settings that you can set manually. To let Collect! detect the
appropriate settings automatically, set the "autosize" to "yes".
 It is recommended that you use the "autosize" feature set to "yes". It is optional but a
majority user preference to also set the "border" to "yes" and the "fixed font" to "no".
It is recommended that you use the "autosize" feature set to "yes". It is optional but a
majority user preference to also set the "border" to "yes" and the "fixed font" to "no".
# Enable auto-sizing and Collect! will set the screen size
autosize=yes

# Draw a border around the fields
border=yes

# Use a fixed font
fixed=no
 If you set "autosize" to YES, this overrides all other settings, except "border" and
"fixed" font.
If you set "autosize" to YES, this overrides all other settings, except "border" and
"fixed" font.
To enable the following settings, you must set "autosize" to "no".
# Enable auto-sizing and Collect! will set the screen size
autosize=no

#Set a font size (This is like setting /f12 on the command line)
font=12

# Set the horizontal modifier
horizontal=10

# Set the vertical modifier
vertical=20
To create a special initialization on a per workstation basis, see Command Line Setting Options.
Technical Note
The following table shows the auto-sizing parameters used by Collect! when automatically setting the
size of the Collect! screen.
Width, Height , Horizontal, Vertical, Font
{ 2048, 1536, 19, 43, 22 }
{ 1920, 1440, 17, 41, 21 }
{ 1920, 1200, 19, 35, 21 }
{ 1920, 1080, 19, 32, 21 }
{ 1856, 1392, 17, 41, 21 }
{ 1800, 1440, 17, 42, 19 }
{ 1792, 1344, 17, 40, 18 }
{ 1680, 1050, 17, 30, 15 }
{ 1600, 1200, 15, 35, 14 }
{ 1440,  900, 13, 22, 11 }
{ 1360, 1024, 11, 29, 11 }
{ 1280, 1024, 11, 29, 12 }
{ 1280,  960, 11, 27, 12 }
{ 1280,  800, 12, 22, 11 }
{ 1280,  768, 12, 20, 11 }
{ 1280,  720, 11, 21, 11 }
{ 1152,  864, 11, 22, 11 }
{ 1024,  768, 10, 21, 10 }
{  800,  600,  7, 16,  6 }
Alternative To Flex Screen
As an alternative, you have the ability to increase the font size directly instead of using Flex
Screen. This is done with a startup option in your shortcut.
Example:
CV13.exe /f{number}
Target: Collect\bin\CV13.exe /f14
This example will set the font size in Collect! to size 14.
When you maximize the Collect! screen, the window will fill the white space between the fields
to fill your monitor.
|

Was this page helpful? Do you have any comments on this document? Can we make it better? If so how may we improve this page.
Please click this link to send us your comments: helpinfo@collect.org