How To Setup Amortized Interest
This topic discusses the basic layout for Amortized Interest. It is an ADVANCED TOPIC requiring skill in
using Transaction Types and posting Transactions.
Requirements
- Setup Transaction Types
- Review posting Transactions
- Review help on Interest Detail

Overview
Collect! can handle every standard type of interest calculation. To setup the calculating of interest, use
the Interest Detail form. Access this form when you are on the Debtor form. Click in the Interest field and
the Interest Detail form will be displayed. Press F1 from this form for information on all of its fields. Be
aware that several fields are only visible when certain types of interest calculations are chosen.
Transactions And Transaction Types
To properly enter information required for interest calculations, you must use transactions that have
Payment Breakdown switched ON. Also, the account's Original Principal must be entered as a transaction
rather than merely entered on the Debtor form.
To perform these procedures, we will modify or create transaction types for entering original principal and
for posting payments. We will also address interest adjustment, late fees and credit bureau reporting.
Original Principal
1. When posting the Principal for a Debtor, a new Transaction should be used.
Transaction Type 196 (Original Principal)
 When you use Compound interest, you MUST post the Original Principal amount as a Transaction. You cannot just enter a
number into the Debtor's Principal field. Any principal entered into the Debtor's Principal is wiped out because
Collect! calculates the remaining amount of principal owing at any point in time and displays that declining balance
in the Debtor's Principal field when you switch ON Compound interest. The compound interest calculations produce a
running balance of principal, interest, fees and adjustments.
When you use Compound interest, you MUST post the Original Principal amount as a Transaction. You cannot just enter a
number into the Debtor's Principal field. Any principal entered into the Debtor's Principal is wiped out because
Collect! calculates the remaining amount of principal owing at any point in time and displays that declining balance
in the Debtor's Principal field when you switch ON Compound interest. The compound interest calculations produce a
running balance of principal, interest, fees and adjustments.
2. After Transaction Type 196 is selected in your Transaction form, type the amount of the Debtor Principal in the Direct box
as a NEGATIVE number.
The negative Transaction amount that is entered in the Direct box will show up as a positive to the Debtor Principal
and is essential for Interest calculations.
3. Set the Posted and Payment Dates to coincide with the date that you want this Original Principal to reflect. Contract start
date should be taken into account for these dates.
Original Interest
The Original Interest may be used if you are using Revolving Compound Interest but not for Amortized Loan Interest.
1. If there is Interest pending on the account, it must be set as a new Transaction:
Transaction Type 197 (Original Interest)
This Transaction Type is used when you want to keep Original Interest and Original Principal separate.
2. After Transaction Type 197 is selected in your Transaction form, type the amount of the Debtor Interest in the Direct box
as a NEGATIVE number.
The negative 197 Transaction amount that is entered in the Direct box will show up as a positive to the Debtor
Interest and is essential for Interest calculations.
3. Set the Posted and Payment Dates to coincide with the date that you want this Original Interest to reflect. Contract start
date should be taken into account for these dates.
Interest Setup
1. Click the Interest field in the Debtor form. The Interest Detail form will display.
2. Select Compound Interest and Amortized Loan, either Normal or Rule of 78. You will find details of the fields in Step 3.
3. Select and fill in the following fields.
- Annual Interest rate
- Period
- Calculate Interest from Date
- Term
- First Payment Date
The other boxes will automatically fill with the correct amounts.
If you select Set terms manually, please be advised that you must check that the data is correct. An Interest
Adjustment many have to be used in this case.
Interest Adjustment
1. If an Interest Adjustment is required after you set the terms manually, you can adjust the interest with a new Transaction.
Transaction Type 401 (Interest Adjustment)
2. After Transaction Type 401 is selected in your Transaction form, type the amount of the Debtor Interest in the Direct box
as a NEGATIVE number.
The negative 401 Transaction amount that is entered in the Direct field will show up as a positive to the Debtor
Interest and is essential for Interest calculations.
3. Set the Posted and Payment Dates to coincide with the date that you want this Interest Adjustment to reflect. Contract start
date should be taken into account for these dates.
Late Fees
1. If you require Late Fees to be calculated on this account, switch ON the Late Fees switch in the Interest Detail form.
Notice that several fields are now visible where you can enter information. Press F1 for help on the Interest Detail form if
you need an explanation of these fields.
2. Select a Grace period.
3. Switch ON Lesser of or Greater of.
4. Enter a Late Fee amount or a Late Fee percent.
Fees can also be set manually to your own amount on an individual Debtor contract.
Transactions And Payments
1. Create a new Transaction Type that is not in the Collect! Demonstration database. For example, Transaction Type 110.
Pull down the System menu and choose Financial Settings, Transaction Types. When the list of all transaction types is
displayed, click the New button at the bottom of the list screen.
2. You can fill out this new Transaction Type to suit your needs. However, it is essential that you switch ON Payment Breakdown.
When posting payments, transaction types MUST have the Payment Breakdown option set so that Collect! can deduct fees
first, then deduct current interest, and finally apply the remaining payment amount to principal.
3. Every time you enter a Transaction on this Debtor's account, you should select this Transaction Type.
Credit Grantor
If you are a Credit Grantor, the switch in the Credit Bureau Reporting should be set to 'Report As Credit Grantor'.
1. Pull down the Tools menu and choose Credit Reporting. The Report to Credit Bureau form will display.
2. Choose Credit Bureau Setup.
3. Switch ON (check mark) Report As Credit Grantor.
Bring Account To Current
When an account is delinquent, pressing Recalc on the Debtor form will display "Bring Account To Current" in the Debtor Notes.
The amount needed to bring the account up to date will be displayed. This will only work when 'Report As Credit Grantor' is
switched on and Amortized Interest is set up as described above.
Amortization Schedule
This topic discusses the use of a handy tool in Collect! to assist you in interest calculations. This requires familiarity
with use of the Interest Detail form in Collect! and Amortized Interest.
Quickly view and print an Amortization Schedule after you have entered your interest details for a Debtor
account. The schedule also displays current credit bureau status for the underlying account.
Enter Interest Details
Before you can use the Amortization Schedule, enter all pertinent details in the Interest Detail form. This includes
the following which are covered in the Interest Detail help.
Switch ON Amortized Loan
Annual Interest Rate
Period
Rate Basis
Calculate Interest From
Term
First Payment Date
Example:
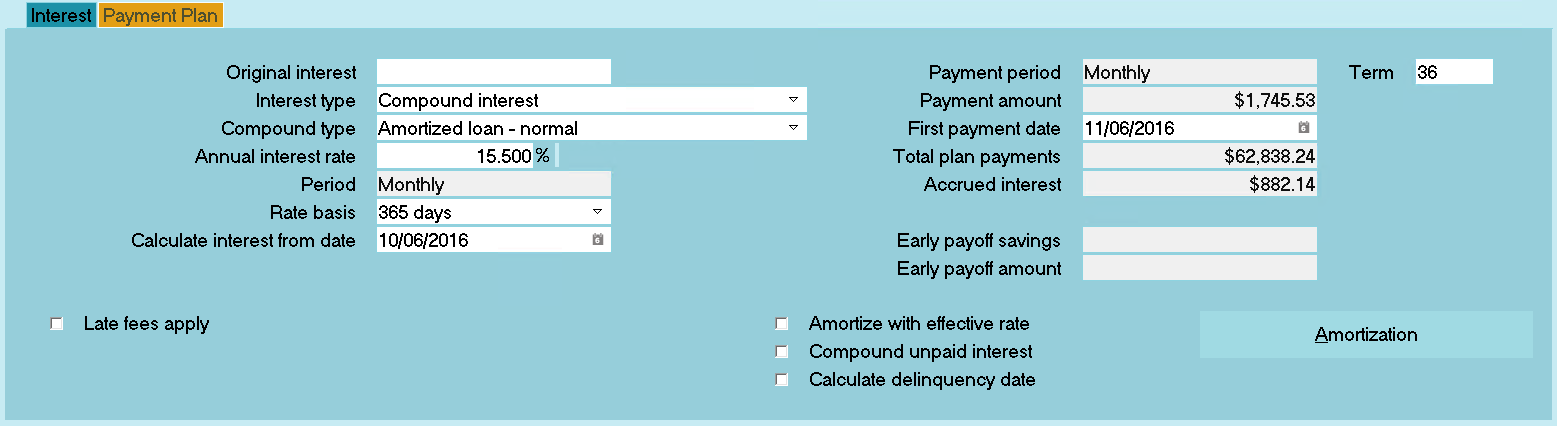
Interest Detail form with Amortized Normal
When you have entered all of your settings, select the Amortization Schedule button to display the Amortization Table Summary.
CBR Status
Notice at the Column entitled CBR. This is the current status of the loan according to credit bureau reporting
standards. Please refer to your credit bureau manual for details.
Print The Amortization Schedule
The sub-form Atable Entries is best printed to your Browser for easy viewing.
To do this:
1. Select the Print icon from the top toolbar. This will display a list of reports and letters.
2. Select Quick Print from the list. This will display the Print Report dialog where you may set your printing options.
3. Select the PRINTER SETUP button and make sure there is a dot in the radio button labeled Print Via Browser.
Select the EXIT button to close the Printer Setup form and return to the Print Report dialog.
4. Select Printer and you will see two options - Print and Preview.
5. Select Preview so there is a dot in the radio button.
6. Select the PRINT button. This will display the table in your Internet browser.
| 
Was this page helpful? Do you have any comments on this document? Can we make it better? If so how may we improve this page.
Please click this link to send us your comments: helpinfo@collect.org