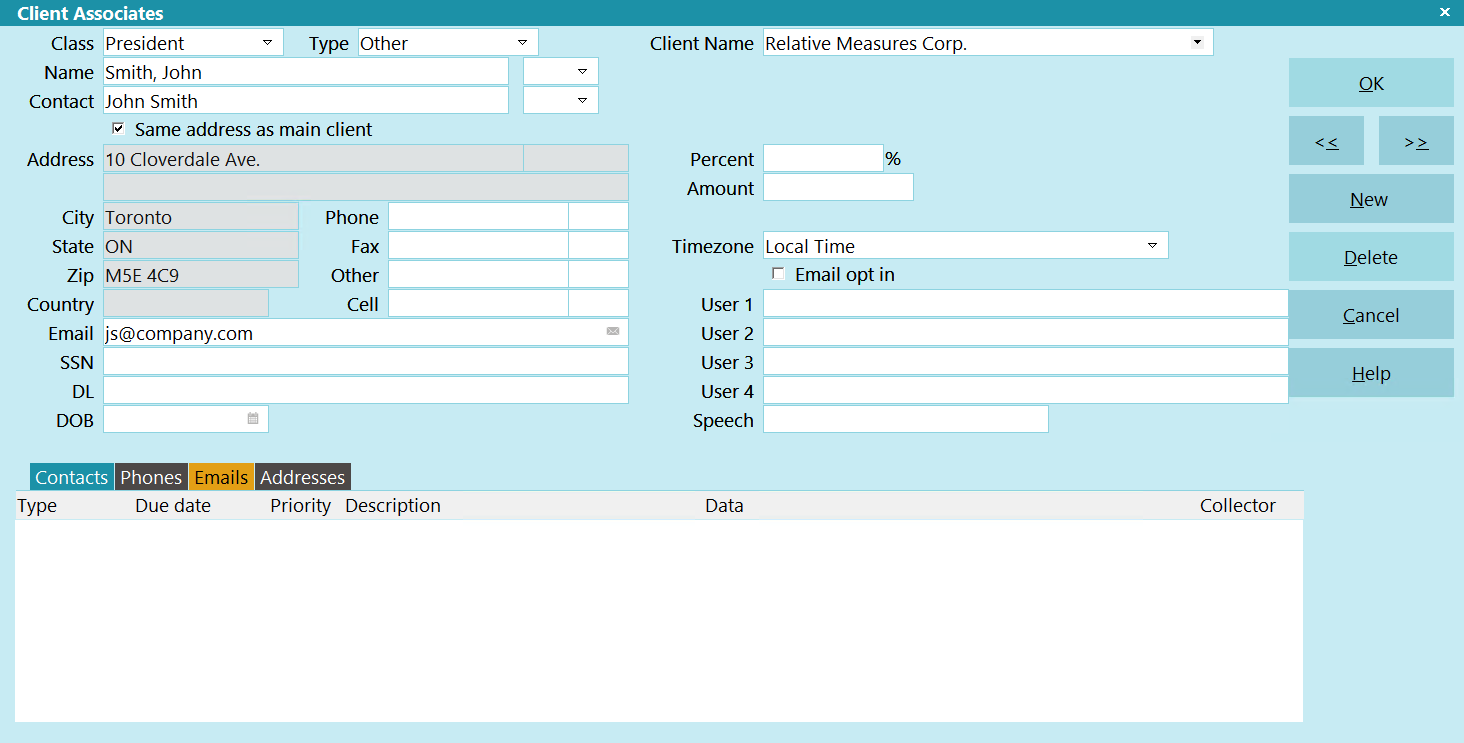
Client Associates
The Client Associate form stores personal information about
individuals or parties related to the client. Information about
an associate would be entered here.
Client Associate
 As a rule, if you have an address for the name you are
entering, then use the Client Associate form. Then your letters
and reports can use this address information when printing.
As a rule, if you have an address for the name you are
entering, then use the Client Associate form. Then your letters
and reports can use this address information when printing.
Class
From the pick list on this field, select a general category
for the information entered in this Client Associate form.
There are many possible uses, not just client associates.
You can define your own classes and add to the pick list
on this field.

Type
Enter the relationship this party has to the client. You can
customize this field to suit your needs. Define your own types
and add them to the pick list on this field.
Name
Type the associate's Name here.
Generation
Press F2 to pick the Generation of the associate. (Jr, Sr, II, III etc.)
This field is optional.
Contact
This is the name of the contact person at the address
or phone number. By default, this is the same as the
Name field, except that it is formatted as "{First Name}
{Last Name}" for printing on reports and letters. You
can enter a different name here, if you wish.
This field is optional.
Legal Entity
You can optionally pick a Legal Entity such as Ltd.
or Inc.
This field is optional.
Same Address As Main Client
Click, or press the spacebar, in this field to flag the
system to use the client's address when printing
letters to this associate. If a different address is
displayed on this form, it will be hidden when you
check the 'Same Address As Main Client' box.
Address OK
Click, or press the spacebar, in this field to flag the
associate address as valid. When the box has a
check mark, letters will be printed to this associate.
 If the Address OK box is unchecked,
letters will not be printed to this associate.
If the Address OK box is unchecked,
letters will not be printed to this associate.
This field is hidden when the 'Same Address As
Main Client' box is checked.
Address
Enter the associate's address here. This is the first
address line. Additional fields are available to
complete address information. You can use them
as you wish, unless you intend to report to
credit bureaus.
Address 2
Continue entering the associate's address here, or leave
the line blank if you don't need it.
Street Number
You can store the Street Number in this field if you
wish. It is an optional field.
City
Enter the City name here.
State
Enter the State name or code here.
ZIP
Enter the ZIP code here.
Country
Enter the Country name here.
Email
Enter the associate's Email address in this field.
The field is optional.
Home
Enter a home phone number here.
Press F2 on this field to activate the Auto Dialer.
You can switch ON 'Only numerics in phone fields'
in Screens and Messages to remove any non-numeric
data from your phone fields.
Phone Ext
Enter an extension to the phone number if needed.
You might also use this to store an ID number.
Work
Enter a Work phone number here.
Press F2 on this field to activate the Auto Dialer.
You can switch ON 'Only numerics in phone fields'
in Screens and Messages to remove any non-numeric
data from your phone fields.
Work Extension
Enter an extension to the phone number if needed.
You might also use this to store an ID number.
Other
Enter an additional phone number here.
Press F2 on this field to activate the Auto Dialer.
You can switch ON 'Only numerics in phone fields'
in Screens and Messages to remove any non-numeric
data from your phone fields.
Other Extension
Enter an extension to the phone number if needed.
You might also use this to store an ID number.
Cell
Enter a Cell phone number here.
Press F2 on this field to activate the Auto Dialer.
You can switch ON 'Only numerics in phone fields'
in Screens and Messages to remove any non-numeric
data from your phone fields.
Cell Ext
Enter an extension to the phone number if needed.
You might also use this to store an ID number.
SSN
Type the associate's Social Security Number here.
DL
Enter the associate's driver's license here.
You can use this field to store other alpha-numeric
information.
DOB
Enter the associate's Date of Birth in this field. You may
press F2 to bring up the calendar, or type the date
as MM DD YY.
You can use this field to store a different date for your
own purposes.
Percent
This field is for your own use. You can use it to
store a percentage amount.
Amount
This field is for your own use. You can use it to
store a currency amount.
Timezone
This field holds a POSITIVE or NEGATIVE
integer indicating the Timezone of this
Client Associate. Timezones are standard integer
values calculated from GMT (Greenwich Mean Time).
To set this field automatically, please refer to Help
topic, How to Use Control Files.
EMAIl OPT IN
Switch this box ON to include this associate in emails
when the 'CC Cosigners' box is enabled on batch letters.
User 1
This field is for your own use. You can use it to
store other alpha-numeric information.
User 2
This field is for your own use. You can use it to
store other alpha-numeric information.
User 3
This field is for your own use. You can use it to
store other alpha-numeric information.
User 4
This field is for your own use. You can use it to
store other alpha-numeric information.
Speech
This field allows you to track the language that the Associate speaks.
This is a string field.
OK
Select this button to save any changes you have
made and return to the previous form.
<<
Select this button to go to the previous
associate for this client.
>>
Select this button to go to the next associate
for this client.
New
Select this button to open a new blank Associate form.
Delete
Press this button to delete the currently displayed
record.
When you are viewing the Client Associate list that
displays when you select the ASSOCIATES tab on the
Client form, you can delete a highlighted line item
in the Client Associate list.
Cancel
Select this button to ignore any changes you
may have made and return to the previous form.
Help
Press this button for help on the Client Associate
form and links to related topics.
Edit
Press this button to open the currently displayed
record for modifying.
When you are viewing the Client Associate list that
displays when you select the Associates tab on the
Client form, you can open and edit a highlighted line
item in the Client Associate list.
| 
Was this page helpful? Do you have any comments on this document? Can we make it better? If so how may we improve this page.
Please click this link to send us your comments: helpinfo@collect.org