How To Export A Report
This topic gives you steps to export a report from your database.
You may want to export a report for several reasons:
* If you have an issue with a report, Collect! Tech
Support can usually resolve it most quickly when
you send us the report.
* We can customize an existing report for you.
* You may want to share a report with another
Collect! user.
To get the report out of Collect!, we export it
and give the report a name. (e.g. myreport)
Collect! saves it as an ASCII text file and gives it
a *.rpt extension.
Make sure you know exactly which report you want to
export. Also, have a name ready to give to your
exported report file and know where on your computer
you want to save it. Saving to your Desktop is convenient.
Let's proceed, now, with the steps below to export
your report from Collect!.
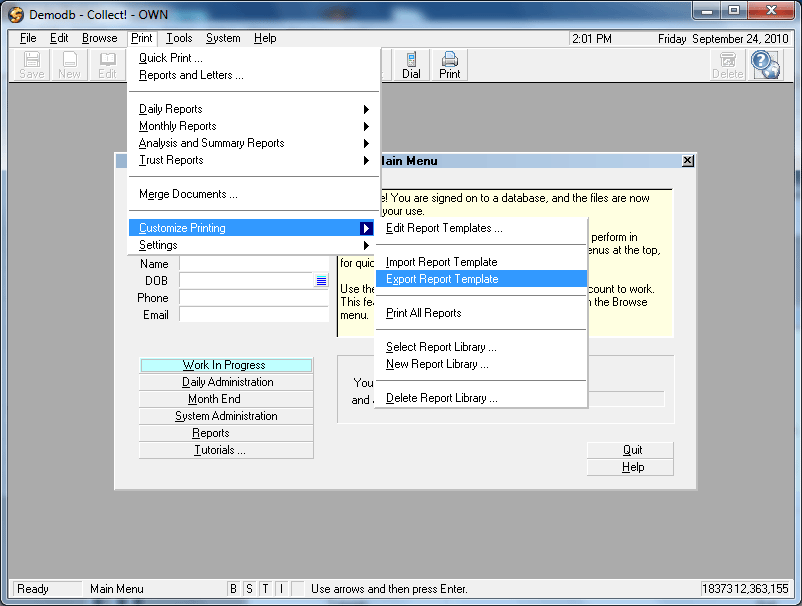
1. Sign into Collect! as you would normally
and select Print from the top menu
bar.
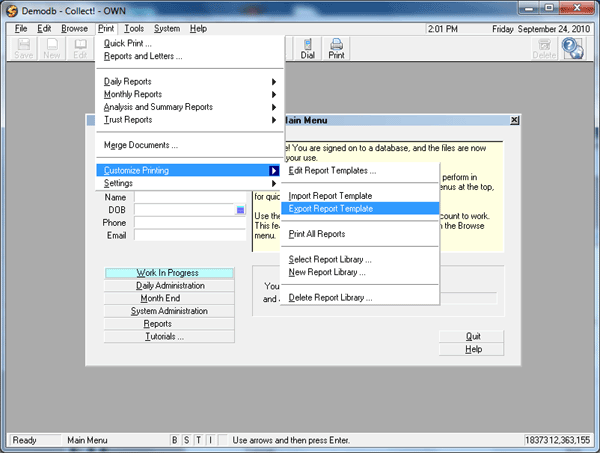
Print Menu
2. Then select Customize Printing, Export Report Template.
This displays the Report Definition list where you see all
the reports and letters in your working database.
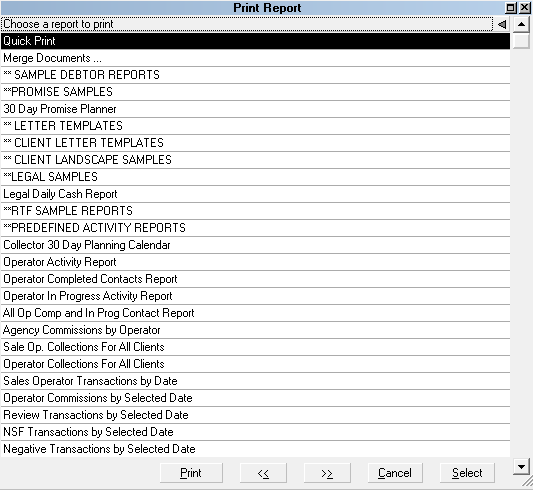
Report Definition form
3. Use the up/down arrow keys on your keyboard
to highlight the report you want to export.
Press Enter or select the OK
button at the bottom of the list.
The Export Collect! Report dialog pops up.
If you are needing to export multiple reports in a single
output file, use the up/down arrow keys on your keyboard to
reach the first target report and press your Space bar to
Tag the report name. This will cause the white background
of the report name in the list to become colored to indicate
that a tagged item has been selected. You will notice that
the letter "T" in the status bar at the bottom of the screen
has turned blue, indicating that a tagged list has been
initiated.
Continue use your up/down arrow keys and space bar until
you have tagged all the reports you want to export out to
file. Press Enter or click OK to proceed.
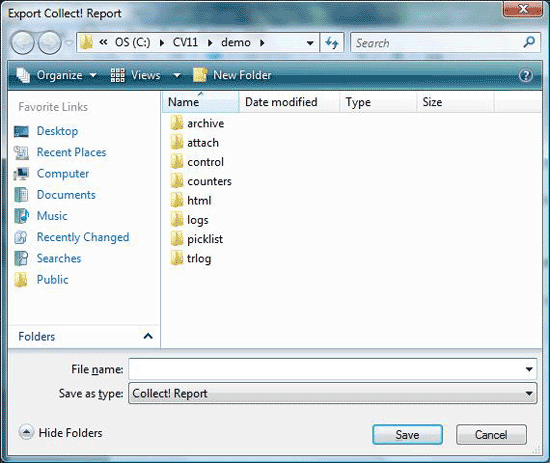
Export Collect! Report Dialog
4. The next window that pops up is the same type you see
when saving any file in a Windows application: you are
prompted to provide a path and file name of what you wish
to save. Navigate to where you wish to save the file on
your PC or Network, i.e. Desktop or folder path, and
give the file a name. It is important to use the file
extension ".rpt" in the name of the exported report name.
Example: "letterseries1.rpt". It is also important to
ensure you have network write privileges to save on the
location you are selecting. Windows 8 users may find that
their default network settings do not allow users to save
to their local C: drives. See your inhouse Systems
Administrator for info or assistance on where you should
save a file in your system if you receive any Windows
error message rejecting the path to which you were attempting
to save into.
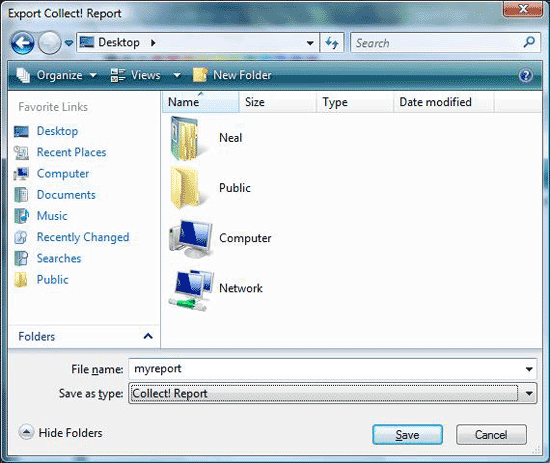
Report To Save
5. Select Save to export the report.
6. Now you will be prompted to export Printer Control Codes
with your report. Please choose Yes.
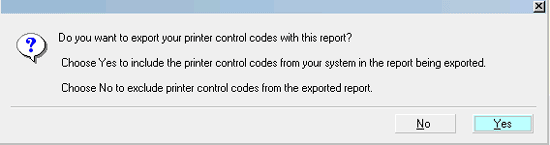
Prompt to Export Printer Control Codes
Your report will be exported immediately and a
message will show the name of the report you
just exported and the location where you saved it.
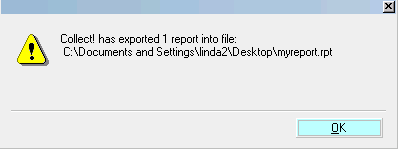
Report Export Success
Please make note of the location so that you can find the
exported report. It is a good idea to write down the filename
so that you can locate the report easily.
7. Select OK to close the message
window.
If you are going to send this report to Collect! Tech
Support, you can attach it to an email. Please refer to your
email program's help documentation on attaching a file
to an email.
@include files
If the report you are exporting uses an @include file,
please also attach this to the email along with the *.rpt
file that you send to Collect! Technical Services. @include
files may be found in the Collect! application's STYLES
folder, (e.g. CV11\styles)
Locating the exported report
If you do not know where on your computer the exported
report was saved, you may do a search for files and folders
using the Windows Search feature to locate your
report file. You have to know the exact name of the file or
do a search for all *.rpt files.
Please refer to your Windows Help for details. Type
in "searching for files and folders" as the keywords for your
Help topic and you should see results that help you use the
Search feature.
When your report shows up in the search results, select it
and Right click on it with your mouse. This will display a
submenu. Select COPY from the submenu.
Now, move your mouse to a spot on your Desktop. Right
click again and select PASTE.
A copy of the report file is now on your Desktop. This is
a convenient location to use to easily find the *.rpt file if
you want to attach it to an email.
Viewing a report outside of Collect!
If you need to open an *.rpt file, please open with a text
editor that will not change the format. If you open with a
word processor, MAKE SURE you save it as a text file and
not in the word processor's default format as this will make
the file unusable by Collect!.
 Please be aware that exported reports DO retain
any additional settings contained in the report definition's
Report Options.
Please be aware that exported reports DO retain
any additional settings contained in the report definition's
Report Options.
 You can also copy reports from one database to
another in Collect!. Please refer to Help topic,
How To Copy Reports To Master Database for details.
You can also copy reports from one database to
another in Collect!. Please refer to Help topic,
How To Copy Reports To Master Database for details.
See Also
- How To Import A Report
- How To Export a Group of Reports
- How to Get Help with Reports
- Report Sample to view sample reports and letters
- Report Topics Index for a list of all report and letter topics

| 
Was this page helpful? Do you have any comments on this document? Can we make it better? If so how may we improve this page.
Please click this link to send us your comments: helpinfo@collect.org