Web Host Company Settings
The Company Details form stores name and address information
about your company. This can be printed on reports and letters
and is used in credit bureau reporting. Some Client Settings
values are set up automatically for you based on information you
enter in the additional fields on this form.
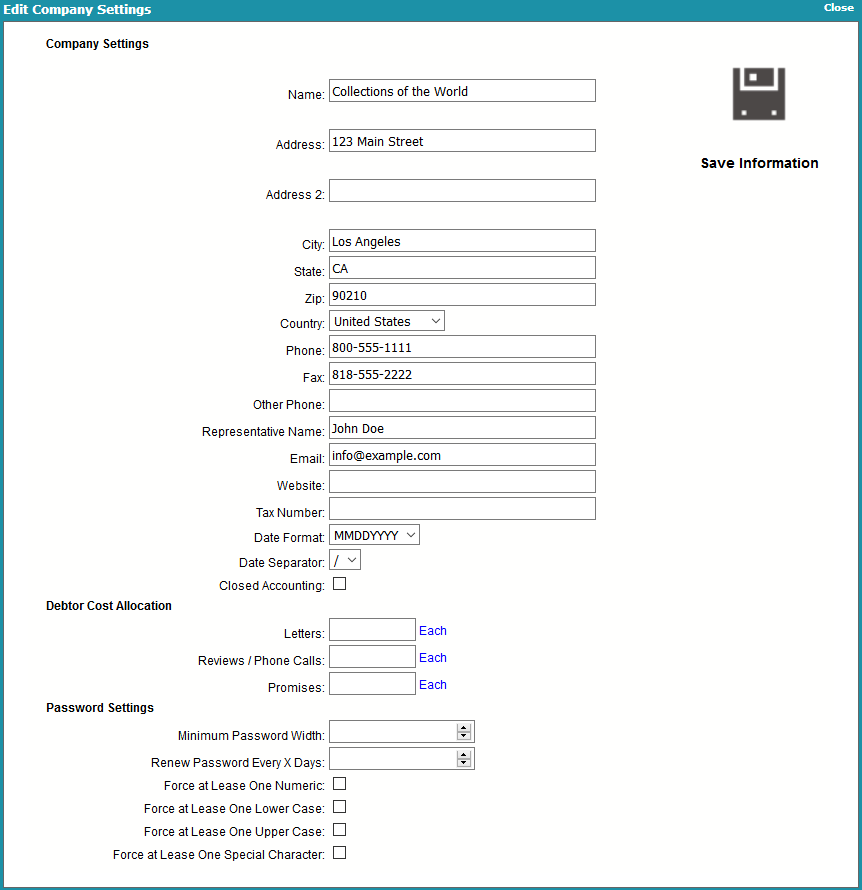
Edit Company Settings
Name
Enter the name of your company as you would
like it to appear on reports and letters. If you
are using the credit reporting module,
please enter your company's name as you would
like it to appear in credit bureau Metro2
output file header records.

Address
Enter your Street Address. There are two
address lines on this screen. The
information you enter in these lines
can be pulled into reports and letters.
The information in these three lines is
also included in header record of your credit
bureau Metro2 output files.
The format with which you enter your
information is up to each agency. However,
we recommend using Postal Addressing
Standards that are applicable to your
country. These are generally available
by looking up the website of the postal
service for your region.
Example:
Name - Your Company Name Goes Here
Address - Your Company Address
Address 2 - Company Addr2
Representative - Default Report Name or Leave Blank
City - Your Company City
State - Your 2 Position State/Province Code
Zip - Your Zip/Postal Code
Country - Choose From Pick List or Leave Blank
Email - Any Company Email Address or Leave Blank
Address 2
This address field can hold your second
address line or other information you may
wish to store for later use/output to
reports or letters.
State
Enter your agency's State Code.
ZIP
Enter your agency's ZIP/Postal Code.
Country
Optional. Use the drop-down arrow pick
list to select your Country OR leave blank
if you do not wish to see this field
expressed in reports/letters.
Phone
Enter your main office Phone number.
Decide on a phone format for your company.
Such as, with hyphens or with parenthesis
around area codes or all numerics/no spaces.
You will find establishing a phone format
convention will ease all look-ups by phone
in your system. Look-ups read the field
exactly as entered.
Some format examples:
123-456-7890
123.456.7890
(123)456-7890
18004567890
1234567890
If you use the Credit Bureau module, the
Phone number is required and is output
to the header record of the Metro2 formatted
text file when created. The Credit Bureau
module will strip out any non-numeric data
automatically and will use a maximum of 10
digits in compliance with the Metro2 File
Format specifications.
Fax
This Fax number field is pulled into
many of the sample reports and letters.
Other Phone
Optional. The Other Phone number is another phone
number for your company. It is not included
in default shipping sample reports/letters.
Representative Name
Optional. Enter the name of your company
representative. This may be the Owner
or President's name.
Email
Optional. This field is used to enter your
agency's central email address or the email
address of your main representative.
Website
Optional. This field can hold the web address
to your website.
Tax Number
This is your Tax registration ID number. It is printed on
statements and invoices. Every time you issue a receipt
or charge for the tax on your commissions, you have to
include your Tax #. If you do not charge tax, you probably
don't need this field.
Date Formats
This is the format that you want you dates to
output to. Here are the available options:
MONTH DAY YEAR (MMDDYYYY)
DAY MONTH YEAR (DDMMYYYY)
YEAR MONTH DAY (YYYYMMDD)
Date Separator
The separator character is by default '/' (forward slash).
This can also be changed to '-'.
Closed Accounting
With this switch ON, when a statement is generated, the
transactions referenced in the statement are locked to
Read Only. This prevents editing or deleting of these
transactions after the statements are generated.
With this switch ON, Collect! will also skip transactions
already connected to an invoice line record, thus
preventing a transaction from being on an invoice more
than once.
 If you ever come across a transaction and all
the fields are "grayed out," this means that
this transaction is on a statement currently in
your system. You can return to this form,
uncheck this to switch it OFF, correct or
delete your transaction and regenerate your
statement. However, a better solution would
be to leave the switch ON, post a new correct
transaction and then post a transaction to off
balance the amount of the erroneous one.
If you ever come across a transaction and all
the fields are "grayed out," this means that
this transaction is on a statement currently in
your system. You can return to this form,
uncheck this to switch it OFF, correct or
delete your transaction and regenerate your
statement. However, a better solution would
be to leave the switch ON, post a new correct
transaction and then post a transaction to off
balance the amount of the erroneous one.
Letters
Optional. This field can be used to enter
average cost associated with Letters.
When an operator opens the Debtor Form, it
will display a graph with the Cost Allocations.
Reviews / Phone Calls
Optional. This field can be used to enter
average cost associated with Reviews or
Phone Calls.
When an operator opens the Debtor Form, it
will display a graph with the Cost Allocations.
Promises
Optional. This field can be used to enter
average cost associated with Promises.
When an operator opens the Debtor Form, it
will display a graph with the Cost Allocations.
Minimum Password Width
Enter the minimum number of characters the user
must enter for their password. If they enter less than
this number of characters when renewing their
password, the system will warn them and will not
accept the password until it is at least this number of
characters. Leave this field blank to allow operation
with no passwords.
Renew Password Every
Enter a number of days. After this time the user is
prompted to renew their password. Leave this blank
if you want the system to never prompt to renew
passwords.
Force At Least One Numeric
Switch this ON with a check mark and the system
will make sure the user has entered at least one
number in their password.
Force At Least One Lower Case
Switch this ON with a check mark and the system
will make sure the user has entered at least one
lower case character in their password.
Force At Least One Upper Case
Switch this ON with a check mark and the system
will make sure the user has entered at least one
upper case character in their password.
Force At Least One Special
Switch this ON with a check mark and the system
will make sure the user has entered at least one
non-alphanumeric character in their password.
Collect! automatically locks out an account after
3 failed attempts to login.
| 
Was this page helpful? Do you have any comments on this document? Can we make it better? If so how may we improve this page.
Please click this link to send us your comments: helpinfo@collect.org