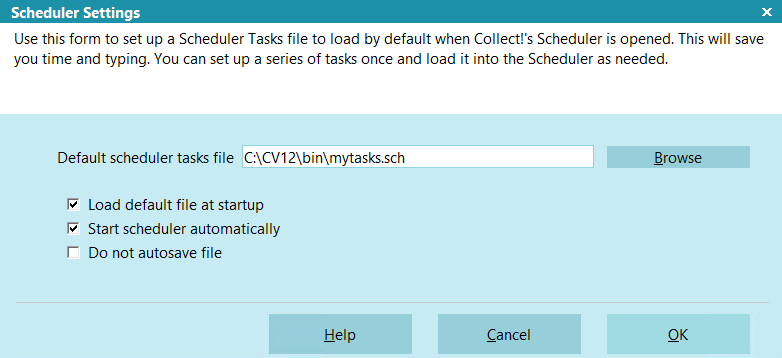
Scheduler Settings
Use this form to set up a Scheduler Tasks file to load by default
when Collect!'s Scheduler is opened. This will save you time
and typing. You can set up a series of tasks once and load it
into the Scheduler as needed.
Scheduler Settings
 To save a Scheduler Tasks file, select the SAVE
button on the Scheduler form when you are viewing a list of
scheduled tasks. This creates a special file with an *.sch
extension that can be read by Collect!.
To save a Scheduler Tasks file, select the SAVE
button on the Scheduler form when you are viewing a list of
scheduled tasks. This creates a special file with an *.sch
extension that can be read by Collect!.
Each database in Collect! stores its own configurations
from the Scheduler Settings form. The settings you set here
will be used whenever you sign into the database you are
in when you set the configuration. So if you are signed into
the masterdb, you are setting defaults
for the masterdb.
Default Scheduler Tasks File
Enter the name of the Scheduler Tasks file that holds the list
of tasks you wish to run. By default, Collect! stores task files
in the Collect\bin folder and you can just type in a filename.
Or, you can use the BROWSE button to locate the Scheduler
Tasks file you wish to use.
When the 'Select Default Scheduler Tasks File'
dialog appears, it will only show files with the *.sch
extension that Collect! uses for saved Scheduler
Tasks files.

Browse
Select this button to open the 'Select Default Scheduler
Tasks File' dialog where you can select a previously saved
Scheduler Tasks file that you want to use as your default
when the Scheduler is started. Select the file you wish to use
and select OPEN. The next time you open the Scheduler,
Collect! will load the file you selected as your default.
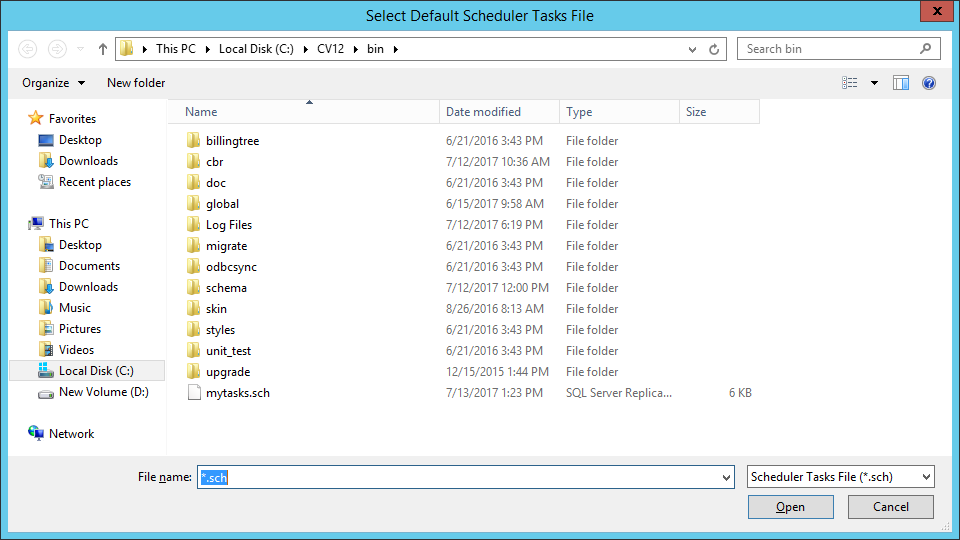
Select Default Scheduler Tasks File
Automatically Load Default File
Switch ON 'Automatically Load Default File' to load the
scheduled tasks when you open the Scheduler. This is
useful when you have a series of tasks that you run on
a regular basis. When you sign in as a Scheduler Operator,
the Scheduler will display the list of tasks already for you
to press START SCHEDULER with no further action
required on your part.
Start Scheduler Automatically
Switch ON 'Start Scheduler Automatically' if you want
the Scheduler to start as soon as you sign into Collect!
as a Scheduler operator.
This will only work if you have tasks in the
Scheduler Tasks list. So make sure you are
using this switch with "Load Default File At
Startup" switched ON and that you have a
valid default file that contains your previously
saved tasks.
Do Not Auto Save
Switch ON 'Do not auto save' if you want Collect! to not save
the scheduler file each time a task runs.
 WARNING: This may disrupt events from running as they will not
have the correct date and time settings from the last
time the task ran.
WARNING: This may disrupt events from running as they will not
have the correct date and time settings from the last
time the task ran.
Log File Settings
When a task runs, Collect! writes a date/time stamped
entry to the log file. By default, this file is located in
Collect\bin\scheduler.log.
Scheduler Tasks For Each Database
The settings you set in this form are for the database you are
signed into. If you wish to configure Scheduler defaults for
other databases, sign into them and set the settings.
You can also set a task file to load automatically in the Collect!
shortcut, using the /sch: command line option.
This command will load the tasks file into whatever database
you sign into using the shortcut.
For Example:
C:\Collect\bin\cv12.exe /sch:demo.sch
Load the Scheduler Tasks file named demo.sch
when Collect! starts.
The /sch setting takes precedence
over any file specified in the Scheduler Settings "Default scheduler
task file."
Please refer to Help topic, Command Line Startup Options for
details.
Help
Select the HELP button for Help on the Scheduler Settings
form and related help topics.
Cancel
Select the CANCEL button to ignore any changes you
have made and return to the previous form.
OK
Select the OK button to save any changes you
have made and return to the previous form.
| 
Was this page helpful? Do you have any comments on this document? Can we make it better? If so how may we improve this page.
Please click this link to send us your comments: helpinfo@collect.org