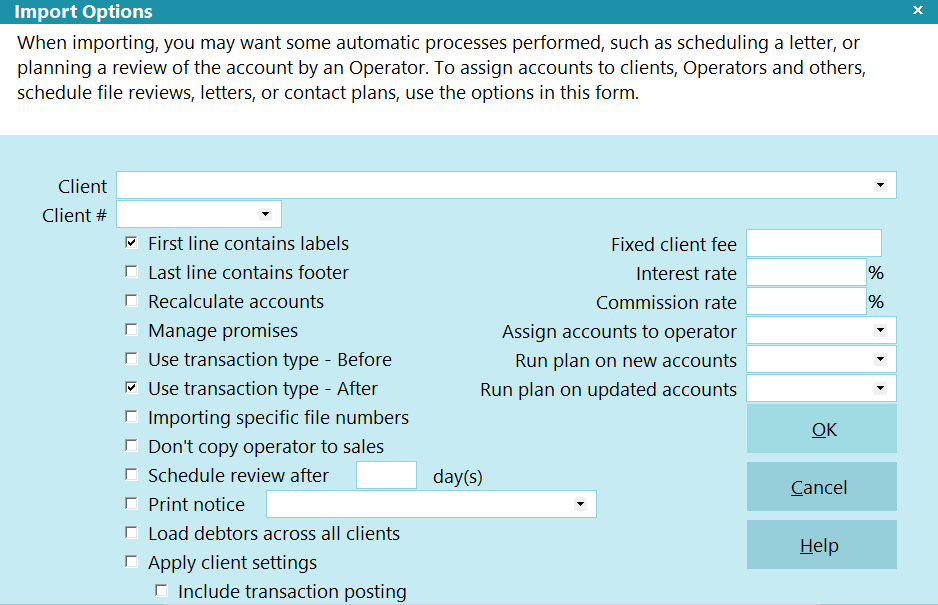
Import Options
When importing, you may want some automatic processes performed,
such as scheduling a letter, or planning a review of the account
by an Operator. To assign accounts to clients, Operators and others,
schedule file reviews, letters, or contact plans, use the options
in this form.
Import Options
Client
This is the name of the Client for whom you
usually import this type of file. If you
import the Client number or name, the imported
value overrides any Client specified here. You
can change the Client in the Import menu just
before you import. If Import can't find the Client,
it will create it for you.
This field is auto-filled when you select a
Client Number first.

Client #
This is the number of the Client for whom
you usually import this type of file. If you
import the Client Number or Client name,
the imported value overrides any Client
Number specified here. You can change the
Client Number in the Import menu just before you
import. If Import can't find the client, it
will create one for you.
This field is auto-filled when you select a
Client Name first.
First Line Contains Labels
When this switch is ON, Collect! ignores the
first line of the file and starts importing
on line 2. This is useful for files created by
Excel, and other similar systems, that put
field labels on the first line of the file.
Last Line Contains Footer
When this switch is ON, Collect! ignores the
last line of the file and stops importing
on the second to last line. This is useful for
files created by Excel, and other similar systems,
that put a footer or totals on the last line of
the file.
Recalculate Accounts
If this switch is checked, the import will
automatically recalculate all imported
accounts when it is completed. If the switch is
unchecked, you will be prompted as to whether you
would like to recalculate the accounts.
Manage Promises
Switch this on to manage promised payments when the
import is run. With this switch enabled, Collect! will
consider any active promises set on an account and
take the appropriate action before importing the next
transaction. This will allow for the Promise contacts to
be revolved ahead or back, or completed, as if you were
posting manually on a debtor.
Use Transaction Type - Before
This switch enables you to apply transaction
type settings BEFORE you bring in your data.
When you put a check mark in this field and you
import a transaction, Collect! does the following.
1. Recalculates the debtor up to the Payment Date
on the transaction, EXCLUDING the new transaction.
2. Loads transaction details from the Transaction
Type imported and performs a breakdown as needed
of the transaction.
 This step brings in the Commission Rate
from the Debtor and writes the amount
to the new transaction, unless you have
a value in the Commission Rate field.
This step brings in the Commission Rate
from the Debtor and writes the amount
to the new transaction, unless you have
a value in the Commission Rate field.
3. Recalculates the debtor up to the Payment Date,
including the new transaction, and updates the Debtor
record in the database.
When there is no data coming in to determine
a transaction type for the 'Use transaction
type' settings, Collect! will attempt to use
the 'Default value' in the Type Field
Specification for a match.
Use Transaction Type - After
This switch enables you to apply transaction type
settings AFTER you bring in your data. When you put
a check mark in this field and you import a transaction,
Collect! does the following.
1. Recalculates the debtor up to the Payment Date
on the transaction, INCLUDING the new transaction.
2. Loads transaction details from the Transaction
Type imported and performs a breakdown as needed
of the transaction.
This step brings in the Commission Rate
from the Debtor and writes the amount
to the new transaction, unless you have
a value set in the Commission Rate field.
3. Recalculates the debtor up to the Payment Date again,
including the new transaction, and updates the Debtor
record in the database.
When there is no data coming in to determine
a transaction type for the 'Use transaction
type' settings, Collect! will attempt to use
the 'Default value' in the Type Field
Specification for a match.
Importing Specific File Numbers
By default, newly imported accounts will be
assigned the next available file number. Checking
this switch overrides this default behavior and
allows you to specify file numbers in your
import file.
Don't Copy Operator To Sales
When you turn this switch On, the Sales field
in the transaction record being imported is not
automatically filled in. Instead, it
must be filled in by the import program
specifically.
In the past, the Sales field was filled with the
same ID as the Operator field in the transaction
record.
In order to leave the Sales field blank in the
transaction records being imported, turn this
switch On.
If this switch is Off, the Sales field will be
filled with an appropriate Operator ID, if at
all possible. If you have existing imports that
work properly, do not turn this switch On in the
existing import specifications, or you may lose
desired Operator commissions assigned after
importing transactions.
Schedule Review After
The import will automatically schedule an
Operator to Review imported files if you put
a check in this field. The number of days
to delay from the current date for the Review
Contact Due Date to appear in the collector's
WIP list will be entered in the adjacent
Day(s) field.
Print Notice
Import will automatically schedule a
letter if you put a check in this field.
Select which letter from your Print Menu
by clicking the drop-down arrow to the
right of the adjacent field.
Notice
To choose the letter you want printed,
click the drop-down arrow to the right
of the field adjacent to Print Notice,
or press F2. Use the arrows to select
from the list.
The letter contact will be scheduled in
the current day's Due Date print batch.
To schedule more complex letter series
and Review schedules, create a Contact
Plan for this purpose that contains all
the requisite events.
Load Debtors Across All Clients
Switch this ON with a check mark if you
want Collect! to consider all clients
when matching records during the import.
If this is switched OFF, only the client
displayed in the Client or Client # field
will be processed.
 Switch this OFF if you have multiple
accounts in your database with the
same "Use as key" value and you want
to ensure that Collect! only considers
records belonging to the Client or
Client # you have specified.
Switch this OFF if you have multiple
accounts in your database with the
same "Use as key" value and you want
to ensure that Collect! only considers
records belonging to the Client or
Client # you have specified.
 WARNING: If this switch is OFF and the Client
and Client # fields are BLANK,
then the incoming data will be
associated to the FIRST CLIENT
in your list!
WARNING: If this switch is OFF and the Client
and Client # fields are BLANK,
then the incoming data will be
associated to the FIRST CLIENT
in your list!
Apply Client Settings
When switched ON with a check mark, the
client settings will be applied to newly imported
debtors just as they are when the debtors are
created manually. For example, Client Sales ID,
Operator ID, Currency, Commission Rate, as well
as other settings, are applied to new debtors as
they are imported.
Include Transaction Posting
This option is used on conjunction with Apply Client Settings.
Switch this ON to invoke the automated transaction posting for
Client Fees, Debtor Fees, Principal Creation (which means you
don't have to create a Transaction record in the import map to
import the 196 Transaction), Add Commission to Owing (Bill
Commission to Debtor), and Judgment Transactions if you are
importing Judgments as new debtors.
Fixed Client Fee
This is a fixed charge that is loaded into the account's Fixed
Fee field in the Client Settings form. Collect! does not currently
use this for financial calculations.
To post a charge that will be used in financials,
you should create a transaction type with
'Use Dollar Amounts' on, and enter the amount
of the fee. Then, create a contact plan that
contains a contact of type Transaction, and
reference the transaction that posts the fee.
Interest Rate
The interest rate is used to automatically calculate interest on
the account if the Debtor's 'Charged' date (also called the
Incurred or Write-off date) is also imported.
Interest is calculated, assuming the interest rate is annual,
based on the number of days since the Interest Date. If
you tell Import to import the Interest Rate field, the value
you set here will only be used if the Interest Rate field imported
is blank. Otherwise, the imported Interest Rate value will be used.
Commission Rate
Commission Rate is used to calculate commission for payments
from accounts. You can enter a value here if you want to apply
it to all the records that you are importing.
To recalculate imported transactions automatically
and post the commission amount, switch ON 'Use
transaction type - Before' or 'Use transaction
type - After'.
If your import map brings in a Commission Rate from the incoming
data or has a default set in the Field Specification for Commission
Rate, then that will be used instead of this value.
Assign Accounts To Operator
This is the ID code of the collector to whom these accounts
should be assigned. Press F2 to pick from the Operator list.
If you tell Import to import the Collector field, the value you set
here will be used only if the Collector field imported is blank.
Otherwise, the imported Collector value will be used.
Run Plan On New Accounts
The contact plan will be run on each Debtor imported. You
will be prompted after the import runs and before the
contact plan is run.
To pick from your list of contact plans, press F2.
To create a new contact plan, press F2 and then F3
to add a new contact plan in the list.
Run Plan On Updated Accounts
This Contact Plan will be run after Collect! imports all data
to existing accounts.
Since contact plans can contain conditional
processing (based on field values in the database)
you can embed quite a bit of intelligence into the
processing of incoming accounts. This eliminates
human error and increases efficiency.
OK
Selecting this button will save any data you have
entered and return you to the previous form.
Cancel
Select this button to ignore any changes you may
have made and then return to the previous form.
Help
Press this button for help on the Import Options
dialog and links to related topics.
| 
Was this page helpful? Do you have any comments on this document? Can we make it better? If so how may we improve this page.
Please click this link to send us your comments: helpinfo@collect.org