How To Use The Predictive Dialer
Predictive dialers automatically dial a set of phone numbers and route calls to available collectors when what the dialer system
perceives as live human connections are made on the phone. Busy signals, no answers, operator intercepts, and what are perceived
by the dialer system as answering machines are call result logged.
The objective of a dialer system in predictive mode is to have a live-voice call available for a collector when that collector is
statistically likely to be available to take it.
The dialer is constantly computing stats while the campaign is running, making adjustments in how many lines are dialing per head
of collector on the campaign, speeding up/slowing down its pacing, clocking and revising how long it takes to get a live-voice on
the phone and factoring into its computations the average call times of each collector. With all these parameters and
calculations in place, the dialer will determine how far in advance it should be actively dialing numbers to have a call ready at
the statistically anticipated time of availability for each collector signed into the campaign.
The quality of your data that you are uploading to a dialer system greatly impacts the success and efficiency of the campaign,
which in turn impacts the revenue generated from use of call campaigns.
If bad/confirmed wrong numbers are not be removed from the phone fields on the accounts, then the resource time is being
mismanaged (as well as that of the collectors) because the same numbers are being repeatedly called after verified as bad. If
you lists are very long, that can mean that every day, there are numbers not being dialed because the list keeps restarting from
the same order as the last download - numbers in the lower part of the list are never being attempted.
To ensure optimized inventory penetration rates, it is important to segment and rotate your call lists so that all callable
files are being actually dialed.
Reviewing your call results is important. They will show you with hard numbers and percentages what days and times of day your
call lists are reaching the most people.
The quality of your data will impact the success and effectiveness of your call campaigns. Whether you use a premise dialer
product or an off-site provider, it should be possible to obtain a variety of analysis reports that provide you with details
about your campaigns separate and apart from straight call results such as busy, no answer, passed to live collector/agent.
Campaign stats generally will show you hard numbers/percentages in summary, then with detail breakdown of those summary figures
for categories such as # contacts, # no answers, # busy, # operator intercepts, # machines detected, # live contacts passed to
agent, # wrong numbers (if you agents press a key for this call result). It should be possible to get account number and phone
number details in the summarized categories. Using these reports to keep your data clean so that your future call lists will be
better aimed at right party contacts will continually raise your campaign success ratios and actual inventory penetration rates.
The following are areas where if detailed reports are available, assigning admin/clerical staff to review and update files will
contribute to your call campaigns being better each time.
1. Operator Intercepts. If you have the manpower to support it, having someone manually dial these numbers to confirm whether
they are a true NIS or possibly a Phone Number Has Changed is useful. There will always be many more NIS numbers than forwarder
moves but the percentage of free locates that easy can be worth the verification step. Making sure that NIS numbers are removed
from phone fields so that they don't waste future dialer time.
2. If your collector has entered a "wrong number" code into the dialer prompt after a live-voice contact has confirmed that that
the number is wrong for the debtor on file. If the collector forgets to remove the number in the heat of the campaign, then the
same uninvolved consumer will continue to be called and this can spark a harassment complaint. Make sure that wrong numbers
confirmed get removed from your phone fields. If you extract from the Phone Tab into your call lists, it is recommended to have
your staff use the Active Yes/No field so that selection of phone numbers from this tab are only those that are deemed Active
Yes.
3. Accounts with no phone numbers that are being included in your lists. You may wish to devise an inventory strategy to
segregate uncallable/skip files from the pools you are sourcing for your call lists. How many head of collector needed versus
skip tracing decisioning can be made from accurate stats in these areas. Many premise dialer systems and off-site providers
automatically discard no phone records when they build the call list. If you are not aware of what percentage of your lists are
not callable, your staffing and locate work plans may not be aligned with the actuality of your inventory.
The basic predictive dialer operation is a three-step process:
1. Send a list of phone numbers to the dialer to dial.
2. Wait for calls, and as calls are made Collect! pops up the file being called.
3. Import the completion status of calls made or attempted by the dialer.
Send Call List To Dialer
* First, you must send a list of phone numbers to the dialer to dial.
You do this by exporting a list of accounts that you want dialed out of the Collect! system. You can use the export module to
create such a file; or, you can also use the report system to generate an appropriate list and then save that list to a file.
 Collect! searches on the File Number to pop up accounts.
The format of this list is completely up to your dialer manufacturer. Please contact your dialer manufacturer for more
information.
We have included a sample report named Dialer Export To File.rpt, which exports a file listing all pending scheduled phone call
contacts. This can be used with Predictive Dialer dialing software.

Wait For Calls From The Dialer
* Wait for calls, and as calls are made, Collect! pops up the file being called.
Sign in to your database, select the Tools menu, and choose the Predictive Dialer Link option. This pops up the
Predictive Dialer Link form, and Collect! is ready to receive calls from the dialer.
Your dialer manufacturer must set up each workstation properly to allow Collect! to communicate with the dialer.
 You can create an Operator ID where the Operator type is ' Dialer Operator'. Then, upon signing on, Collect! will go
directly to the Predictive Dialer Link screen, waiting for calls. This type of Operator cannot do anything but receive
predictive dialer calls.
You can create an Operator ID where the Operator type is ' Dialer Operator'. Then, upon signing on, Collect! will go
directly to the Predictive Dialer Link screen, waiting for calls. This type of Operator cannot do anything but receive
predictive dialer calls.
Import Completion Status
Import the completion status of calls made or attempted by the dialer
At the end of the call campaign, you can load the call results in to the Collect! system by running an import program to import.
Set this program to import any call result logs generated by the dialer during the campaign.
Using Predictive Dialer With Dynamic Data Exchange
Collect! supports the following Dynamic Data Exchange (DDE) scenario:
Connection
Connect using:
Service: 'collect'
Topic: 'dialer'
Command Line Startup Options
Turn on DDE by using /z in Collect!'s Command Line Startup Options.
Right-click the Collect! icon on your Desktop, choose Properties, and add the /z option to the Target line.
Example: Target: X:\Collect\bin\collect.exe /z
Ready Indicator
The interaction between Collect! and a Predictive Dialer system relies on the Collect! session sending out a "Ready" signal when
the collector is available for a call or a "Busy" signal when the collector is on a call or otherwise unavailable to the dialer.
It is the DDE Request command that manages these "Ready" and "Busy" signals.
DDE Execute Command
We use the DDE Execute command in the following format.
[open(debtor,file,FileNumber)]
Where the strings 'open', 'debtor' and 'file' are string literals, FileNumber is the ASCII representation of the
file number of the Debtor Collect! is to display. Brackets are used as shown.
Example DDE Execute String: [open(debtor,file,1438)]
The result of this command is that the Debtor screen pops up and the collector can edit the file. During this time, the DDE
Request commands return the string 'Busy,' as the collector is handling the call.
When the collector closes the Debtor by clicking OK, Collect! returns to the Predictive Dialer waiting for file screen. Now the
DDE Request command returns the string 'Ready'.
If the file number is invalid, the collector will receive a message that the file could not be found in the database. Collect!
DDE functions return a DDE_FACK, to acknowledge receiving the number. An invalid file number passed via DDE should not occur
and indicates a serious campaign build issue on the predictive dialer side. If a collector were to see such a message, they
should immediately contact their system administrator.
If the format of the command is incorrect, the DDE return value is DDE_FNOTPROCESSED. If this error occurs, please check the
format of the Execute command you are sending. This error indicates that the Predictive dialer software has a problem.
If, for any reason, Collect! is not in the correct state for the DDE Execute function to succeed, the DDE return value is
DDE_FNOTPROCESSED. The DDE caller should respond by trying again later.
DDE Functions And Callbacks
Collect! uses a limited subset of DDE command to enable predictive dialer links.
DDE Functions
Collect! uses the following DDE functions:
- DDEInitialize - using the following parameters:
- APPCMD_FILTERINITS
- CBF_SKIP_CONNECT_CONFIRMS
- CBF_FAIL_SELFCONNECTIONS
- CBF_FAIL_POKES
DDECreateStringHandle - 'collect'
DdeConnectList - establishes a conversation with all server applications that support the 'collect' Service and 'collect'
Topic names.
The data format we use is CF_TEXT - i.e. the standard text format.
DDE Commands Supported
Collect!'s responses to the following commands:
XTYP_CONNECT
Returns TRUE.
XTYP_ADVREQ
Returns "Ready" or "Busy".
XTYP_REQUEST
Returns "Ready" or "Busy".
XTYP_ADVSTART
Checks that the format is CF_TEXT and checks if the hszItem is the same as the application name "collect".
Returns TRUE if the condition fails and FALSE if the condition succeeds.
XTYP_EXECUTE
If Collect! is busy, it returns DDE_FBUSY.
If it doesn't understand the command/syntax, it returns DDE_FNOTPROCESSED.
If it gets a file number, it returns DDE_FACK.
XTYP_REGISTER
Returns a DdeConnectList, then posts a DDE ADVSTART Transaction.
STYP_DISCONNECT
Returns a FALSE.
Using Predictive Dialer With URL Strings
Collect!'s Web Predictive Dialer enables you to easily integrate your Predictive Dialer with VoIP and IP-PBX dialing systems.
You simply start Collect! with the /w2 Web Host mode, start Predictive Dialer in Collect! and wait for calls. Collect! pops up
the Debtor on your screen. If several accounts are found with the same phone number, Collect! returns all results in a Find by
Phone list.
This feature requires that you have confirmed that your predictive dialer provider can communicate with your browser
and send URL requests to it. Also, you must have licensed the Predictive Dialer module in Collect!.
Web Dialing Protocol
Using the existing Predictive Dialer functionality, a dialing system can connect to Collect! via HTTP and pass a URL string
containing a phone number.
Collect! listens in a special Web Host mode for HTTP requests and processes dial strings in the following formats.
Your dialing service must be able to pass the URL string in one of these formats. Collect! can process numbers with
or without dashes. It is most efficient if you store numbers in the same format that your dialer uses.
Phone Number
http://ipaddress/dialer?phone=phone number
Examples:
http://127.0.0.1/dialer?phone=5551111222
http://127.0.0.1/dialer?phone=555-111-1222
Phone Number With Text String
Collect! also accepts special strings if the defaults are not adequate for your dialer. The text must be added to the /w2text
argument when starting Collect! in Web Dialer mode.
Example:
http://127.0.0.1/dialer?text=5551111222
The string "text" may be replaced by any identifying character string that you want Collect! to look for instead of the default
"phone".
Collect! will search the database for the phone number and if a match is found, display the debtor. If the phone
number exists, Collect! will leave the Predictive Dialer and open the debtor. If multiple matches are found for
different debtors, a list of matches is presented instead. Partial matches will never displayed.
File Number
Collect! can also pass the Debtor File Number if you use the /w2file argument when starting Collect! in Web Dialer mode.
Example:
http://127.0.0.1/dialer?file=1430
Collect! will search the database for a matching File Number and will display the debtor.
Web Dialing Setup
To put Collect! into Web listening mode, you must create a Collect! shortcut with one of the following command line arguments.
/s80 /w2 to start the Web Dialer Server on port 80.
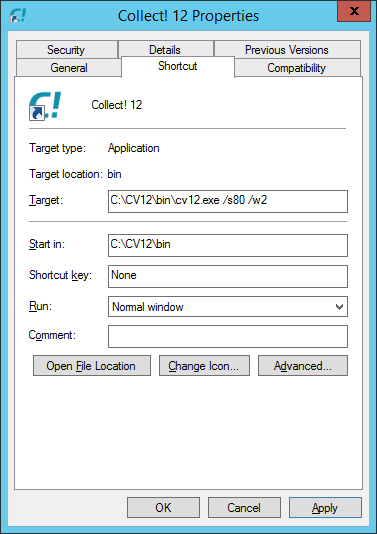
Web Dialer Shortcut
Or
/s80 /w2ss to start the Secure Web Dialer Server on port 80.
When Collect! is in /w2 mode, the Operator can work normally in Collect!. Although this is technically a Web Host mode, it does
not open Collect! in Web Host mode. It listens in the background instead. While the operator is working, any packets received
are discarded, unless Predictive Dialer is active.
Special Text String
If you are not using the default string "phone" in your URL, as in "http://127.0.0.1/dialer?phone=5551111222"
then, the Collect! shortcut can contain the string that you are going to use.
Example:
/s80 /w2text tells Collect! to look for a URL in the format,
http://127.0.0.1/dialer?text=5551111222" where "text" is replaced with the character string you want Collect!
to look for instead of the default "phone".
/s80 /w2sstext starts the Secure Web Dialer Server where "text" is to be replaced with the character string
you want Collect! to look for instead of the default "phone".
Pass File Number
If you are not using the default string "phone" in your URL, as in "http://127.0.0.1/dialer?phone=5551111222"
then, the Collect! shortcut can contain the Debtor File Number that you want to send.
Example:
/s80 /w2file tells Collect! to look for a URL in the format,
http://127.0.0.1/dialer?file=1430" where "file" tells Collect! that the number included in the URL refers to a
Debtor File Number instead of the default "phone".
/s80 /w2ssfile starts the Secure Web Dialer Server where "file" enables Collect! to pass the Debtor File
Number instead of the default "phone".
When you send the Debtor File Number instead of the Phone Number, this assumes that your dialer has its own database
of matching File Numbers and Phone Numbers already supplied by you.
Using Web Dialer
Start Collect! from a shortcut with the special arguments outlined above.
Select Tools->Predictive Dialer to start the Predictive Dialer. Collect! will display a message box and begin
waiting for phone number packets to arrive via HTTP.
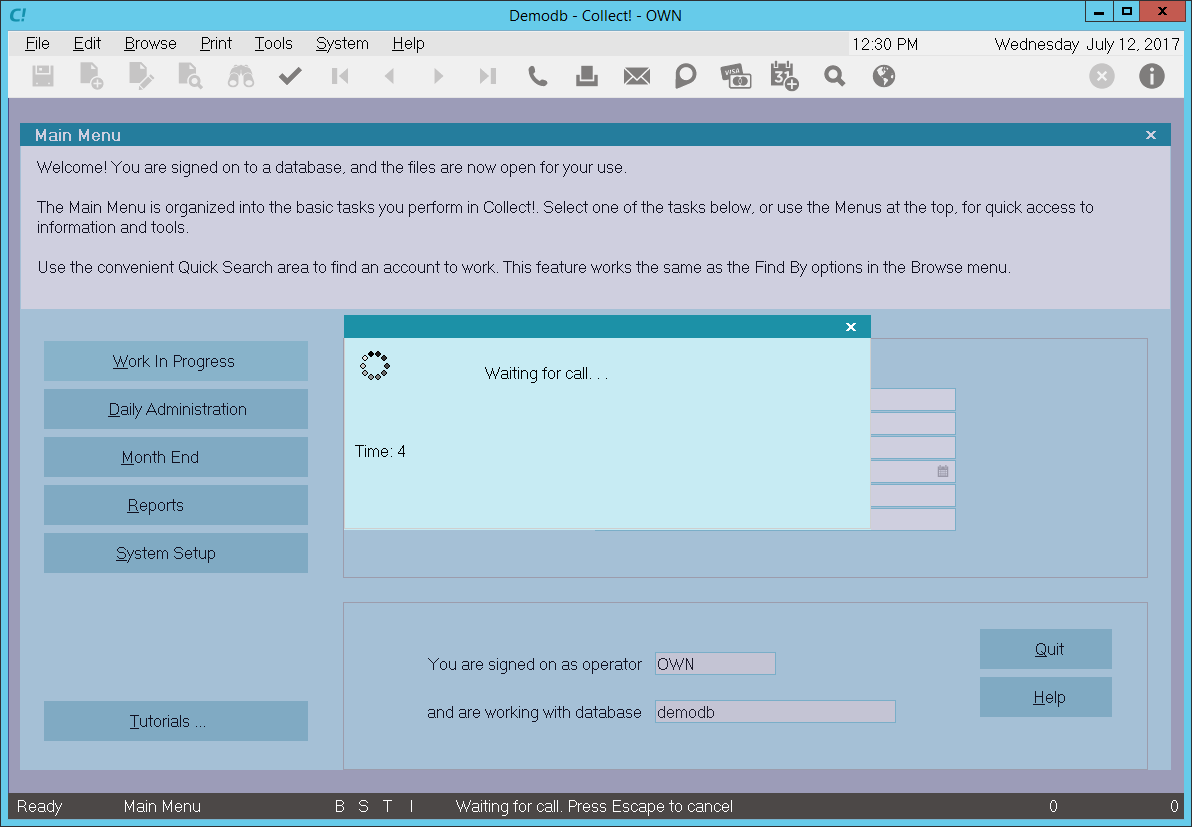
Waiting for Calls
As soon as a match is encountered, Collect! will display the Debtor.
If multiple matches are found, Collect! will display the list of matches. Partial matches are never displayed.
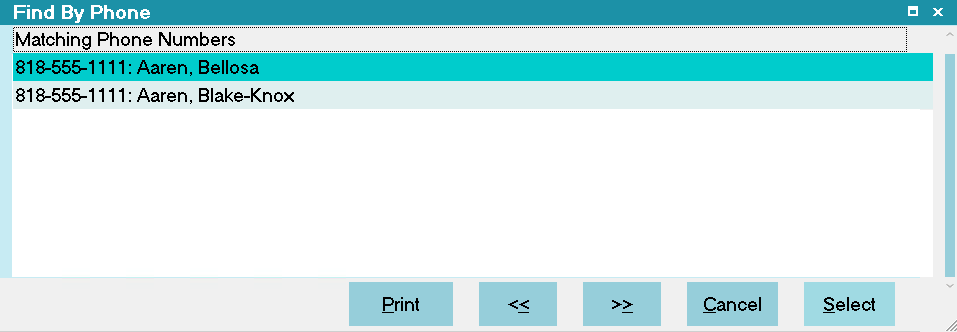
Multiple Matches Found
Testing Web Dialer
To test, run the Predictive Dialer, "Tools->Predictive Dialer".
Then open up a browser and type http://ipaddress/dialer?phone=phone number where ipaddress is
the IP address of your machine.
You should be able to just type 127.0.0.1 if you are testing from the same machine.
Example:
http://127.0.0.1/dialer?phone=5551111222
If collect is operating in "Secure Web Dialer" mode, then use "https" instead of "http."
Secure Mode
There may be issues with secure mode as this requires authentic certificates. Depending on your situation, your web browser may
display certificate messages rather than completing the URL transfer. If in doubt, use the /w2 mode to make sure you are able
to connect and display Debtors.
Collect! supports all common encryption methods. You can use any one of the following.
To enable a specific encryption method, you can simply add one of the following arguments to the Collect! shortcut.
| /w2s ARG | /w2ss ARG | ENCRYPTION METHOD |
| /w2s | /w2ss | SSL2.3 |
| /w2s0 | /w2ss0 | SSL3.0 |
| /w2s1 | /w2ss1 | SSL2.0 |
| /w2s2 | /w2ss2 | SSL2.3 |
| /w2s3 | /w2ss3 | TLS1.0 |
| /w2s4 | /w2ss4 | DTLS1.0 |
| /w2stext ARG | /w2sstext ARG | ENCRYPTION METHOD |
| /w2stext | /w2sstext | SSL2.3 |
| /w2s0text | /w2ss0text | SSL3.0 |
| /w2s1text | /w2ss1text | SSL2.0 |
| /w2s2text | /w2ss2text | SSL2.3 |
| /w2s3text | /w2ss3text | TLS1.0 |
| /w2s4text | /w2ss4text | DTLS1.0 |
| /w2sfile ARG | /w2ssfile ARG | ENCRYPTION METHOD |
| /w2sfile | /w2ssfile | SSL2.3 |
| /w2s0file | /w2ss0file | SSL3.0 |
| /w2s1file | /w2ss1file | SSL2.0 |
| /w2s2file | /w2ss2file | SSL2.3 |
| /w2s3file | /w2ss3file | TLS1.0 |
| /w2s4file | /w2ss4file | DTLS1.0 |
Summary
Automatically retrieve information through VoIP and IP-PBX dialing systems using Collect!'s Predictive Dialer and the special
Web Host command line argument /w2. Provided that your Predictive Dialer is able to communicate with your browser, they can
send a specially formatted HTTP or HTTPS request string to retrieve data from the database.
Collect! will pop up the Debtor screen when a match is found. If several matching accounts are found, Collect! will display a
list of matches.
| 
Was this page helpful? Do you have any comments on this document? Can we make it better? If so how may we improve this page.
Please click this link to send us your comments: helpinfo@collect.org