Import Field Specification
The Import Field Specification defines which field is
imported, and how it is processed before being imported.
For example, you can use a field as a key, to check for
existing records and avoid duplication.
You could specify that a field is required, so that no new
record is created unless the field contains some data. You
can also append incoming data into a single field in the database.
Numerous options are available that provide significant flexibility
for importing.
For each record type, you must specify the fields imported. When
you pick a Record in the Import Record definition form, you will
have to tell Import which fields from that Record Type are on the
line being read in, and where they are.

Import Field Specification
Field
Pick from the list of fields belonging to
the Record Type you are importing.
To skip a field in CSV files, leave the field
blank. The field imported will be skipped.
If you enter a default value when exporting,
you don't need to specify a field. The default
value will be sent to the export file.
Exercise care to choose the correct field
name in the list. In some record type
field lists, there may be multiple fields
with the same name. Example: in the Debtor
Record there is a Driver's License field
intended to hold the entire DL # for the debtor
which appears first in the fields to choose
from. Further down in the list of fields,
a second "DL" is referenced and this one is
a 1 character field belonging to the
Group Member fields to indicate by a check
box being ON or OFF for cascade field
sharing.

Use As Key To Find Existing
This switch allows Import to test whether a record already exists.
If the record already exists in the database, imported data will
update existing data unless the "Preserve Existing Data" is
set for a field.
If the record does not already exist, it will be created, and field
values will be filled in from the imported data or default values.
If Inhibit Auto-create is switched on, the record will not be created.
The "Use as key to find existing" switch can be set for any
number of the fields being imported. This allows us to perform
complex comparisons.
 WARNING: For numeric fields like File Number or UID, this box will
likely perform an exact match as the database indexes are
sorted numerically. If you use the 'Use key to find existing'
on a text field like Acct or SSN, then Collect! will likely
do a partial match search. For example, if the lookup value
in the data file is 'ABC123' and Collect! encounters 'ABC123456'
in the database, it will consider it a match. In order to key
on an exact match, select the 'Exact match only' box.
WARNING: For numeric fields like File Number or UID, this box will
likely perform an exact match as the database indexes are
sorted numerically. If you use the 'Use key to find existing'
on a text field like Acct or SSN, then Collect! will likely
do a partial match search. For example, if the lookup value
in the data file is 'ABC123' and Collect! encounters 'ABC123456'
in the database, it will consider it a match. In order to key
on an exact match, select the 'Exact match only' box.
For example, we may be importing transactions and want to
ensure that we don't create duplicate transactions. We would
then set the "Use as key to find existing" and/or "Exact match only"
switch on the transaction date, type and amount fields. This would cause
Import to first check if a transaction record exists which contains
identical date AND type AND amounts. If it finds one with those
matching fields, it will not add the transaction in the import file
to the database.
If, however, no transaction record with those specific fields is
found, a new transaction will be created in the database, which
contains the information in the imported record. If Inhibit
Auto-create is switched on, the record will not be created.
 Fields from related records do not need to have
this switch set. It searches for matching owner
records automatically.
Fields from related records do not need to have
this switch set. It searches for matching owner
records automatically.
Exact Match Only
This switch allows Import to test whether a record already exists.
If the record already exists in the database, imported data will
update existing data unless the "Preserve Existing Data" is
set for a field.
If the record does not already exist, it will be created, and field
values will be filled in from the imported data or default values.
If Inhibit Auto-create is switched on, the record will not be created.
The "Exact match only" switch can be set for any
number of the fields being imported. This allows us to perform
complex comparisons.
This box will do an exact match search in the database where
the "Use as key to find existing" option will only do a partial
match for text fields like Acct or SSN.
 Selecting this box will inherently enable the "Use as key to
find existing" box, whether you select that box or not. This
means that all functionality associated with that box will be
inherited by this box. The difference is the exact matching
on the database search.
Selecting this box will inherently enable the "Use as key to
find existing" box, whether you select that box or not. This
means that all functionality associated with that box will be
inherited by this box. The difference is the exact matching
on the database search.
For example, we may be importing transactions and want to
ensure that we don't create duplicate transactions. We would
then set the "Use as key to find existing" and/or "Exact match only"
switch on the transaction date, type and amount fields. This would cause
Import to first check if a transaction record exists which contains
identical date AND type AND amounts. If it finds one with those
matching fields, it will not add the transaction in the import file
to the database.
If, however, no transaction record with those specific fields is
found, a new transaction will be created in the database, which
contains the information in the imported record. If Inhibit
Auto-create is switched on, the record will not be created.
Fields from related records do not need to have
this switch set. It searches for matching owner
records automatically.
Inhibit Autocreate
If the record does not already exist, it will NOT be created
when the Inhibit Auto-create is switched ON. If you want
a record to be created, and field values filled in from the
imported data or default values, leave this switched OFF.
Skip Subrecords If Key Not Found
Switch this ON to skip sub-records when the debtor doesn't
exist. Then, subsequent record types in the import are
skipped and the import moves on to import the next valid
record. This must be switched ON in the same field
specification that you are using to key on, that is, where you
have also switched ON 'Use as key to find existing' and/or
'Exact match only'.
Skip If Record Found
Switch this ON to skip matching records. Ensure there is
also a check mark in the field labeled 'Use as key to
find existing' and/or 'Exact match only'. Then, if a
matching record is found, it will be skipped.
Log Skipped Record To File
When you put a check mark in this field, if a line of
data in the incoming file is skipped for any reason,
then the line read from the incoming data stream will
be appended to an "impskip" file uniquely named with
a date and time stamp {impskip-YYMMDD-hhmmss.txt}
and stored in your Collect\import\impskip\ directory.
For example, Collect\import\impskip-091201-123027.txt
If the exact {impskip-YYMMDD-hhmmss.txt}
filename already exists, then Collect! will use
the {impskip-YYMMDD-hhmmss-#.txt} format
and increment the # until it can create a
unique filename.
For example, Collect\import\impskip-091201-123027-2.txt
If the Collect\import\imskip folder cannot be
created, then Collect! will store the "impskip"
files in the Collect\bin folder.
Special Log Format
A check mark in this field will cause the impskip.txt
log file format to output debtor information as File
Number, Client Account Number, Owing, Debtor Name.
File Number, Account Number and Name are read from
the Debtor record, and Owing is read from the input file.
If this switch is not ON, the line of data is written to the
log just as it exists in the import file.
The "impskip" file is uniquely named with
a date and time stamp and stored in your
Collect\import\impskip\ directory.
For example:
Collect\import\impskip-091201-123027.txt
Preserve Existing Data
This switch controls whether existing data will be overwritten
by new data read during the import.
If the record already exists in the database, (based on the
Key fields defined for this record), two things can occur. If
the field is not blank in the existing record, the values read
on importing will not overwrite the existing field data. If the
existing field is blank, the imported field data will be loaded
into the record.
Append To Existing Data
This function causes data being read to be appended to an
already loaded field. Data is simply added to the end of
existing data.
This switch is useful for importing into the address fields.
Some systems have City, State and Zip codes in separate
fields. You could append these together into the Address 2
field.
If you also include a Default Value for the
field, the default value will be prepended to
any data imported in this field. Existing data
in the field is overwritten by any default value.
This is needed when importing notes if you are building
the noteline (EX: 01/01/2020 13:00:00 IMP IMP : Text).
New notelines are automatically created and sorted by date.
If a noteline is not imported with a date/time stamp, Collect!
will put the note at the bottom. See Date Options below for
more information on note dates.
Prepend Comma
If the append switch is set, this switch can modify the way data
is appended into fields. This switch causes a comma and then a
space to be added in front of the data being appended. In the
case above, with the address, you would specify the City to be
read directly into the Address 2 field. Then, you would set the
Append To Existing Data and Append Comma switch on both
the State and Zip fields, which also load their data into the
Address 2 field.
Add Space Before Appending
Put a space between fields being appended. If a comma is also
added, put the space after the comma.
Insert Comma
Put a comma between fields being appended. If a space is also
added, put the comma before the space.
Note
This is for your own use, or for specifying a column from a CSV file.
For Collect Version 11.3.9 and later the note line may contain a CSV
column reference preceded by the "@" symbol.
For example @A represents Column A from the CSV file.
Alternatively, @1 represents the first column from the CSV file.
Offset
This indicates that the Field begins on the nth character
of the line. This is used only for Fixed Length format files.
Note that the first character on the line is offset 0.
Length
This indicates the length in characters of the Field. It is
only used on Fixed Length format files.
If you are exporting, the number you enter here
is evaluated when you have "Right justify
zero fill" switched ON in the Import Options.
Default Value
Enter a value here to fill the field with the text that
you entered.
If you specify a default value for a field that exists in the
file being imported, the default value will override the
imported value, including when you have 'Use
transaction type' settings switched ON in the
Import Options.
If the field does not exist in the file being imported, you
must ensure that you add the field you want filled with
a default value to the end of the list of fields being
imported.
To empty the field during importing, set the default value
to @.
If you turn ON the 'Append To Existing Data'
switch when you have a default value, this
causes the default value to be prepended to
any imported data.
If the text in the default value starts with an "x"
you will have to use the ASCII HEX codes for
your default value.
For Example: Xray should be put in as: x58x72x61x79
For Example: xray should be put in as: x78x72x61x79
For Example: x201 should be put in as: x78x32x30x31
When exporting, the default value is exported to the file.
Comparing Data
You can put a value into the Default Value field and use
that to 'compare' with the incoming data stream. This
comparison works with numeric, text and database field
codes. For example, you might want a value equal to 100
or equal to @de.pr. A text value is compared simply as
an ASCII value. 'z' is greater than 'a', for instance.
Select the OTHER OPTIONS button to set the
comparison in the Import Field Options form.
You may want to set other switches to tell Collect!
what to do during the 'compare' process. For
example, "Use as key to find existing" and/or
"Exact match only", and "Skip sub-records if
key not found" should be switched ON if you
want Collect! to skip the record when the
'compare' fails.
Fill Value
Enter a value into the Fill Value field. This is done when you
want to set a conditional compare with the Default value, and
based on the result of that compare, load some data into a field.
Normally, any value entered into the Default Value field is loaded
into the field either on importing or is transmitted when exporting.
However, this model breaks down when you want to test on a
condition and import or export some piece of data that is not the
same as the compare value.
For example, you might want to export the character 'O' for
accounts with an Owing amount greater than $1.00, and
character 'P' for Paid In Full accounts. You would do this by
creating two export fields, each with $1.00 in the Default Value
field and the appropriate conditional settings set in the
Import Field Options for each case. Then you would enter
an 'O, and a 'P' in the Fill Value field for each of the field
specifications.
You can use printable field specifiers (used to
pull database information into reports) in the
Fill Value field to export data from records
related to the current record. For example,
imagine that you want to export the
Client Name when the current record being
exported is a Transaction record. You
could enter @cl.na into the
Fill Value field, and immediately the Client
Name is exported.
You must make sure the appropriate record
is current.
Scan For
The Scan For field offers the full capabilities of the C language
scanf function to parse imported and exported text.
You can use this function to perform pattern matching, sub-string
extraction, and other functions.
Refer to How to Use Scanf for more information.
Scan For only supports 1 return result. If you try to load
more than one result into a field, Collect! will provide the
below message indicating the Record Definition and
Field that need to be corrected.
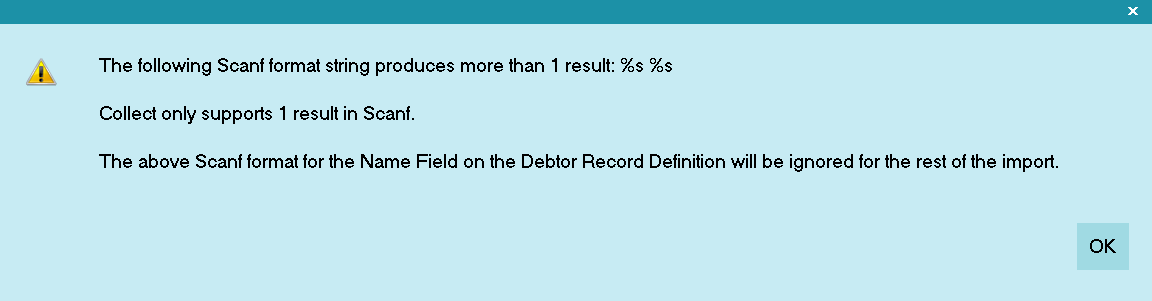
ScanF Message
Lines After Identifier
This is used in conjunction with the Identifier field in the
Import Record Definition form. You may have a record whose
data is spread over several lines in the file being imported.
Here, you specify the line number (after the identifier) on which
the field data appears.
Fields should be listed on a line by line basis.
In other words, list data fields on the same line as the Identifier
(if any) first. Their "Lines After Identifier" field would be blank,
representing 0 lines after the ID. Then, list those one line below
(Lines after = 1), then those fields two lines below, and so on.
Accumulator
The accumulator field specifies where to total the count and
value (if it is numeric) of the field being imported or exported.
Enter a number from 1 to 20 to have the information about
this field totaled in the Accumulator record. The number you
enter is the number of the line item in the accumulator record
where the information will be stored.
This must be defined by you in the
Accumulator form before you reference it.
When importing, you can use this to verify total counts, dollar
amounts and other checks. When exporting, you can total the
counts and values of information exported, then place the totals
at the top or bottom of the file exported.
Disable Log To Notes
Switch this ON to disable the logging of field changes to notes.
The option only applies to fields that support and have the
Log to Notes option enabled in the Access Rights.
Case Conversions
Import can automatically convert field text into upper or lower case,
and even capitalize words. Leaving all of these switches blank by
default ignores any potential case conversions.
Don't Change Case
Choose this option to import or export data AS IS with no
case conversion.
Convert To Upper Case
Choose this option to convert all data to upper case as it
is imported or exported.
Convert To Lower Case
Choose this option to convert all data to lower case as it
is imported or exported.
Capitalize
Choose this option to capitalize the first letter after every
space as data is imported or exported.
Trailing Overpunch
This is a data format used by older mainframes to save
space. By using an alpha or curly brace, it is possible to
indicate either positive or negative value for a numeric
and also to give the last digit in the numeric - using only
one character instead of two.
{ = +0
A = +1
B = +2
C = +3
D = +4
E = +5
F = +6
G = +7
H = +8
I = +9
Examples:
00155003E = +15500.35
003467{ = +346.70
} = -0
J = -1
K = -2
L = -3
M = -4
N = -5
O = -6
P = -7
Q = -8
R = -9
Examples:
005173K = -517.32
003467} = -346.70
In an actual file these would be in a single string.
For example, 00155003E003467{005173K003467}
This might indicate a Principal Amount of $15500.35
with a Payment of $346.70, Fees totaling $517.32 and
an NSF amount of $346.70.
Multiply By
This value is used to multiply incoming numeric values. A typical
use for this is importing from systems which specify percentages as
fractional numbers. For example, 18% would come into Import
as '0.18'. Collect!, however, requires '18.0'. We would, therefore, use
Multiply By 100 in this case, and the '0.18' would be stored as '18'.
Date Options
Selecting this opens the Import Field Date Format form
where you can choose how you want dates represented
for this field. You can choose a format and Collect! will
convert dates to the format you chose.
The format applies only to this specific
field and overrides the date options set
in the Import Date Options form which
sets a format for dates at the record level.
Field level date options are useful when importing or
exporting a file that has different formats for dates in
various fields.
The notes field is considered a text field, so
special steps are required to indicate that you
are importing a date into the notes. Click this
button to open the date options for this field.
Set the date format to match the format in the
data file.
Other Options
Selecting this opens the Import Field Options form where
you can control fields, verify and check values, set a value
to use for comparison and ensure that certain conditions
are met when importing and exporting records.
Ignoring Fields In CSV Files
To ignore a field when importing from a CSV file, simply
create an import field definition record ( Field Type). Then,
instead of assigning a database field in the Field box,
simply leave the Field assignment blank. Leaving the
Field box blank causes the Collect! Import to ignore
the field.
Help
Press this button for help on the Import Field Specification
dialog and links to related topics.
Cancel
Select this button to ignore any changes you may
have made and then return to the previous form.
OK
Selecting this button will save any data you have
entered and return you to the previous form.
<<
Selecting this button will take you back
to another record.
>>
Selecting this button will take you forward
to another record.
| 
Was this page helpful? Do you have any comments on this document? Can we make it better? If so how may we improve this page.
Please click this link to send us your comments: helpinfo@collect.org