How To Use Prompts In A Report
Collect!'s report writer enables you to query the user for data while running a report. The information entered by the user is
then used by the report to complete the next steps. This may be used to apply a filter to the data processed in the report. The
report gives different results depending on the data the user enters in response to the Prompt. For example, Date range,
Operators, Dollar amounts, Transaction codes, Status codes and more can be specified through a prompt. Several examples are
given below.
You can also mask data entered when a prompt is presented to the user. This is useful for example, when a manager
needs to enter an authentication code to complete a process. You can mask the code entered to hide it from the operator
while enabling them to carry on to the next step. Please see examples following.
Prompt For Data Entry
The Prompt command is simply a question mark, ?.
The question mark is used with WHERE clauses and VARIABLES. This causes the report to pause before printing. A dialog box
displays asking the user for a value to use to filter the report's data. For example, WHERE @de.na = ? will allow the user to
type in a value.
WHERE ({field_code} = ?)
Example:
WHERE (@de.sta = ?)

Prompt With A Variable
@varInput* = ? Enter a value
The words following the question mark appear in the prompt to give the end user directions.
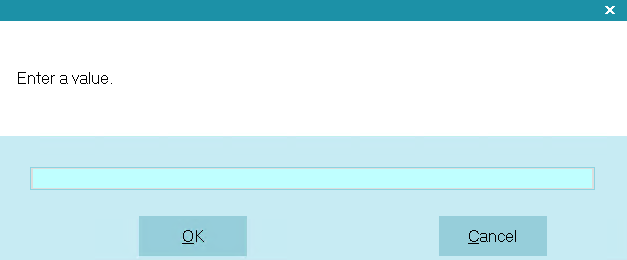
Prompt displays your words to the user
The value entered by the end user fills the variable, in this example, @varInput, and then it can be used in the report later on.
Example:
@de no total WHERE ( @de.u1 = @varInput )
@de.na
@de
When using a variable to obtain data, be sure to assign the correct data type to the variable first! In the example below,
the variable @tvarOwing is initialized as currency with the $ symbol.
For example:
@tvarOwing$ = 0.00
@tvarOwing = ? Enter the minimum Debtor's Owing Amount
@cl.de no total WHERE (@de.sta = ACT) WHERE (@de.ow > @tvarOwing)
@de.na @de.fi
@cl.de
The data type determines the number of digits and/or characters that may be entered in the prompt.
Currency: 15
Integer: 9
String: 63
Percentage: 8
Date: 10
Prompt With Variable String
As well as a literal string, shown in the previous example, you can also use a variable or a field value when presenting
the prompt to the end user.
Example 1:
@varPrompt* = " "
@varPrompt = "Please enter the Delinquency Date" if ( @de.sta = DLQ )
@varPrompt ="Please enter the Listed Date" if ( @de.sta = NEW )
@varMessage* = ? @varPrompt
When this Prompt is displayed requesting input from the end user, the message they see will depend on the Debtor's Status code.
If the Debtor's Status is DLQ, then the message will say "Please enter the Delinquency Date" but if the
Debtor's Status is NEW, the message will say "Please enter the Listed Date."
Example 2:
@varMessage* = ? @de.na
When this Prompt is displayed requesting input from the end user, the message the Debtor's Name will be displayed as the message.
As mentioned before, when using a variable to obtain data, be sure to assign the correct data type to the variable. The
data type determines the number of digits and/or characters that may be entered in the prompt.
Prompt For A Range
You can also present more than one prompt to the end user, if you want to specify a range of data for your report.
Here is an example for a range of Operators:
Example:
@varFrom* = ? Enter an Operator to start with.
@varTo* = ? Enter an Operator to finish with.
And this is how you might use it in a report,
To filter the Operator list:
@op no total WHERE ( @op.id = @varFrom .. @varTo )
@op.na
@op
To filter the Contacts list:
@co no total WHERE ( @co.co = @varFrom .. @varTo )
@co.co @co.ty @co.dda
@co
Prompt For A Date Range
When you prompt using a field that is a Date, Collect! will display the Calendar so that you can select a Date Range.
Example:
@de WHERE (@de.li = ?) MAX = 1
@de
When this code runs, a form will display prompting the user for a Date Range. The form title will change depending on your
field_code. In the above example, a form named "Debtor Listed Range" will display.
 If you want a generic date prompt, you can use @da where ( @da.da = ? )
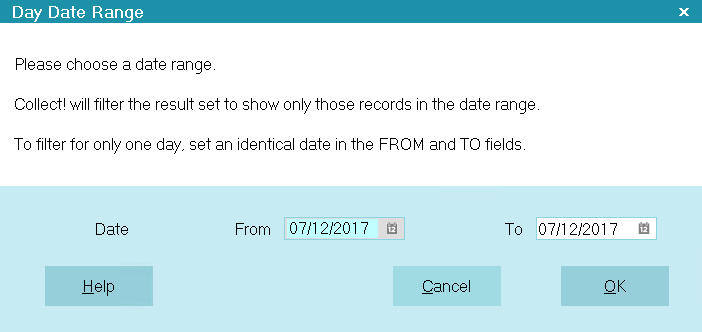
Prompt displays the Calendar when a Date field is used
 Whenever a prompt (?) is used with a Date field, the user will be prompted to enter a Date Range. The values entered
are stored in the database as " Transaction Summary Report.From" and "Transaction Summary Report.To". These values are
called by the report if you use their codes, @tsr.fr and @tsr.to.
Whenever a prompt (?) is used with a Date field, the user will be prompted to enter a Date Range. The values entered
are stored in the database as " Transaction Summary Report.From" and "Transaction Summary Report.To". These values are
called by the report if you use their codes, @tsr.fr and @tsr.to.
Example:
@de no total where ( @de.li = @tsr.fr .. @tsr.to )
@de.li @de.na
@de
The values for @tsr.fr and @tsr.to stay set until they are changed by another prompt for a
date range. This means that you can reference these dates in your code as above. The result will be a Date Range that is
identical to the range you set earlier when the Prompt displayed.
Prompt For Range Of Transaction Posted Dates
This prompts for a Posted Date range from transactions. The user can enter a date in the From and To fields when the
Prompt box is displayed.
Example:
@tr WHERE (@tr.pda = ?) MAX = 1
@tr
To use these results in a report, you can use codes that Collect! reserves for holding the date values in a range.
@tsr.fr is used to hold the date value"From".
@tsr.to is used to hold the date value "To".
In the report body, this would look like:
List of All Transactions Created From @tsr.fr To @tsr.to
@tr WHERE (@tr.pda = @tsr.fr .. @tsr.to)
@tr.de<40> @tr.pda @tr.pd @tr.tu>12> @tr.di>12>
@tr
If the user entered April 1, 2011 in the From value and April 30, 2011 in the To value, this report snippet would display
a list of transactions in this date range with a Report heading.
"List of All Transactions Created From April 1, 2011 To April 30, 2011"
This particular code snippet would then use the same range to filter transactions where the Posted Date is in the range the user
chose.
Prompt For Single Dates
The following example shows the use of operators in a WHERE clause using @tsr.to.
This date: [ Transaction Summary Report.To ], can be set by prompting for a Debtor Listing Date.
To prompt for the Listed Date at run time:
@de WHERE (@de.li = ?!) max = 1
@de
You will be prompted to enter a To date when the report is run. These dates are actually stored in the database.
To print all debtors within this range, the following code is used:
@de WHERE (@de.li = @tsr.to)
@de.li @de.na
@de
Configuring The Text For A Date Prompt
The @DATETEXT command allows you to set the text for date prompts. If not configured,
Collect! will use the default help text associated with the date fields.
Syntax: @DATETEXT({parameters})
Examples:
1. @DATETEXT(Please enter the DOB.)
2. @DATETEXT(Please enter the Court Date.\n\nIt should be @tvarDate or later.)
Once set, you can use any date prompt to display the text: @da no total where ( @da.da = ?! ) MAX = 1
"\n" refers to new lines. In Example 2, there are 2 line feeds creating double-spaced text.
The command only accepts variables and the variables cannot have any characters after it
other than a space or the closing bracket. Regular print codes like @d or @de.na won't work.
Prompt With Several Filters
The following example shows the use of operators in a WHERE clause to display the Client Analysis Report
form with a variety of filters available. This allows you to put as many prompts as you can on a single
form instead of prompting the user for each piece of information.
To display this prompt, you must use a date field, even if you don't display the date fields.
Here we will use the Listed Date:
@de WHERE (@de.li = ?1111111111111 ) max = 1
@de
Where Clause Field Positions:
1. Billing period
2. From date
3. To date
4. From client
5. To client
6. Sort radio buttons
7. Posted/ Payment date radio buttons
8. Operator From
9. Operator To
10. Custom Text 1
11. Custom Text 2
12. Status From
13. Status To
The above example has all the fields displayed, so you will be prompted to enter everything. This
information is actually stored in a RAM database and can be accessed multiple times until cleared.
The printable information form to use is @car (EX: @car.fr).
 WARNING: If the data is not cleared out at the beginning of a report, the next time you call this
form, it will still be populated. Same process as the @tsr fields above.
WARNING: If the data is not cleared out at the beginning of a report, the next time you call this
form, it will still be populated. Same process as the @tsr fields above.
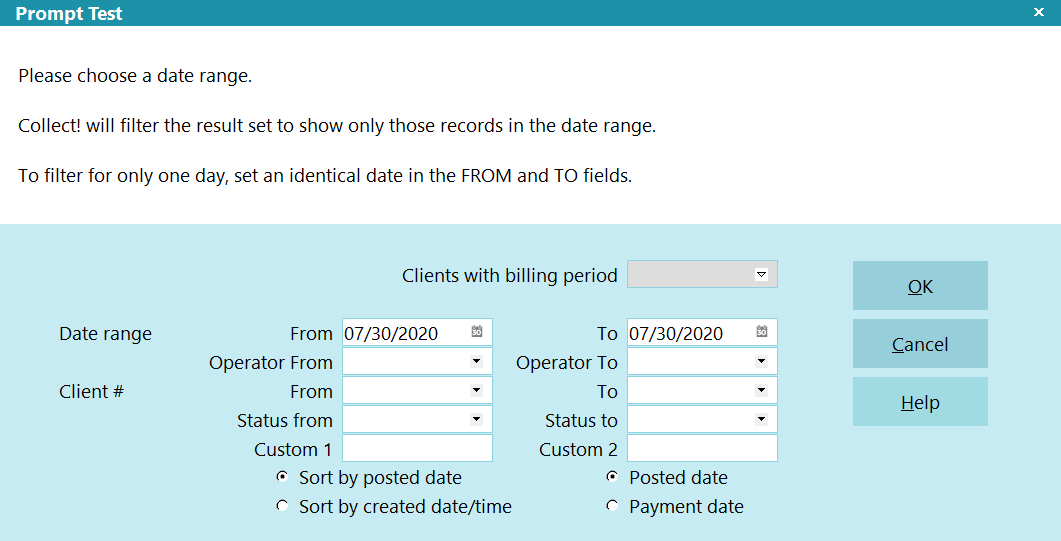
Prompt displaying all the fields
The @DATETEXT command above works on this form, so you can put your own text in the text block.
This example demonstrates just the Date, Operator, Client #, and Status field.
@de WHERE (@de.li = ?0111100110011 ) max = 1
@de
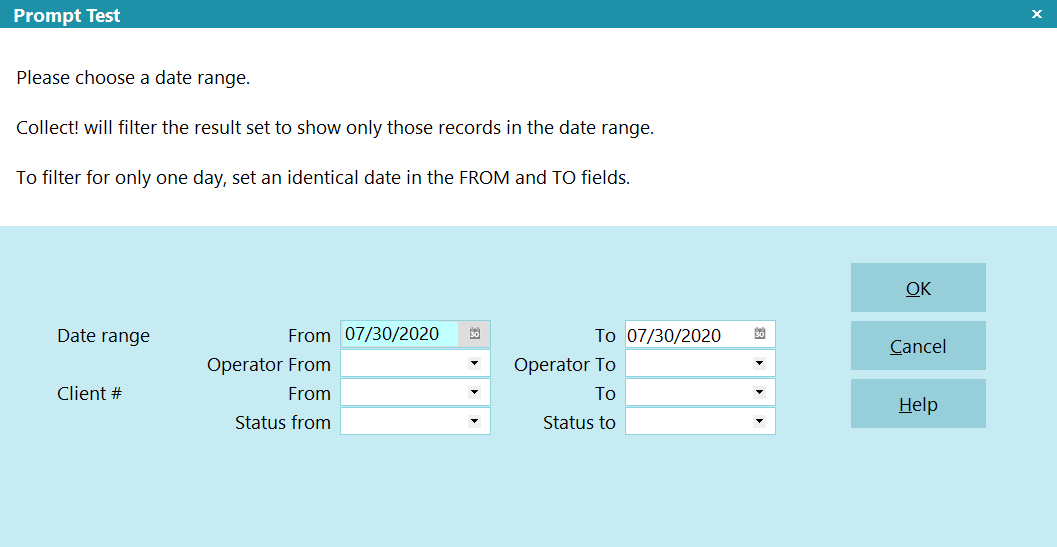
Prompt displaying selected fields
To print all debtors with these filters, the following code is used:
@de WHERE (@de.li = @car.fr .. @car.to) WHERE (@de.op = @car.of .. @car.ot)
WHERE (@de.cn = @car.fro .. @car.to1) WHERE (@de.sta = @car.sf .. @car.st)
@de.li @de.na
@de
Each field is definable. This example demonstrates just one Date and one Client #.
@de WHERE (@de.li = ?0101000110011 ) max = 1
@de

Prompt displaying selected fields without ranges
To print all debtors with these filters, the following code is used:
@de WHERE (@de.li = @car.fr) WHERE (@de.op = @car.of .. @car.ot)
WHERE (@de.cn = @car.fro) WHERE (@de.sta = @car.sf .. @car.st)
@de.li @de.na
@de
The Custom fields provide more flexibility. You can use them together as a range, or independently with both or just one
visible. They are 120-character text fields.
You can also alias them, or any other field, and put a pick list on the fields. Here is an example of filters for
the Attachment record searching on Class and Description. These are actually the Custom 1 and Custom 2 fields.
Prompt displaying selected fields without ranges
Prompt Once For Input
When you are printing a report to a tagged list, Collect! will prompt only once if your report contains a prompt for input.
The input will be applied to each account in the list as it is printed.
Collect! can also process multiple prompts within the report and apply them to each tagged account as the report is printed.
This relates to selecting the "All" option when printing from a list of tagged accounts.
Mask Data Entry On Prompt
You can also mask data entered when a prompt is presented to the user. One practical use of this is changing a receipt number
on a transaction to indicate that the payment about to be processed has been authorized.
The question mark must be followed immediately by an asterisk to alert Collect! for masking the data entry. This works for all
the field data types, String, Integer, Date, Time, Currency and Percentages.
Example:
@varNum# = ?* Ask your Supervisor to enter Auth Code
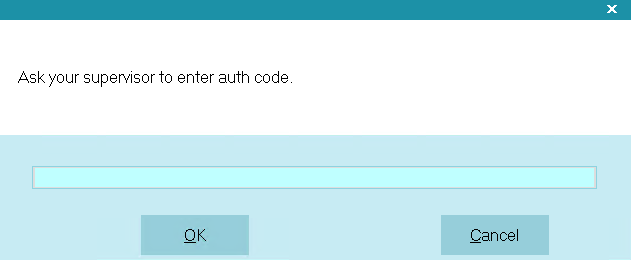
Prompt displays to the end user
When the data is entered in the Prompt, it is masked with "*". This hides the Authentication Code from the operator.
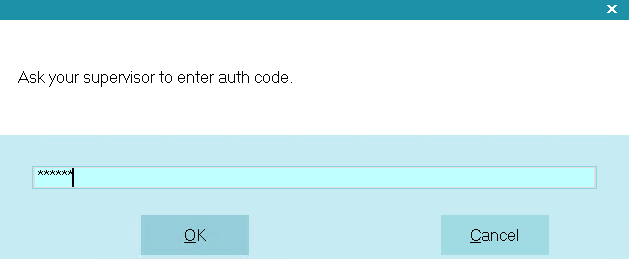
Prompt masks input
In this particular example, the report then changes the receipt number on the payment, using the real value of @varNum.
Example:
@EDITtr.rn = @varNum
The transaction is processed with the proper Authentication Code and account security is preserved.
User Defined Prompts
In the sections above under What is a Variable? and
Loops - Specifying Fields In Different Forms, several examples
were discussed using text or date prompts like these:
@tvarPrompt* = ? Please enter ...
@de no total where ( @de.sta = ? )
The @prompt command enables you to display a dialog box to the screen with up to 6 user defined buttons.
This command allows you to print a custom message to prompt a user to make a selection, then when a button is clicked,
the value of the button will be returned to a variable. The @prompt command message must be created
using plain text or report writer variables such as @var and @tvar.
Prompt Displayed by a Report
Use @prompt to:
- Prompt a user for input in a report
- Prompt a user for input in a control file
This command can only use variables for the message, allowing you to do set conditions, do calculations, retrieve database fields
or give the end user any information needed. This minimizes error and gives the operators the ability to answer their own
questions about what to do next when a special condition is encountered.
When running a control file, you can use the @prompt command to display a message when certain conditions are
met, then prompt the operator for input when a certain debtor record is worked, for instance.
When printing a Collect! report you can display a prompt to the screen during the print process by using
the @prompt command in your report code.
Syntax: @varPrompt* = @prompt([text message prompt variable], {button 1}, {button 2}, {button 3},
{button 4}, {button 5}, {button 6})
The buttons display in right to left order, so button 1 will be the right-most button and must have a space after
each comma.
The variable cannot be declared before-hand (EX: @varPrompt* = " "). It must be declared as part of the prompt
(EX: @varPrompt* = @prompt(...)).
The buttons are optional. If you don't specify any buttons, the prompt will come up with a simple YES/NO prompt.
Examples:
1. Yes/No Prompt:
@varMessage* = "Do you want to print this letter to Cosigners also?"
@varPrompt* = @prompt(@varMessage)
2. User-Defined Message with Fixed Buttons:
@varMessage* = "How many Cosigners?"
@varPrompt* = @prompt(@varMessage, All, Five, One)
3. User-Defined Message with a Variable Button:
@varButton1* = "One"
@varMessage* = "How many Cosigners?"
@varPrompt* = @prompt(@varMessage, All, Five, @varButton1)
You can use the report writer to come up with variable buttons based on loops or if conditions higher up, then
return the applicable values to the prompt.
If the Message text is empty, the prompt will not display, but if the button text is empty, then it will
display a blank button.
Using the Return Value for Comparisons
Once the user selects a button, the literal value of the button is returned to the variable.
Examples using @varPrompt* = @prompt(@varMessage, All, Five, @varButton1):
1. If a user selects All, then All is returned to the @varPrompt variable.
@varResult* = No
@varResult = Yes if ( @varPrompt = All )
2. If a user selects the variable @varButton1, then @varButton1 is returned to the @varPrompt variable.
@varResult* = No
@varResult = Yes if ( @varPrompt = @varButton1 )
You cannot do a comparison on the value of the button variable (in this example "One"), it must be the variable name.
You cannot use the same variable name for a second prompt. Each prompt must have a unique name.
Summary
Collect!'s report writer enables you to query the user for data while running a report. The information entered by the user is
then used by the report to complete the next steps. You can also mask data entered when a prompt is presented to the user.
This topic showed many examples of using prompts in reports. In doing so, it touched on several aspects of report writing
that you may not be familiar with.
| 
Was this page helpful? Do you have any comments on this document? Can we make it better? If so how may we improve this page.
Please click this link to send us your comments: helpinfo@collect.org